Streaming Player
Developer Guide
Roku Streaming Player Version 4.1 12/21/2011
Copyright (c) 2009, 2010, 2011 Roku Inc. All rights reserved. Use of this Roku SDK
Documentation is limited and expressly conditioned on consent to and compliance with the terms
and conditions of the Roku Channel Developer Agreement.
http://www.roku.com/Libraries/Legal/Roku_Channel_Developer_Agreement.sflb.ashx
12/21/2011 © 2009,2010 Roku Inc.
2
Table of Contents
1.0 Introduction: The Roku Channel Developer Program 3
1.1 Welcome to the Roku Streaming Player Developer Guide 3
1.2 Developing with the Roku SDK 3
1.3 What Do I Need to Get Started? 5
1.4 Roku Models and Features 6
2.0 Development Environment Overview 8
2.1 Architectural Overview 8
2.2 User Interface Elements / Object Model 8
2.3 Display Modes (HD/SD) 9
2.4 Top-Level Menu 10
2.5 User Interaction / Events 10
2.6 Customization 10
3.0 Video Streaming 11
3.1 Supported Video Formats 11
3.2 Supported Image Formats 12
3.3 Trick Mode Support 12
4.0 Guided Setup and Registration 12
4.1 Guided Setup 12
4.2 Registration 12
5.0 Security Overview 13
5.1 System Security 13
5.2 Application Security 14
5.3 Protected Environment 14
6.0 Development Overview 14
6.1 Development and Deployment Process Overview 14
7.0 Loading and Running your Application Walkthrough 15
7.1 Enabling Development Mode on your box 15
7.2 Application Installer Page 15
7.3 Using the Makefile to “Side-Load” the channel 18
7.4 Sample “Hello World” Program 19
8.0 Debugging your Application 20
8.1 Accessing the Debug Console 20
8.2 Script Output 20
8.3 The debugger 21
8.4 Enabling tcpdump on your box 21
9.0 Top Development Tips for the Roku Platform 22
10.0 Before Publishing Checklist 23
3 Copyright (c) 2009, 2010, 2011 Roku Inc. All rights reserved.
1.0 Introduction: The Roku Channel Developer Program
Roku is offering content owners and publishers the ability to create their own channels on the
Roku player and to make those channels available to Roku users. The Roku SDK documentation
contains the necessary information for creating a Roku channel, including design tools and
sample applications. The terms of use of the Roku SDK are contained within the Roku Channel
Developer Agreement. After creating a channel application, content owners and publishers may
upload the application to the Roku Developer Site for distribution to Roku users. There are two
methods for distributing Roku channels through the Roku Developer Site after they have been
uploaded:
The Roku Channel Store
Roku Public Channels
Public Channels created for the Channel Store should be those intended for the widest possible
distribution, without restriction other than as required for business reasons, such as payment of a
monthly subscription.
Public channels channels may be submitted to Roku for acceptance into the Chanel Store. If
accepted by Roku, a channel will be made available through the Channel Store to all Roku users.
Roku Private Channels
A channel may be uploaded to the Roku Developer Site and made available to users through the
Private Channel mechanism. These channels are not available through the Channel Store, but
can be accessed by Roku users by means of a unique channel access code provided to users.
Channels intended for a very narrow audience, or carrying restrictions on access such as
membership in a group or organization are better suited for Private Channels. There is no Roku
approval process necessary to publish a Private Channel.
1.1 Welcome to the Roku Streaming Player Developer Guide
This Developer Guide is designed to help you quickly come up to speed on the Roku platform
architecture, Channel Store, and the basics of how to develop and deploy an application to the
box in development mode and to the Channel Store as a published application to end users.
Note: In this documentation we refer to the development of new channels on the Roku player as
“applications” since they consist of a set of scripts and related assets. Channels can access video
streams, music, photos, or perform other functions enabled by the SDK.
1.2 Developing with the Roku SDK
The Roku SDK consists of a set of documentation, design guidelines, and sample applications
that enable channels to be developed for the Roku Streaming Player. To understand the Roku
SDK, here are the key documents:
• The Developer Guide (DeveloperGuide.pdf) covers the architecture, programming
language, development process, and channel deployment requirements.
• The BrightScript Reference Manual will bring you up to speed on the language and
serves as a reference for the core components. BrightScript is the programming
language used to develop channel applications on the Roku Streaming Player.
BrightScript is a scripting language optimized to be the high level glue that ties together
BrightScript Components and the Internet.
4 Copyright (c) 2009, 2010, 2011 Roku Inc. All rights reserved.
• The Component Reference guide describes the Roku Streaming Player platform
components that expose APIs to BrightScript.
The entire documentation set includes the following:
README Important information pertaining to this release of the Roku SDK
Developer Guide
Introduction to developing for the Roku platform
BrightScript Reference Manual
Reference for the BrightScript programming language.
Component Reference Manual Reference for the components exposed to BrightScript
Channel Packaging and Publishing
Creating a package and uploading to the Developer Site
Design Guidelines
User Experience guidelines and standard art dimensions
Mockup Tool (PowerPoint)
Quickly create a mockup of your channel as ppt screens
Device Registration and Linking
Linking the Roku Streaming Player channel to an account on
your site
BIF File Specification
How to support Trick Mode for your streams
Encoding Guide Creating Roku compatible streams.
Eclipse Plugin for Brightscript Guide Installing and using the “Brightscript IDE”.
In addition to the documentation, the SDK includes a set of sample apps that demonstrate some
of the BrightScript and Roku Platform programming techniques. You may reuse any of the code
found in these sample apps as a basis for your own development, subject to the terms of the
Roku Channel Developer Agreement. A brief description of these sample apps follows:
Simpleposter Very simple poster screen with a filter banner
Simplevideoplayer Use the roVideoScreen component to play video with SRT
subtitles. Modify the app to quickly test your media.
Videoplayer Complete Video Channel using category based XML feeds
Audioapp Use the roAudioPlayer component to play audio
Monitorsetup Example use of the roSlideShow component
Deviantart Example use of the roSlideShow component and XML feeds
Register Rendezvous style registration and account linking
Flickr Slide show including registration, XML feeds, registry
TwitterOAuth Use the roImageCanvas to display tweets. OAuth
implementation uses roUrlTranfer and roHMAC
Clock Screensaver uses RunScreenSaver() and
RunScreenSaverSettings() entry points. The
roImageCanvas uses rotations.
Paragraph Display images on the roParagraphScreen
CustomVideoPlayer Use roVideoPlayer to play HLS stream in an
roImageCanvas window. roFontRegistry example.
Filebrowser Simple roFilesystem and roRegEx example.
USBPlayer Play media files form USB drive. USB, roFileSystem,
roRegEx example.
SimpleGrid A barebones grid screen example.
UsbGrid Use the grid screen to browse a USB filesystem.
SimpleInfo Example of using the Info Button to popup contextual
information
Simple2D A simple bouncing ball implementation of using the 2D
graphics system and the roScreen component.
5 Copyright (c) 2009, 2010, 2011 Roku Inc. All rights reserved.
2D Test Sample 2D graphics tests.
Metadata Show getting EXIF metadata from images and tag
information in audio files. Example of roImageMetaData and
roAudioMetaData
launchparams Example of channel that accepts parameters from ECP.
Useful for channels that respond to remote apps and
clickable ads.
Scroll Scroll a large image on the viewable screen
Snake A Sample 2D Graphics Game.
Simple2d Example of using the roScreen component.
Socket_tests Simple example of using roStreamSocket and
roDataGramSocket
Web_server Example of using roStreamSocket
Ecp_client Java examples utilizing the ECP protocol to control the
Roku. There is a simple Roku_Finder that uses SSDP to
detect Roku boxes on the network and android_remote that
is a simple remote control application that will run on the
Android platform.
1.3 What Do I Need to Get Started?
Here’s a list of the things you’ll need to get started writing applications for the Roku Streaming
Player:
1. Roku Streaming Player with Software Release 2.7 or later
2. Roku SDK (Development Kit Documentation and Sample Applications)
3. Development Workstation with Text Editor and Terminal Application
4. Standard Web Browser (Firefox, Internet Explorer or equivalent)
6 Copyright (c) 2009, 2010, 2011 Roku Inc. All rights reserved.
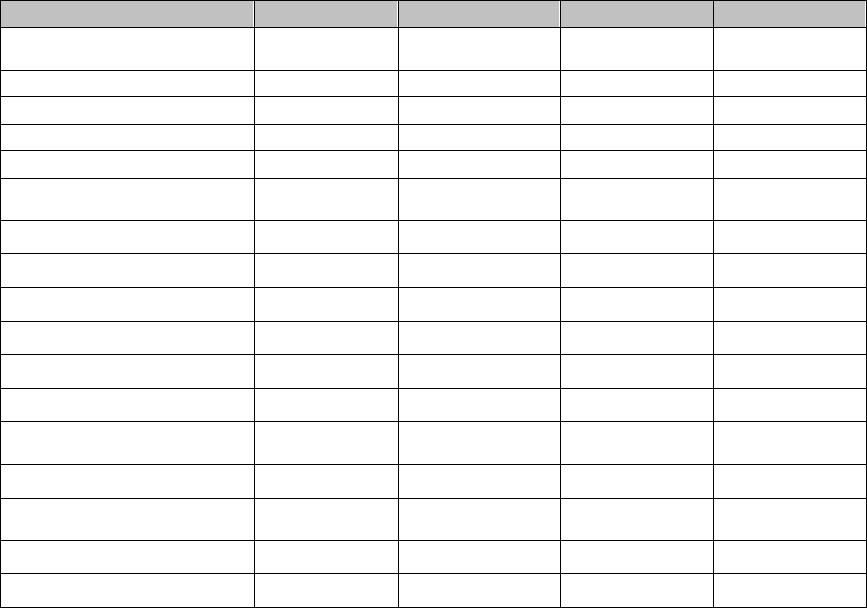
1.4 Roku Models and Features
With the release of the Roku 2 platform, Roku’s product line has expanded to the point that there
are significant capability differences between many of the models. While all the models have the
same basic streaming video playback support, the hardware internals of the models will support
different levels of game play. There is even a new SDK method, (roVideoScreen or
roVideoPlayer).SetMaxVideoDecodeResolution() , that only has an effect on units with an
OpenGL implementation. Please see the Component Reference for more details on this method.
The Roku models ship with incompatible power supplies as specified in the table below. If the
wrong power supply is used, there is a risk of bricking the Roku unit when the power current of
the supply is greater than what is specified for your Roku unit. On the other hand, if the power
supply current is less than the Roku’s specified power current, you run the risk of spontaneous
reboots when the Roku cannot draw enough current.
When publishing your channel, you will have the opportunity to specify hardware requirements
like “USB”, “Roku 2”, or “Bluetooth Game Remote” . The table below should help you in
determining the target models for you channel.
Current Models
Roku LT*
Roku 2 HD
Roku 2 XD
Roku 2 XS
roDeviceInfo.GetModel()
“2400X” or
“2450X”
“3000X”
“3050X”
“3100X”
Power Supply Current
1 A
1 A
1 A
1.5 A
CPU
MIPS 400 MHz
ARM 600 MHz
ARM 600 MHz
ARM 600 MHz
Accelerated Graphics API**
None
OpenGL ES 2.0
OpenGL ES 2.0
OpenGL ES 2.0
RAM
256 MB
256 MB
256 MB
256 MB
Non-volatile Memory (Flash)
Storage
256 MB
256 MB
256 MB
256 MB
Composite Video Out
HDMI 720p Video Out
WiFi (b/g/n)
Supports Games < 750K
Supports Games > 750K
microSD Slot
Works with Bluetooth Game
Remote
HDMI 1080p Video Out
Ships with Bluetooth Game
Remote***
USB 2.0
Ethernet Port
* Roku LT “2400X” started with the same ARM chip as Roku 2 models, but transitioned to
the MIPS chip with model “2450X”
** The OpenGL ES 2.0 API is currently only available under NDA to selected premium
development partners. Roku desires to more openly share these low level APIs. We are
7 Copyright (c) 2009, 2010, 2011 Roku Inc. All rights reserved.
hard at work tackling the security issues with this sharing that will simultaneously give
content owners good reason to trust the uncompromising security of the box.
** Bluetooth Game Remote supports motion control and the instant replay button. The IR
remote does not. The APIs for the motion control are only available under NDA at this
time.
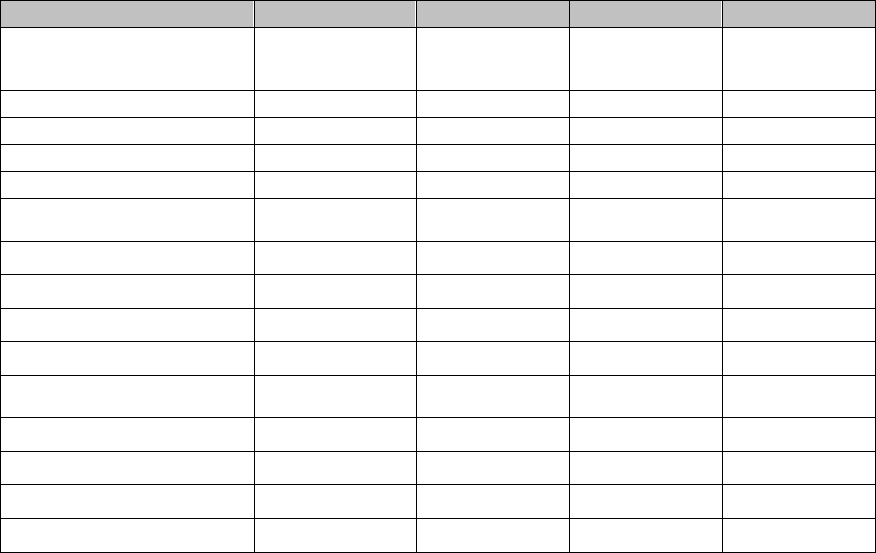
Classic Models
Roku SD
Roku HD
Roku XD
Roku XD|S
roDeviceInfo.GetModel()
“N1050”
“N1000”,
“N1100”,
“2000C”
“2050N”,
“2050X”
“N1101”,
“2100X”
Power Supply Current
2.5 A
2.5 A
2.5 A
2.5 A
CPU
MIPS 400 MHz
MIPS 400 MHz
MIPS 400 MHz
MIPS 400 MHz
Accelerated Graphics API
None
None
None
None
RAM
256 MB
256 MB
256 MB
256 MB
Non-volatile Memory (Flash)
Storage
64 MB
64 MB
64 MB
256 MB
Composite Video Out
WiFi (b/g)
Ethernet Port
Supports Games < 750K
HDMI 720p Video Out
HDMI 1080p Video Out
WiFi (n 2x2)
USB 2.0
Supports Games > 750K
8 Copyright (c) 2009, 2010, 2011 Roku Inc. All rights reserved.
2.0 Development Environment Overview
2.1 Architectural Overview
Diagram: Architecture Block Diagram
The diagram above provides a high-level overview of the main system components for the Roku
Streaming Player platform. Developer applications are written using the BrightScript
programming language. These applications are designed to be standalone entities that can be
deployed to a running system with minimal impact.
BrightScript applications are dynamically loaded at runtime and run within a unique context within
the BrightScript virtual machine. They are “sand-boxed” and run protected from other areas of the
system. Scripts only have access to platform resources that are exposed to the scripting layer as
BrightScript components. Developers have a wide selection of built-in elements from the
BrightScript programming language, plus additional platform components to build their
applications. See the BrightScript Reference and the Component Reference for additional
information.
2.2 User Interface Elements / Object Model
The Roku SDK uses the BrightScript programming language for development and exposes a set
of interfaces to platform services through BrightScript Components. These platform SDK services
include capabilities such as networking, video playback, user interface, and data management.
Roku DVP Hardware Platform
Linux 2.6
Roku DVP Software Platform
BrightScript Engine
Roku
Application
Shell
Application Plug-in
Application Plug-in
Application Plug-in
Application Plug-in
Application Plug-in
BrightScript Virtual Machine
BrightScript Components
9 Copyright (c) 2009, 2010, 2011 Roku Inc. All rights reserved.
The objects in the Roku SDK are divided into two primary areas:
• Core Objects – Fundamental objects that exist on all Roku platforms and are device
independent
• Platform Objects – Objects unique to a specific platform, such as the Roku Streaming
Player
Developing an application for the Roku Streaming Player consists of writing a BrightScript
application, packaging the application and associated resource files and deploying it to the
platform. During development packaging consists of a structured zip file. For final deployment,
tools are provided to create a signed and encrypted application package. At runtime, the player
will enumerate the installed applications and display them on the main menu. When the user
selects the application, the script(s) are loaded and control is passed to your application. When
the user exits, the script is halted and control is returned to the user interface “shell”.
User interface functionality available in the SDK includes:
• Top-Level Menu (Launch screen for applications with logo art)
• Poster Screen (Horizontally scrolling list of shows with poster art)
• Springboard (Detail screen with options for displaying individual shows)
• Video Player Screen (Video playback support with progress bar and trick mode support)
• PIN Entry Screen (User entry of PIN for purchase/rental verification)
• Message/Error Dialog (Dialog for display of errors and other user messages)
• Filter Widget (Selection widget for filtering content display by type)
• Rendezvous/Code Registration Screen (Display/validate registration codes)
• Username/Password Registration Screen
• Text Screen ( Display formatted text to the user and allow selection of options)
• Search Screen (Keyword based search with progressive disclosure of results)
Detailed information on all these screens can be found in the Component Reference Manual.
2.3 Display Modes (HD/SD)
The user interface has been designed to support both High Definition (HD) and Standard
Definition (SD) displays. By default the streaming player starts in SD mode, but allows the user
the option to specify their display preferences. Display preferences are handled globally for all
applications by selecting the “display type” option in “settings”.
There are three possible modes:
• 4:3 standard-definition (480i/p)
• 16:9 anamorphic widescreen (480i/p)
• HDTV (720p)
The SDK UI objects are SD/HD aware and will automatically display in the correct mode. In
some cases, the HD mode will allow the user to see more data on the screen. The SD UI is
rendered natively at 480p and the HD UI at 720p. As a developer, no special programming is
required to support these display modes. Any artwork used by the application (movie posters,
logos, etc.) should be provided in both HD and SD versions and included with the application or
downloaded dynamically at runtime. The screen objects will attempt to scale improperly sized
artwork, but this could result in a loss of quality or degrade performance. It is strongly
recommended that developers provide original artwork in both resolutions.
10 Copyright (c) 2009, 2010, 2011 Roku Inc. All rights reserved.
2.4 Top-Level Menu
The top-level menu provides a launch point for all applications. Applications must provide HD and
SD versions of the application icon artwork for display on the top-level menu. When an
application is selected from the top-level menu, the application is loaded and control is transferred
to the application. The user may return to the top level at any time by pressing the Home button.
Pressing the Home button will always exit the application and unconditionally return control back
to the UI application shell.
2.5 User Interaction / Events
Roku SDK UI objects provide an event oriented model for user interaction. Instead of receiving
and directly handling all of the IR events received by the application, the UI elements will handle
all navigation commands directly and send higher level events to the script as the focus changes
or the user makes a selection. Scrolling, trick modes and screen-to-screen navigation is handled
by the SDK UI objects and the script generally only needs to interact when there is a change in
context or the user highlights or selects new data elements. Refer to the Event Loops section or
the Class Interface sections for additional information.
2.6 Customization
The objects in the user interface framework expose a set of screen types which standardize user
interaction and make it easy for developers to quickly write and deploy applications. Screen
types enforce a user interaction model and ensure consistency between applications. They may
be customized to provide a unique, developer specific look-and-feel. Customization is currently
focused on “re-skinning” the application and supports the following types of changes:
• Add an application specific image to the top-level menu
• Change the text to be displayed on the main menu to identify the application
• Change the application logo to be displayed in the header area for the screen
• Change the artwork used on the “overhang” or header area for the screen
• Change the background color for the screen
• Change the colors used for font rendering on text, buttons, and screens
Within the application the developer is free to combine the available screen types and controls as
needed to implement their application. The hierarchy of screens is unique for an application and
depends on the user experience desired. Some applications may be fairly “flat” while others may
have a deeper hierarchy.

11 Copyright (c) 2009, 2010, 2011 Roku Inc. All rights reserved.
3.0 Video Streaming
3.1 Supported Video Formats
The following is a summary of supported video formats that have been tested and/or are currently
in-use. Other formats or encodings may be supported, but should be evaluated on a case by case
basis.
H.264 SD
H.264 HD
Aspect Ratio
1
4:3
16:9
Dimension
Various to 720x480
Various to 1280x720
and
1920x1080 for
1080p
Progressive/Interlaced
Progressive
Progressive
File Format
.mp4 (MPEG-4 Pt
14), .mov .m4v
HLS: m3u8 & .ts
.mp4 (MPEG-4 Pt
14), .mov .m4v
HLS: m3u8 & .ts
Frame Rate
2
23.976 fps or
29.97 fps
23.976 fps or
29.97 fps
Color Space
YUV
YUV
Video Codec
H.264/AVC
H.264/AVC
Profile
Main/High
High
Level/Complexity
4.0
4.0
Video Mode
Constrained VBR
Constrained VBR
Average Streaming
Video Bitrate
3
384Kbps - 1.6Mbps
1.6Mbps – 3.2Mbps
Average USB Video
Bitrate
3
384Kbps – 8.0Mbps
384Kbps – 8.0Mbps
Peak Video Bitrate
1.5x average
1.5x average
Key Frame Interval
< 10s
< 10s
DRM
None
None
Audio Codec
AAC LC (CBR),
AC3 Passthrough
AAC LC (CBR),
AC3 Passthrough
Audio Bit Rate 128-256Kbps 32-256Kbps
Audio Sample Rate
44.1 Khz or 48Khz
44.1 Khz or 48 Khz
Audio Sample Size 16-Bit 16-Bit
Audio Channels
2-Ch Stereo
2-Ch Stereo
Notes:
1) The dimensions vary on a title-by-title basis depending on the source material and the
target aspect ratio for the encoding (e.g. 4:3 or 16:9). Content should always be encoded
at full width and the height is adjusted. For example, a 1.66 aspect ratio source is
encoded as a 720x432 video and displayed as letterboxed for a 4:3 display.
2) The frame rate used for encoding depends on the source material. Film content is
generally 23.976 fps, while video content is generally at 29.97.
3) For typical streaming video applications, we recommend a range of ~384Kbps to
~3.8Mbps. For USB playback, we recommend that you stay under 8.0 Mbps. This
provides a good balance between quality and support for a wide number of users. In
some cases lower and higher bitrates have been used, but this frequently results in poor
quality or limits the % of the installed base that can view this encoding.
12 Copyright (c) 2009, 2010, 2011 Roku Inc. All rights reserved.
3.2 Supported Image Formats
The following image formats are currently tested and in-use. Other formats or encodings may be
supported, but should be evaluated on a case by case basis. The use of .png is recommended
for UI graphics due to the use of alpha channel within the UI.
• JPG, JPEG
• PNG
• GIF
3.3 Trick Mode Support
Two types of trick mode support (FF/REW/SEEK) are provided. For developers who generate
and publish image archives in Roku’s BIF (Base Index Frame) file format, scene based trick-
mode using index frames will be supported. A specification is available which details the BIF file
format and data required. If this data is published and available for a given title, scene based
trick-modes will be available. The content meta-data indicates the availability of this data on a per
title basis by providing URL’s for the HD and SD versions of these assets.
In cases where the BIF file is either not supported or unavailable, the system will present a time-
based method of supporting trick modes. The user will be presented with a progress bar showing
their location in the show and be allowed to seek using the normal trick play controls. Since
scene information is not available, the user will only have a visual timeline and numeric time
information to locate their desired position in the movie. Once the new location is selected, the
system will buffer a minimal amount of stream data and begin playback.
4.0 Guided Setup and Registration
4.1 Guided Setup
Guided Setup is done only during the initial setup process or when the device has been reset to
factory defaults. This process is designed to be developer independent and is performed one
time. If reconfiguration of these attributes is needed, it can be done through the Settings option on
the main menu. Guided Setup configures basic network services (wired or wireless) and performs
a series of tests to ensure the device can communicate properly.
Guided Setup then takes the user through a rendezvous style registration process to link the
Roku device to an account on roku.com. An account defines a unique channel line-up for a user
based on the channels they have selected. All devices linked to a specific account will receive the
same channel line-up.
4.2 Registration
Developer applications may also wish to present a customized view to their individual users. The
standard way to support this on the Roku Streaming Player is to provide a registration process
that associates the device with a user-specific account on the developer’s site. Each developer
needing account registration will be required to implement a registration UI as part of their
application. This UI may be called in one of two ways:
1) On first use of any service, the system may detect that a service has not yet been
configured and guide the user through the registration process for that developer. This
method makes it easy for new services to be added to the device over time and presents
a one-time configuration step on first use. The Netflix channel is a good example of this
type of registration
13 Copyright (c) 2009, 2010, 2011 Roku Inc. All rights reserved.
2) On first use of an account specific feature, the user may be prompted to register their
device and obtain access to these enhanced feature(s). An example of this approach
would be a service that may be used without an account to provide a base level of
functionality, but that requires account linking for advanced features such as
personalization, favorites or other similar features. The Amazon channel is a good
example of this type of registration. You can see it when entering “Your Video Library”.
Flickr also uses this approach and that source is available in the SDK examples.
The process of registration involves linking a device (identified by a unique electronic serial
number) with an account on a specific service. Account registration and device linking can be
accomplished in two ways. The preferred method is through the implementation of a code-based
“rendezvous” style registration system. An alternative username/password style of registration
may also be used.
A rendezvous registration system presents the user with a simple on-screen code on the device
during registration. The end user enters this code on the developer’s website to establish a link
between the device and the users account. This type of registration requires the third-party
developer to implement the following features:
• A web services API for obtaining a registration code and specifying retry parameters
• A web services API for obtaining the registration result and associated user token
• Web pages to register/un-register a device on the developer’s site
A username/password registration scheme may be desirable for some services. In these cases,
the user will enter the username and password for their account during setup. This info will be
used in subsequent calls to the third-party service to obtain the necessary credentials to make
web services requests. This method is provided solely for compatibility with a variety of services.
The rendezvous style registration is preferred both for its usability as well as the security benefits.
Any user account information or tokens exchanged during the registration process may be stored
in the application specific portion of the registry as persistent data. This data may be accessed
again at any time by the application when making web services calls to the developer’s back-end
service.
It is important not to keep any permanent device association stored on your server. Roku wants
to give users the ability to do a “Factory Reset” and have any personally identifiable information
wiped from the device. This includes removing any association with server side accounts.
Account tokens stored in the device registry meet this requirement nicely as the device registry is
removed with a “Factory Reset”.
Details and a walkthrough of implementing device/account linking and registration can be found in
the Device Linking and Registration Guide.
5.0 Security Overview
5.1 System Security
The Roku Streaming Player is designed to play a variety of streaming content directly from the
Internet. We understand that this content is valuable to the content owners and must be protected
from unauthorized access to prevent both casual and professional copying and distribution.
Multiple types of security provisions are available if needed.
The system has been designed to be hardened against unauthorized attack. This process starts
at the Roku factory as each system is individualized and uniquely keyed as a foundation for
robust security. The platform supports a secure key store and hardware encryption engine. The
14 Copyright (c) 2009, 2010, 2011 Roku Inc. All rights reserved.
core set of system software has been encrypted and is protected by a secure boot process and
the use of signed binaries.
SSL is the primary method provided for developers to implement content and/or communications
security for their application. The device supports both client and server authentication via SSL to
provide a secure communications channel between trusted end-points.
5.2 Application Security
Applications which run on the player must be encrypted and signed using the developer’s unique
developer specific set of keys generated by the Roku Streaming Player in developer mode. Code
signing is done automatically as part of generating a package and ensures the integrity of code.
Application packages are also encrypted to ensure confidentiality of the source code. Packaging
tools are available on the Developer web page of Roku Streaming Players. By default, the
developer page is not enabled. You must enter the remote code Home 3x, Up 2x, Right, Left,
Right, Left, Right to enable it. A walkthrough of the packaging process is detailed later in this
document.
The packaging process is designed to be lightweight and focuses on ensuring that an application
originates from a known source and is protected against tampering. It is the responsibility of the
developer to ensure that the application is properly tested, high quality, and provides a good user
experience.
5.3 Protected Environment
BrightScript applications are run within a unique context in the BrightScript Virtual Machine.
Applications are “sand-boxed” and run protected from other areas of the system. Scripts have
limited access to platform resources and can only access functionality specifically exposed
through the scripting layer as BrightScript components. This ensures the overall integrity of the
platform and prevents unauthorized access to the Operating System or any 3
rd
Party content.
Applications are restricted from interacting with other applications on the system or accessing
their private data. Applications store their data separately and securely in a unique area of the
system registry. Suites of applications can share registry data by creating each application’s
package with the same developer id set of keys.
6.0 Development Overview
6.1 Development and Deployment Process Overview
New applications or channels are written using the BrightScript programming language.
BrightScript exposes platform functionality through BrightScript Components, which may be used
by developers to create their application. These applications are designed to be standalone
entities that can be deployed to a running system with minimal impact, no major software
upgrades, and no downtime.
Applications consist of a set of BrightScript program files (text), resources such as images (jpeg,
png) and optionally, data unique to a specific application. Since BrightScript files are text,
developers can use their Text Editor or IDE of choice for writing code. When the application is
ready to be tested, web and command line based tools are available to make the process of
packaging the application and deploying it to a development system fast and easy. Development
builds are designed to be deployed to individual or small groups of systems where the developer
has physical access. Wider deployment for beta and/or production releases can utilize the Roku
developer website to upload channels for private or public access.

15 Copyright (c) 2009, 2010, 2011 Roku Inc. All rights reserved.
A walkthrough of installing to a local development enabled Roku Streaming Player can be found
later in this document. A walkthrough of packaging your application and deploying privately to
users who know your channel code or publicly to all users via publishing in the Channel Store is
available in the Channel Packaging and Publishing Guide. Details on developing with Roku
Components and the API’s available can be found in the Roku Streaming Player Component
Reference.
7.0 Loading and Running your Application Walkthrough
7.1 Enabling Development Mode on your box
Before you are able to load a development application to your box, you must enable development
mode on your Roku Streaming Player. When you enter the special remote control sequence:
Home 3x, Up 2x, Right, Left, Right, Left, Right
You will be presented with the Developer Settings page where you can enable developer mode
on the box. When developer mode is enabled, you can access the Application Installer page as
specified in the next section.
If you would like to subsequently disable development mode on your box, simply enter the special
remote code sequence again and select the “disable installer” option on screen.
7.2 Application Installer Page
Development applications are loaded onto the device using a standard web browser. When
enabled for development mode the device hosts a web page for installing your application. To
access the installer page, do the following:
1. From your Roku Streaming Player, navigate to “Roku Player Settings”, “player info” to
find the IP address of your box.
2. From your development workstation, open a standard web browser and type the following
URL:
a. http://<rokuPlayer-ip-address> for example:
http://192.168.1.100
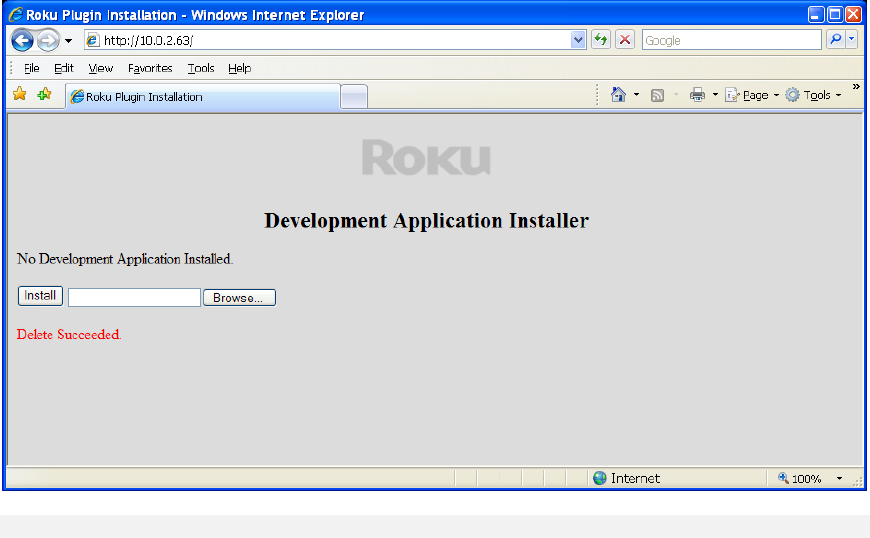
3. You should see a page like the one displayed in Figure 1 (Application Install Page)
below.
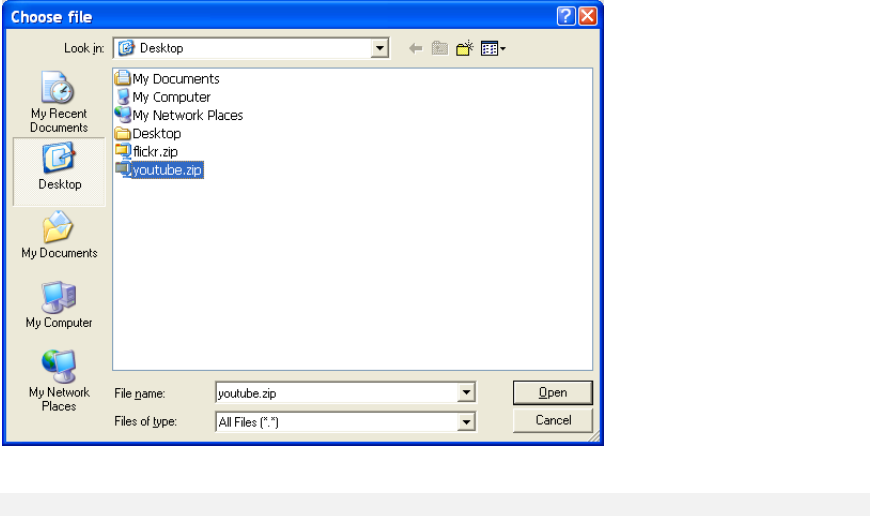
4. Click the “Browse” button and navigate to the location of the application zip file on your
development machine as shown in Figure 2 (Application File Browser). The full path to
the application .zip file should appear in the text field.
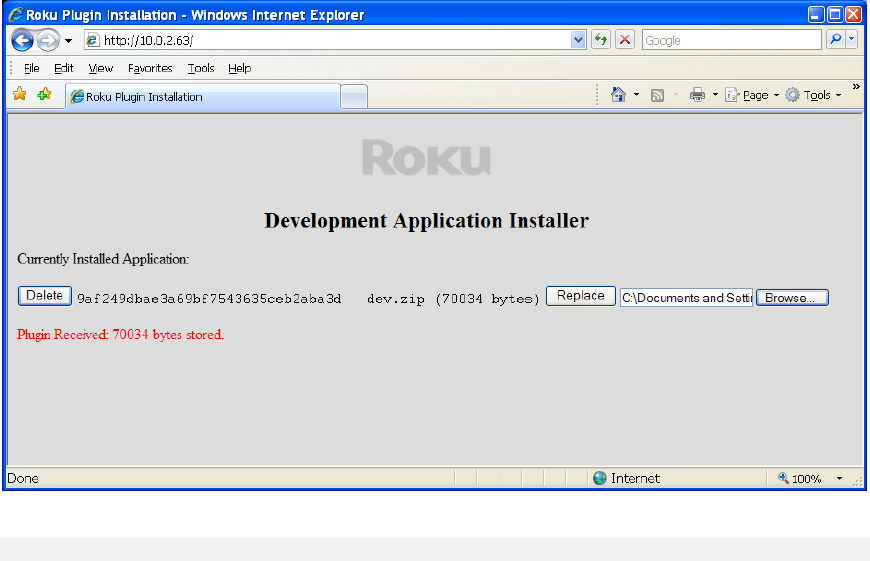
5. Finally, click the “Install” button to deploy the application to the box. The application
should install and begin running immediately. You will see a message on the web page
indicating it was successfully loaded as shown in Figure 3 (Application Installer page –
Installation Complete)
6. Run the application with the application debug console open. When you telnet to the
Roku Streaming Player on port 8085 (see section 8.1) you will see the debug console
from your application. If there are any errors in your code, they will show up on this
console. There is even a debugger attached to this port that will give you source file and
line number information for script errors.
The Application Installer page only accepts applications using the zip file format. This process is
often referred to as “side-loading” your application. It does not allow installation of signed (.pkg)
16 Copyright (c) 2009, 2010, 2011 Roku Inc. All rights reserved.
applications package files. The .pkg file must be distributed through the channel store
mechanism as either a published or private application.
The following image shows the Development Application Installer web page. At this point, there is
no developer application on the device. If an application were present, it would be shown as
installed when the page is initially opened. The application will continue to persist on the device
until you delete it by using the “Delete” button shown below.
Figure 1: Application Installer Page
17 Copyright (c) 2009, 2010, 2011 Roku Inc. All rights reserved.
The following image shows the standard windows file browser. Your development environment
may be on Windows, Linux or Mac, since all you need are text editing tools, a web browser and
the ability to generate .zip files containing your application. Select your application zip file and you
are ready to install.
Figure 2: Application File Browser
18 Copyright (c) 2009, 2010, 2011 Roku Inc. All rights reserved.
The following image shows the Development Application Installer web page after you’ve
successfully installed your application. If you attempt to reinstall an identical version of an
application that is already installed on the box, you will receive an error. You can always delete
and re-install any application at any time.
Applications are limited to a maximum of 2MB in size, due the the limited amount of flash storage
available. In general, since these are internet enabled applications, they tend to be much smaller
and are typically < 300KB in size. Most of the space is consumed by artwork and the code size is
minimal. If you find that your application is too large to install, look at removing some of the
artwork from your application package and placing it on the web where it is easier to modify and it
can be downloaded dynamically at runtime.
Figure 3: Application Installer Page (Installation Complete)
7.3 Using the Makefile to “Side-Load” the channel
The SDK examples include Makefiles that can automate the steps needed to install the channel.
The Makefiles use the ROKU_DEV_TARGET environment variable to know the ip address of the
Roku box to install on. Instead of following the steps in 7.2, you could use the Makefile from a
shell like so:
% export ROKU_DEV_TARGET=192.168.1.140
% cd <sdk>/examples/source/videoplayer
% make install
19 Copyright (c) 2009, 2010, 2011 Roku Inc. All rights reserved.
7.4 Sample “Hello World” Program
Now that you’ve installed some of the SDK examples, try building your own program from
scratch.
% mkdir helloworld
% cd helloworld
% mkdir source
In your favorite editor create a file name ‘manifest’ in the helloworld directory that contains the
following content:
title=Hello World
subtitle=Simplest Program
major_version=1
Now, create a helloworld.brs file in the hellowold/source directory that contains the following
content:
' *********************************************************
' ** Roku Hello World Example
' *********************************************************
Sub Main()
port = CreateObject("roMessagePort")
screen = CreateObject("roParagraphScreen")
screen.SetMessagePort(port)
screen.SetTitle("Example")
screen.AddParagraph("Hello World!")
screen.Show()
wait(0, screen.GetMessagePort())
End Sub
% zip -9 –r ../helloworld.zip .
Now, you can follow the instructions section 7.2 to install helloworld.zip as a development
applications on the Roku.
20 Copyright (c) 2009, 2010, 2011 Roku Inc. All rights reserved.
8.0 Debugging your Application
8.1 Accessing the Debug Console
Using a standard shell program and a telnet client application, you can connect to the console for
your application. The console provides you a window into the runtime environment for your
application. By default, all console output from your application goes to the shell. You can learn a
lot about your application just from the debug output. To access the console for your application:
1. Open up a terminal shell application
a. Command.com or other terminal on Windows (All Programs -> Accessories ->
Command Prompt)
b. Gnome or other terminal on Linux
c. Terminal on Mac
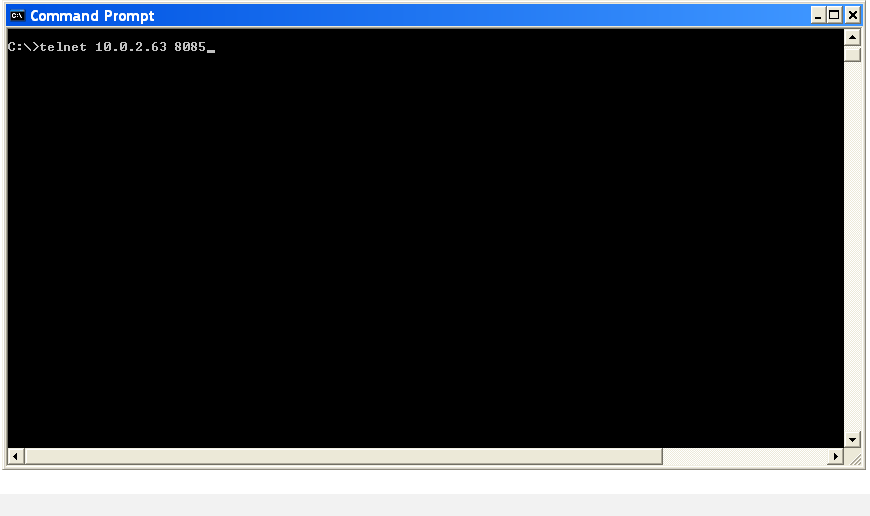
2. Type the command:
a. telnet <rokuPlayer-ip-address> 8085
e.g. telnet 192.168.1.100 8085
3. You should see the contents of the current application output buffer. Make sure your
application is running, because you must run a development app to see output in this
console. The console will not allow access to the output of other applications on the
system. It will only allow debug access to your development application.
Figure 4: Connecting to the application debug console
8.2 Script Output
The console shows you the output of your script during run time. If your application crashes, the
debugger will display the line number of the error, as well as the contents of various variables at
the time of the crash. If there is a syntax error in your code it will also be described here. You
should have the developer console open whenever you install a new application to catch any
startup errors.
21 Copyright (c) 2009, 2010, 2011 Roku Inc. All rights reserved.
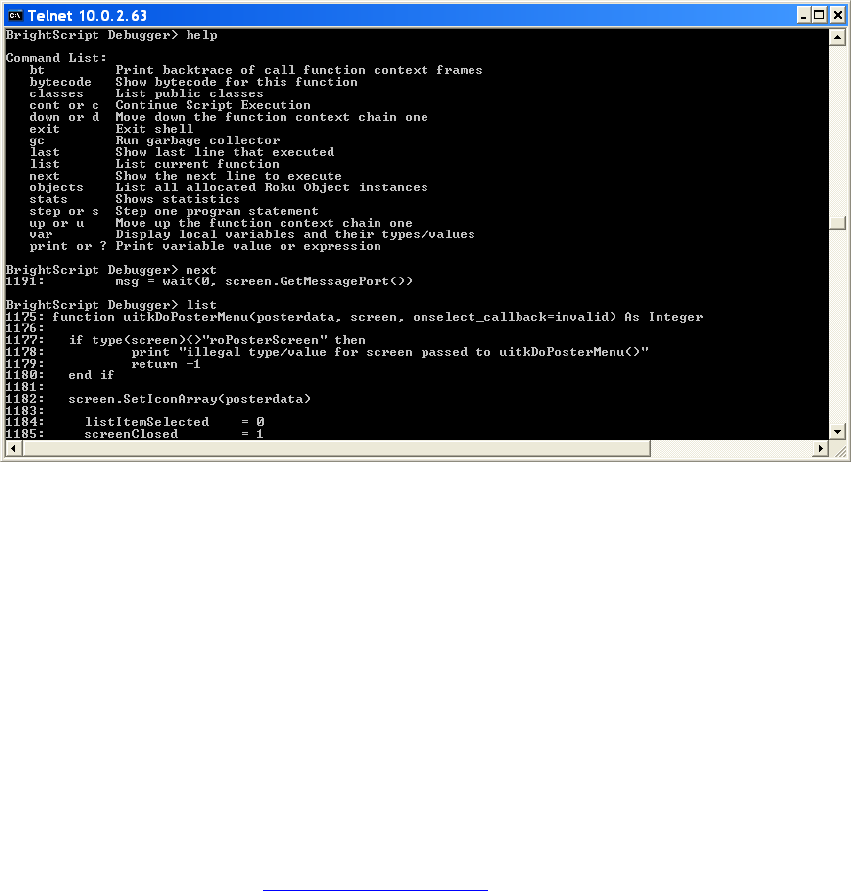
8.3 The debugger
In addition to displaying console output, the shell can also be used as an interactive debugger.
When your application is running, simply press CTRL-C to break the application and enter debug
mode. You will see the BrightScript Debugger prompt where you can type in commands. You
can also force your application to break at a specific location by placing the “stop” command
anywhere in your script.
You can resume you application again by typing “c” or “cont”. For a full list of options, type “help”
in the debugger. You’ll see options for inspecting variables, stepping through your code and
looking at the backtrace of the current call stack.
8.4 Enabling tcpdump on your box
In today's world of switched hubs that lack a promiscuous mode, having tcpdump on the Roku
box will allow you to more easily get a packet trace to aid debugging.
To enable tcpdump packet traces on the Roku box, enter the remote code:
Home 5x, FF 3x, Rewind 2x
This brings you to a "secret" screen, where you can select:
"enable debug logging"
tcpdump is now enabled on the box. It creates a circular log of packet traces that can be
accessed at http://<rokuPlayer-ipaddress>/pkgs/ in log0,log1,log2,log3 that can be filled circularly.
Once the log is downloaded to your host, you can view it in your favorite tcpdump viewer. A
popular viewer is available at
http://www.wireshark.org/
22 Copyright (c) 2009, 2010, 2011 Roku Inc. All rights reserved.
Figure 6: Application Console Output
9.0 Top Development Tips for the Roku Platform
• Make sure you capture all of the events sent by the roVideoScreen or you may miss
important playability information.
• Know the Remote Control Codes for special screens:
o Dump Core: Home 5x, Up, Rew 2x, FF 2x
o Debug Info on screen: Home 5x, Rew 3x, FF 2x
o Channel Version Info: Home 3x, Up 2x, Left, Right, Left, Right, Left
o Developer Settings Page: Home 3x, Up 2x, Right, Left, Right, Left, Right
• The Developer Settings Page is necessary for enabling developer mode on your box.
• All file paths are prefixed by the device (currently pkg or tmp) and using the naming
convention: pkg:/filename.txt. Even file URLs must use this convention:
file://pkg:/filename.txt.
• Always use a screen facade object when launching your application so that it appears to
the user that your channel launches immediately and avoids screen flicker when exiting.
(See the simplevideoplayer sample application for a commented implementation of the
technique)
• You can use the theme attributes of roApplicationManager (see Component Reference)
to create a new UI skin for your channel.
• When using rendezvous style registration and account linking, be sure to store the linking
information in the device registry and not on your servers. We require that users are able
to do a “Factory Reset” and be confident that no personally identifiable information is
associated with the device. This is not possible if you have saved permanent serial
number information on your servers.
• We are limited in the types of video content supported on the device. We currently
support .mp4, .mov, and .m4v files with H.264/AAC encoding as well as unencrypted
WMV and HTTP Live Streaming.
• We only support .wma and .mp3 audio files in the audio player.
• Be sure to use a unique key for each application you publish and reuse this key each
time you update your application using the “rekey” option. This ensures that all versions
of your application will have access to the same registry data and avoid causing users to
re-link after an update.
• When using the slide show component, sometimes a high resolution image may take a
while to download. A good trick to provide quick feedback to the user is to put an image
in your package (so it’s not downloading) that may have your logo, etc… but informs the
user that the slideshow is playing it’s just “Retrieving…”. This slide could be the first slide
in your slideshow so that feedback to the user is instant and the slideshow never appears
“hung”.
• We require that your web servers support range requests. If they do not, you may run into
content that is not playable, or large images that do not display. The data will appear as a
corrupted file format to our components, as the first block may be resent by the web
server when we expect data at a particular range or offset.
• The screens are displayed in a LIFO (stack) order. If this behavior is causing your screen
to flicker (perhaps you wanted to pop two screens after you are done with the current
one) there is a Close() method in the screen interface of all the screen and dialog
components that deletes the screen out of the display stack. An example might be
coming out of a Registration or Search page to a Springboard screen. From the
Springboard screen, you might want to exit to your main screen, not the registration
screen or search screen.
Example:
searchScreen = CreateObject(“roSearchScreen”)
REM in a real app, you would setup this search screen…
23 Copyright (c) 2009, 2010, 2011 Roku Inc. All rights reserved.
searchScreen.show()
REM screensToPop is a set of screens that will be popped
screensToPop = CreateObject(“roArray”, 1, true)
screensToPop.push(searchScreen)
REM real app code processes the searchScreen here
REM and eventually decides it’s time to jump to a
REM springboard.
scr = CreateObject(“roSpringBoardScreen”)
REM in a real app your code to
REM process your Feed and setup scr goes here
REM before calling show() on your scr, close the
REM previous screens on the display stack
if screensToPop <> invalid
for each screen in screensToPop
screen.close()
end for
screensToPop = invalid
end if
scr.show()
10.0 Before Publishing Checklist
• Refer to the Design Guidelines document and implement your application consistent with
these best practices. Users will appreciate the ease-of-use and consistency provided
when all applications behave in a consistent manner.
• Make sure all your art is the correct size (see the Design Guidelines document).
Sometimes bad overhang art sizes can negatively impact the layout of screens.
• Increment the version number and/or build number in the manifest for each new build of
your application. This allows you to easily tell which version of the application is running
in the field by accessing the Channel Info screen.
• Be sure to safely store the keys and password used in packaging your application and
sign any new revisions of your app with the same keys (see the Channel Packaging
Publishing Guide).
• Always call Flush()after modifying the registry with either a write, delete, or a series of
writes. Flush is transactional and all writes between calls to Flush are atomic. Without a
Flush, there is no guarantee that the changes have made it to non-volatile storage.
• Thoroughly test every code path of your app, and check that there are no BrightScript
crashes.
• When using rendezvous style registration and account linking, be sure to store the linking
information in the device registry and not on your servers. We require that users are able
to do a “Factory Reset” and be confident that no personally identifiable information is
associated with the device. This is not possible if you have saved permanent serial
number information on your servers.
• Always use the screen façade technique in your application initialization routine so that it
appears to the user that your channel launches immediately and avoids screen flicker
when displaying dialogs or exiting. Please see the simplevideoplayer sample application
for a commented example of the technique.
24 Copyright (c) 2009, 2010, 2011 Roku Inc. All rights reserved.
• Always ignore unknown events and do not exit event loops when receiving them. If you
receive an unknown event in your event loop, you should just continue processing other
events. Roku may occasionally add new events, and if your event is written to exit on
unknown events, any future events that Roku may add will break your script.
• Determine if you would like to charge for your application. The channel store now offers
“Premium” developer accounts that enable you to publish applications that you charge
money for. There are new terms to agree to as well as sharing your taxID with Roku for
tax reporting.
• One popular model for enabling users to try your channel before purchasing is to create a
“Lite” version of your channel that is free. This channel could include a clickable ad that
uses ECP to directly launch the channel store springboard page for purchasing the full
channel that is a paid app. Check out the ECP guide for an example of passing the
contentID parameter to the channel store app to go directly to the page for purchasing
your application. The contentID should be the plugin_id of your paid app.
