
Oracle Eloqua Landing Pages
User Guide
©2024 Oracle Corporation. All rights reserved
26-Aug-2024

©2024 Oracle Corporation. All rights reserved
2 of 104
Contents
Landing pages 4
Landing page examples 8
Creating landing pages using the Design Editor 18
Finding landing pages 21
Legacy rendering for landing pages 23
Working with landing page content components and layouts 27
Copying content components or layouts 32
Content Blocks 36
Creating a content block 37
Adding a content block 39
Editing a content block 40
Searching for a content block 43
Locking a content block 44
Deleting a content block 46
Landing page styling in the Design Editor 47
Background 49
Text Defaults 49
Hyperlink Defaults 49
Advanced Styles 49
Adding an image carousel in the Design Editor 50
Adding a video to landing pages in the Design Editor 52
Adding a form in the Design Editor 54
Hide landing pages using the Design Editor 55
Changing the landing page visibility 55

©2024 Oracle Corporation. All rights reserved
3 of 104
Setting an expiry date for a landing page 57
Customizing Design Editor emails and landing pages with CSS 58
Class names 59
Sample code 60
Things to consider 62
Customizing landing pages with HTML code in the Design Editor 66
Previewing landing pages 68
Creating folders for landing pages 72
Editing landing pages in the Design Editor 73
Exporting landing page HTML 74
Making copies of landing pages in the Design Editor 77
Deleting landing pages 80
Creating landing pages using the Source Editor 82
Code requirements for uploading HTML landing pages 86
Editing HTML landing pages using the Source Editor 88
Creating new landing pages and templates using the HTML upload wizard 90
Landing page template manager 97
Creating new landing page templates from the template manager 97
Adding protections in landing page templates for theDesign Editor 99
Creating an intermediate unsubscribe landing page 103

©2024 Oracle Corporation. All rights reserved
4 of 104
Landing pages
Landing pages are often the first significant part of a campaign that a contact will see
and an increasingly important part of powering engaging cross-channel experiences.
A contact may be directed to your landing page from social media, events, or organic
traffic, as well as from an email campaign. The landing page provides the contact with
more information and options related to the email or ad that brought them there. On
the landing page, a visitor can be asked to participate in the campaign by reviewing
detailed information, submitting a form, or clicking a button to receive additional
information. The landing page moves prospects through your campaign, and gives
them a clearer idea about your product and your company's trustworthiness.
Eloqua provides a landing page editor in which to create customized dynamic landing
pages. Using Eloqua, you can insert visitor or contact information directly into your
landing pages to provide them with a customized experience. The landing page
should grab the visitor's attention, and it should give them a reason to stay and take
action.
To keep visitors engaged with your landing pages, keep the following four questions
in mind when designing the page:
l
Am I where I expected to be? Establish familiarity so that your visitor knows exactly where
they are. If they are coming from an email, make sure that the "look and feel" of the landing
page is similar to that of the email. If they are clicking through from a Pay-Per-Click
advertisement on a third-party web site, make sure that the search term is the title of the
landing page header.

©2024 Oracle Corporation. All rights reserved
5 of 104
l
Is it relevant to me? Ensure that the value proposition on the landing page aligns with what
most visitors will expect. Use imagery, language, and tone to write engaging, dynamic copy.
Use contact fields to personalize the site for the visitor.
l
Do I believe you? Leverage testimonials, awards, certifications, customer logos, and third-
party validation to establish trust with the visitor.
l
Can I easily engage? Do not use forms that ask for every bit of information about the visitor
all at once. You can gradually glean that information as you establish a relationship with the
visitor. The incentive on the landing page should be matched to the effort required by the
visitor.
-Example: For the visitor to download an eBook, perhaps you only need to ask
them to submit three fields of information in a form rather than 20 fields. If you are
providing a paid-for analyst report, you may be able to ask for more information to
match the value you are providing.
Oracle Eloqua provides you with the following landing page editors to help create your
landing pages:
¤ Tip: Learn more about differentiating between these asset types.
l
Design Editor: A drag-and-drop interface that let's you easily create fully responsive landing
pages without touching any code. Learn more about creating responsive landing pages
using the Design Editor.
©2024 Oracle Corporation. All rights reserved
6 of 104
l
Source Editor: An HTML code editor that provides you with a live preview and HTML editor.
If you're familiar with HTML code, you can build responsive landing pages with full access to
the underlying code. Learn more about creating HTML landing pages.
l
Classic Design Editor: View-only version of Classic Design Editor assets
Learn more by watching this video!

©2024 Oracle Corporation. All rights reserved
7 of 104

©2024 Oracle Corporation. All rights reserved
8 of 104
Landing page examples
Give your visitors a good impression with a crisp, professional design and efficient,
valuable information that builds trust and compels them to move through your
campaign. It is important that your landing pages are persuasive and informative
without wasting the viewer's time.
Here are some examples highlighting the features of a good landing page.
Gating content behind a simple form
This page acts as a gateway to content that was advertised in the email or PPC as that
drove the visitor to this location. The strengths of this page lies in its brevity: the page
gets straight to the point without too much textual or visual flare, and the visitor must
fill in only a few fields before they can access the desired content.
©2024 Oracle Corporation. All rights reserved
9 of 104
Event registration and context-specific presentation
The following examples provide an idea as to how you can strategically measure the
value of your content against the type of service being provided, and then stage your
information accordingly.
In this first example, the goal is to drive RSVPs for a semi-informal, social networking
event. The strength here lies in how the type of event is appropriately framed by an
informative yet enthusiastic tone. The page invites potential guests using a language
that is appropriate to the type of event.

©2024 Oracle Corporation. All rights reserved
10 of 104
Conversely, this next example aims to drive event registration for a panel discussion
and luncheon with industry leaders. While the event description is much more concise
than the previous event, brand recognition, trust, and overall importance are fostered
by featuring multi-organization partnerships and personable or recognizable
identities.
Note the additional company contact information and social media options at the
bottom of the page.

©2024 Oracle Corporation. All rights reserved
11 of 104
Customer profiling with surveys
These landing pages highlight a few different ways in which you can use surveys to
measure customer satisfaction and drive engagement.
©2024 Oracle Corporation. All rights reserved
12 of 104
This first example allows customers to explicitly state their information, using a
custom contact field for the feedback itself.
A second example gives recent webinar attendees a chance to rate their experience.
Multi-select and single-select picklists help to quickly organize survey results, while
explicit answers in a few open questions help to contextualize some of those results.
©2024 Oracle Corporation. All rights reserved
13 of 104
©2024 Oracle Corporation. All rights reserved
14 of 104
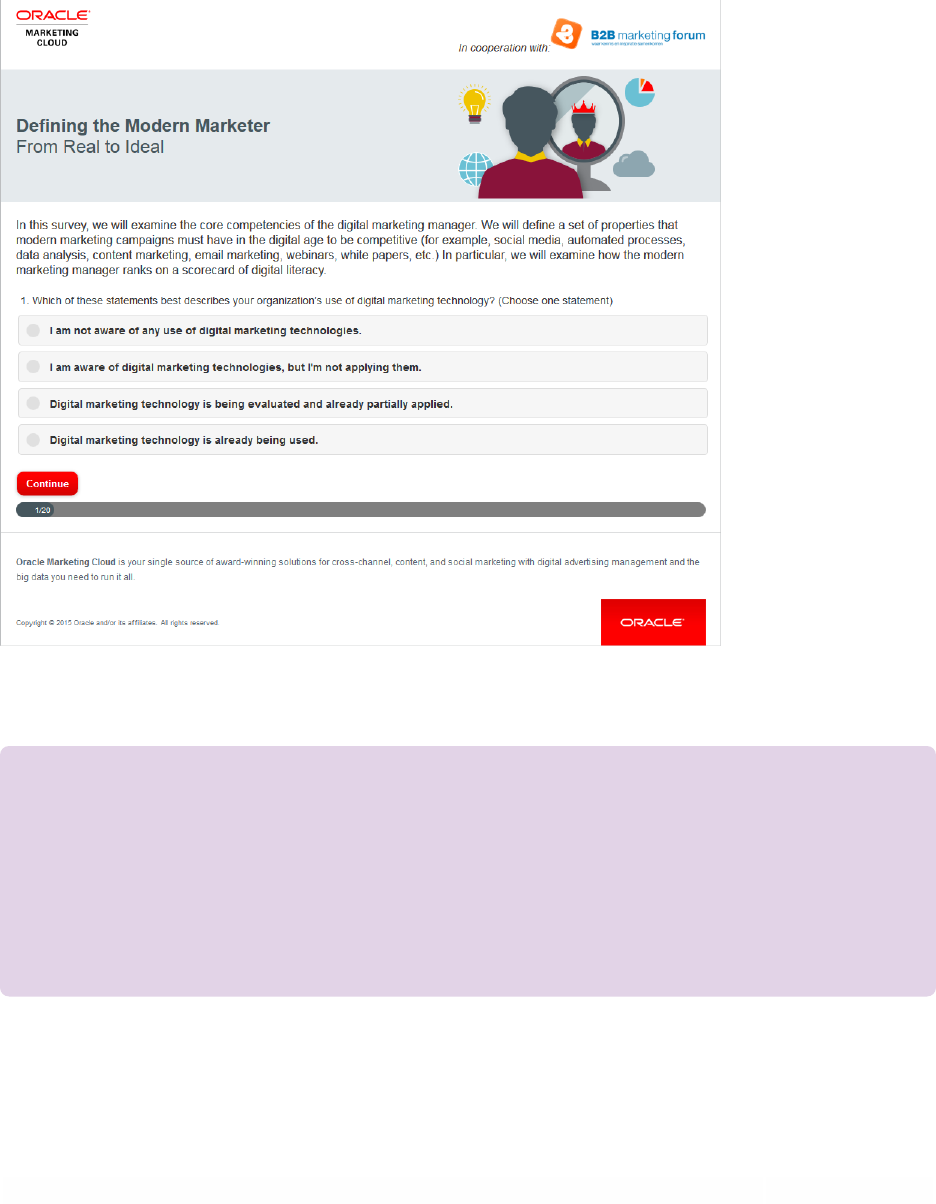
You can also break a larger survey down into a landing series of landing pages. This
example is from the first of twenty pages in a survey, all meant to form a cohesive
customer profile, while explaining key concepts for the participant to think about while
they select their answers.
¤ Tip: If a survey is going to require a longer commitment from a contact, you
might offer an additional incentive to participate, such additional content,
promotional deals, or entering a draw to win a prize once the survey is
completed.
©2024 Oracle Corporation. All rights reserved
15 of 104
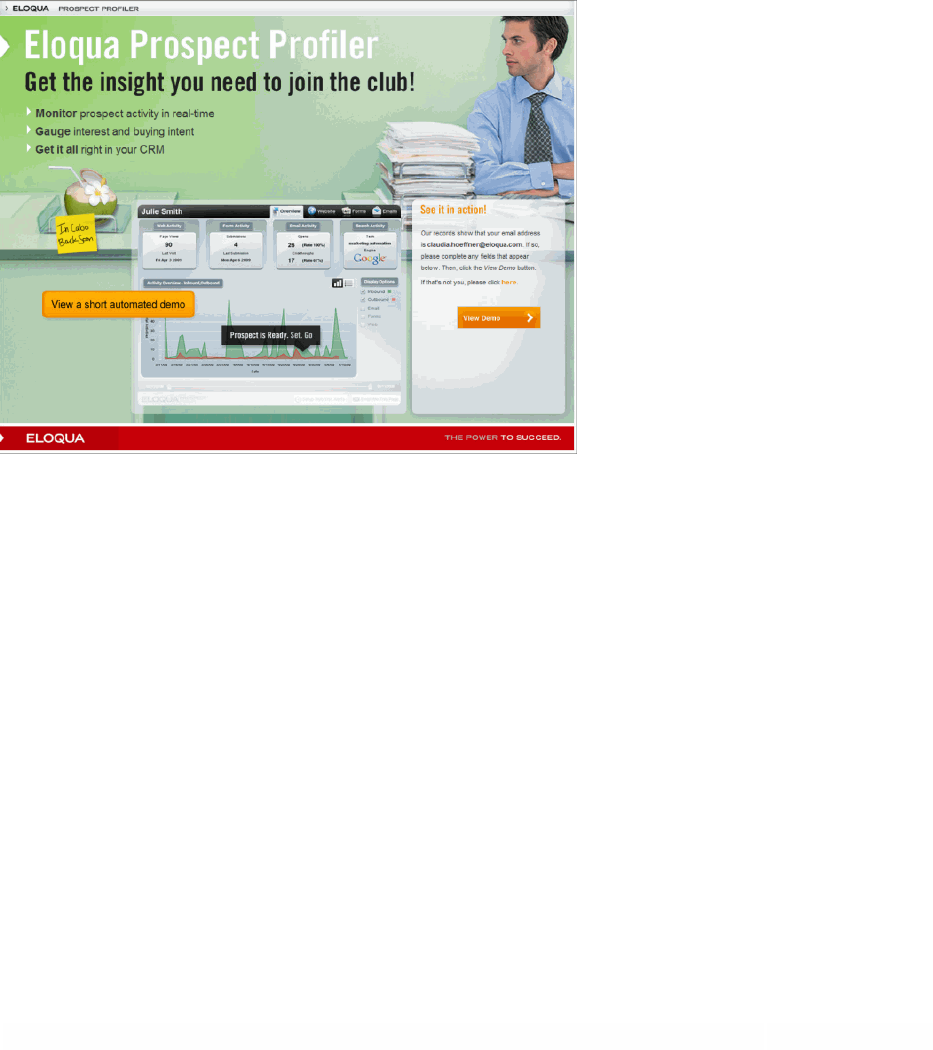
Alternate landing pages and personalization
You can create multiple versions of the same landing page, and then send them out to
different customers based on different audience regions. Alternatively, test alternate
landing pages on the same audience, the use campaign reporting to measure which
version of the landing page drives more visitor traffic.
This landing page provides visitors with access to a demo for a new product. The
demo is the main driver for this page, so the text on the page is minimal.
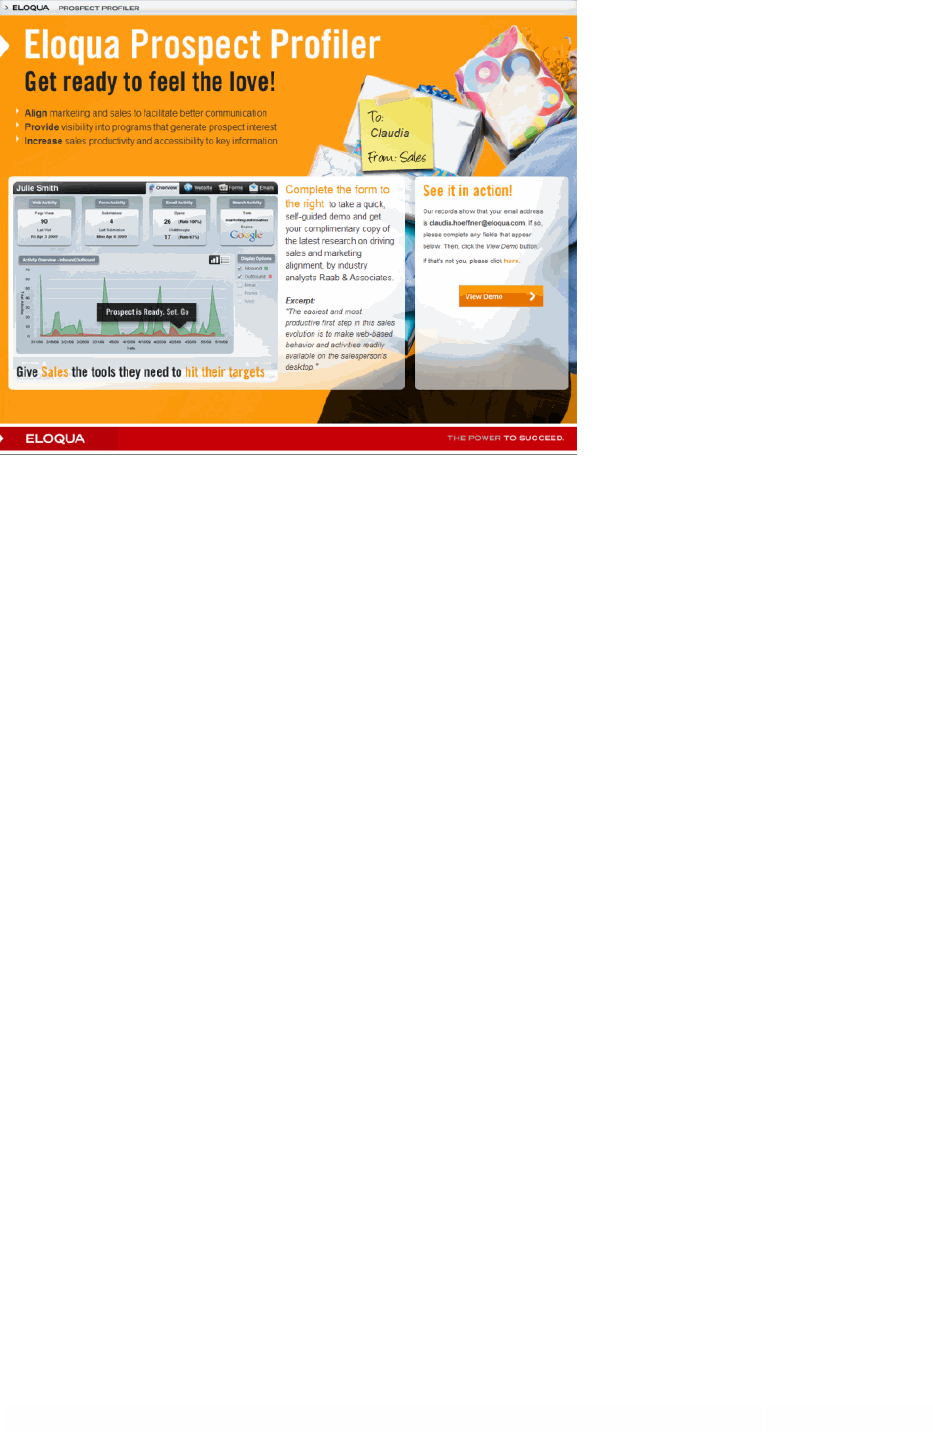
Here's a slightly different version of the same page. Note the personalization (carried
out using a field merge of the first name contact field) on the post-it note in the image.
You can use field merges within the page so that fields such as First Name are auto-
populated when accessing the landing page.
©2024 Oracle Corporation. All rights reserved
16 of 104
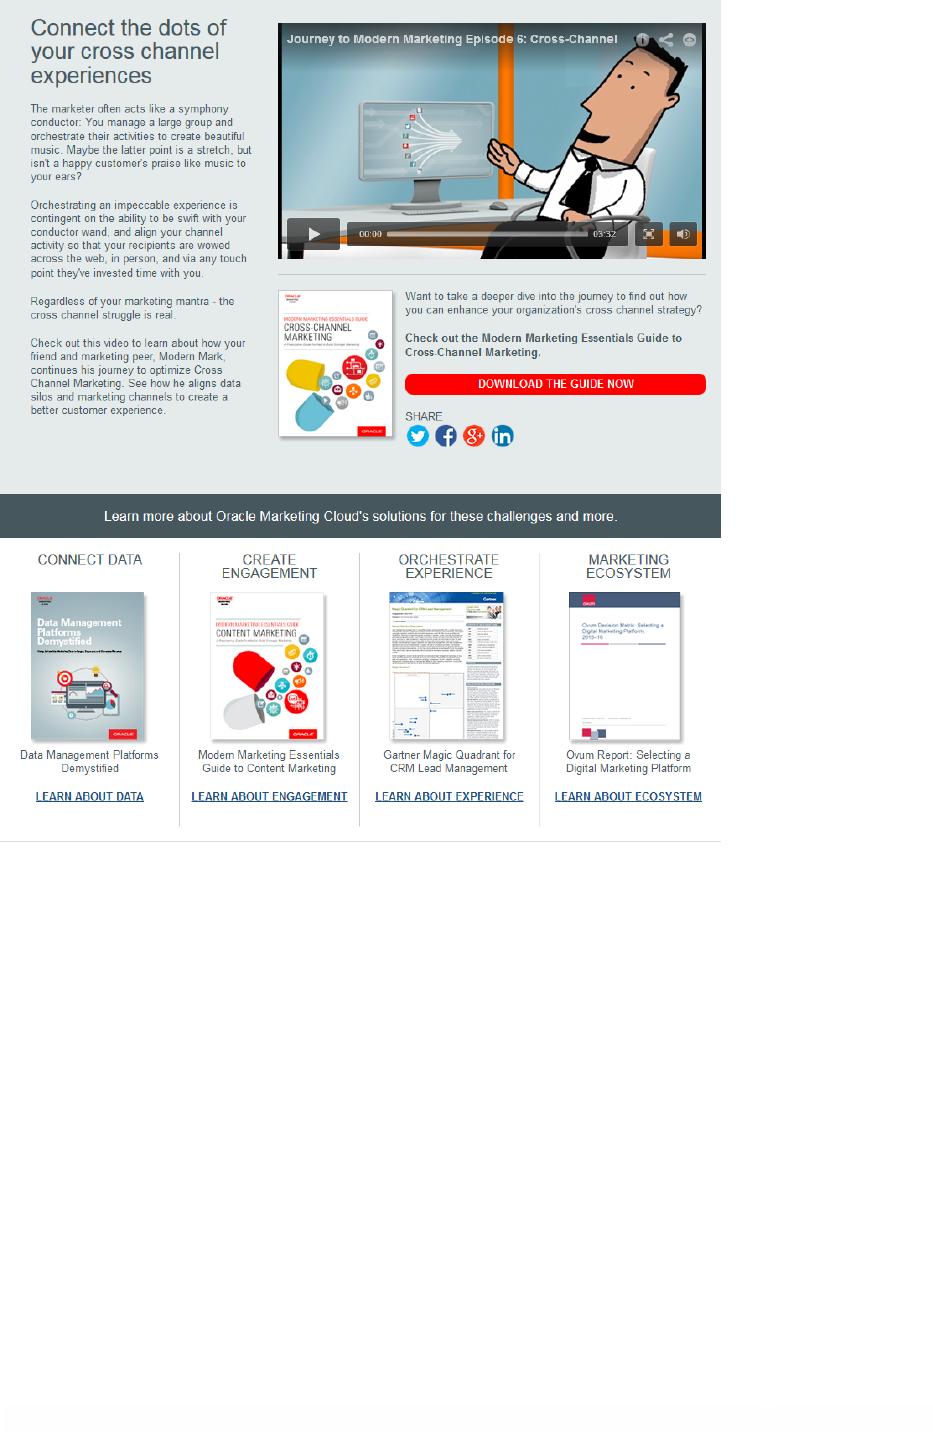
Multimeda and dynamic visuals
This landing page pulls different elements together to create a navigational hub of
sorts. The YouTube video at the top, embedded via the HTML source editor, delivers a
brief, compelling introduction to the featured content, and this is accentuated by the
bright red call to action, "Download the guide now!" Images and links to associated
products at the bottom offer added value for a visitor looking to educate themselves.
©2024 Oracle Corporation. All rights reserved
17 of 104

©2024 Oracle Corporation. All rights reserved
18 of 104
Creating landing pages using the Design
Editor
It's easy to create dynamic and responsive landing pages using the Design Editor. The
Design Editor lets you add elements to your landing page using the graphical user
interface without touching any HTML code. Learn more about creating an HTML
landing page using the Source Editor or uploading an HTML landing page.
When creating your landing page, different combinations of devices and operating
systems may have differing results. The following browsers have been identified as
the most commonly used clients and have been tested for responsive or mobile
friendly elements:
l
Firefox
l
Chrome
l
IE11
l
Edge
l
Safari
Learn more by watching this video!
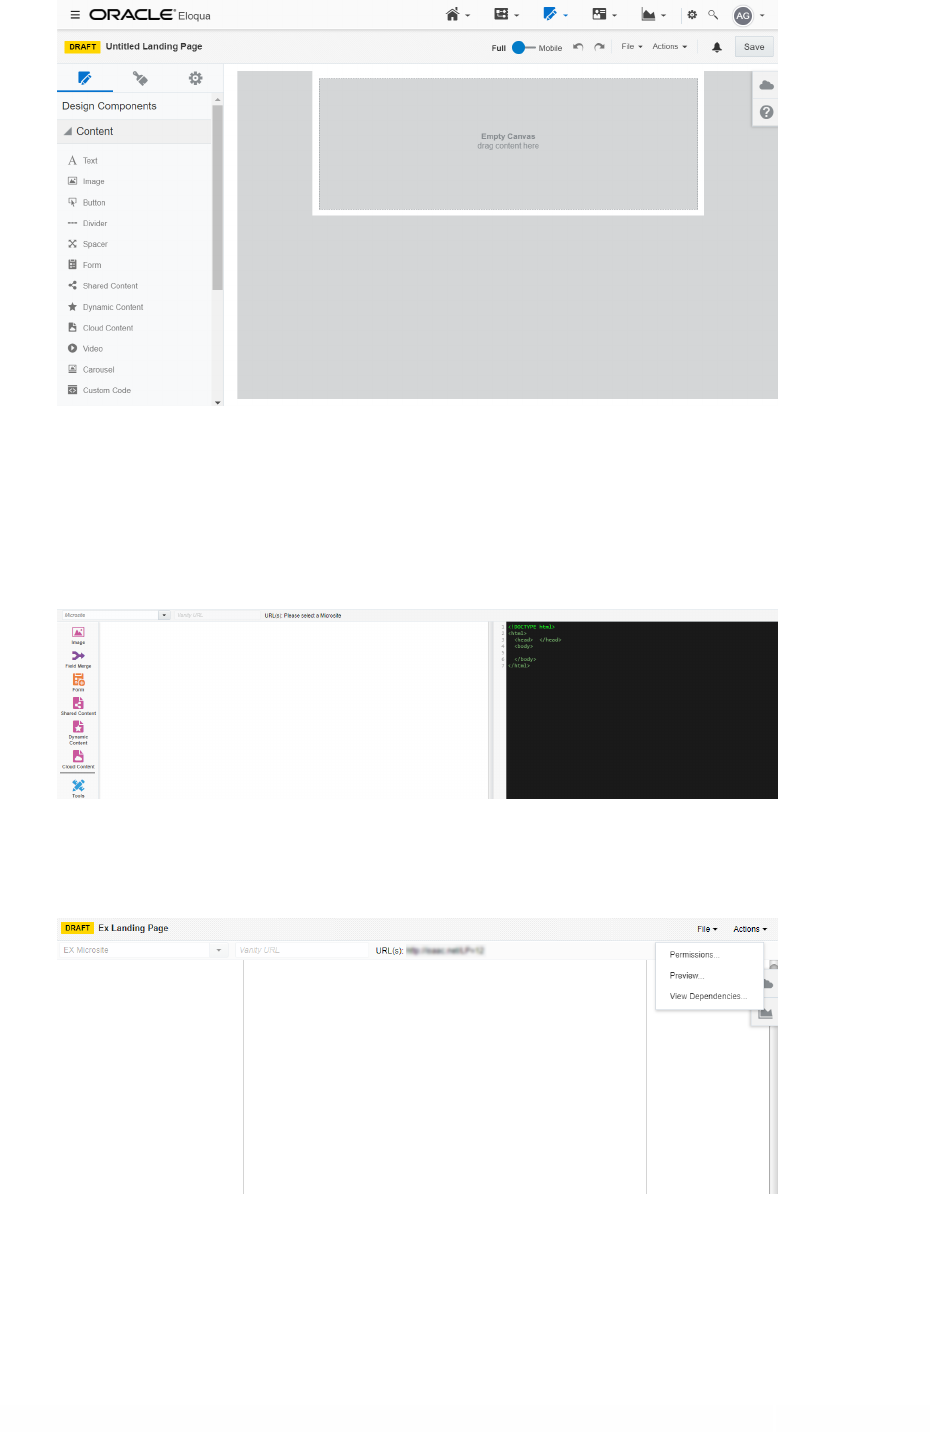
To create a landing page using the Design Editor:
1.
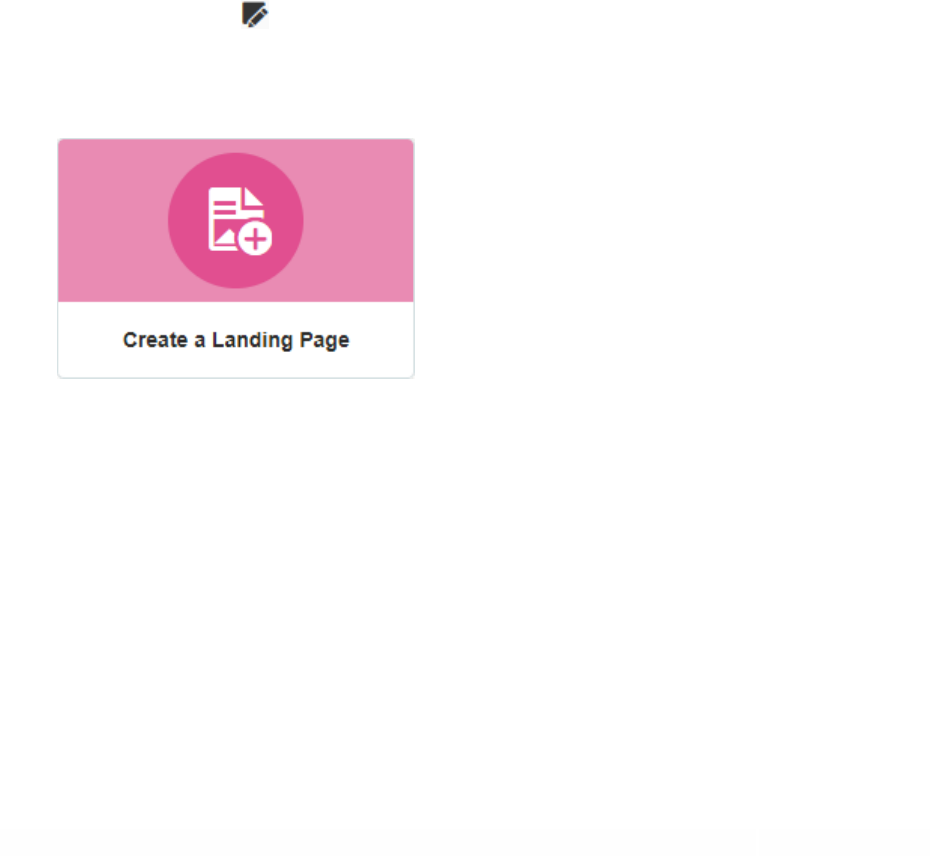
Navigate to Assets , then click Landing Pages.
2. Click Create a Landing Page to open the Template Chooser window.
©2024 Oracle Corporation. All rights reserved
19 of 104
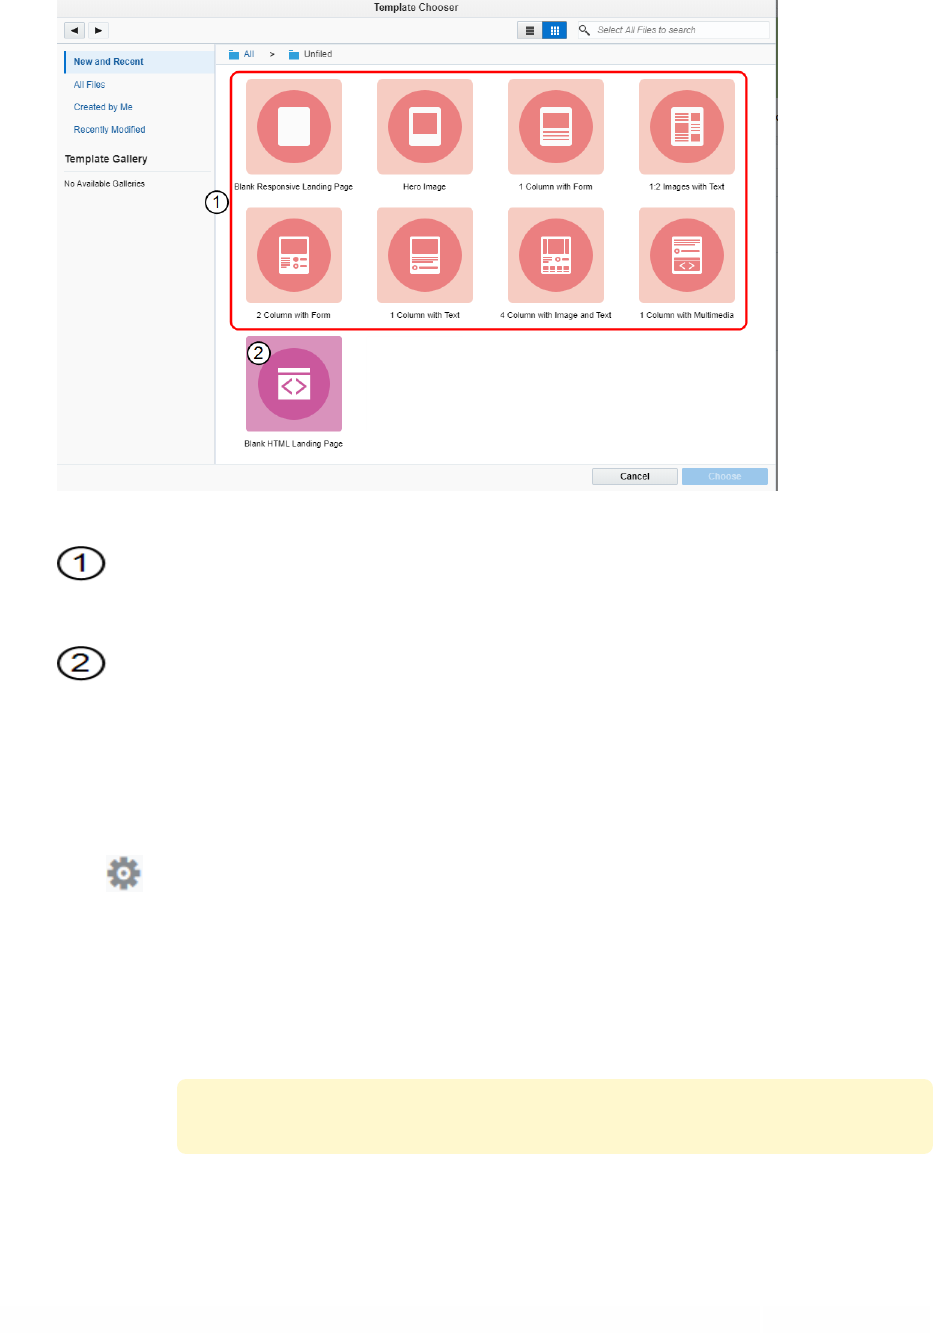
3. Choose a template or layout for the landing page. To build a fully responsive email in the
Design Editor, choose Blank Responsive Landing Page or one of the layout options.
Design Editor responsive layouts
Source Editor template
4. Name your landing page by clicking Untitled Landing Page in the top left and typing a new
name.
5.
Click to configure your landing page settings.
a. General Settings:
l
Select the microsite that you want to add the landing page to from the Microsite drop-down list. Learn
more about microsites.
Z Important: A microsite is required to launch your landing page.

©2024 Oracle Corporation. All rights reserved
20 of 104
l
To make the landing page URL more descriptive, add a Vanity URL. The vanity URLmust be unique.
Otherwise, Oracle Eloqua uses an ID for the landing page's URL.
l
Optionally, add a custom browser title in the Browser Title box. Text in the Browser Title box it will reflect
accordingly in the browser tab of the live landing page.
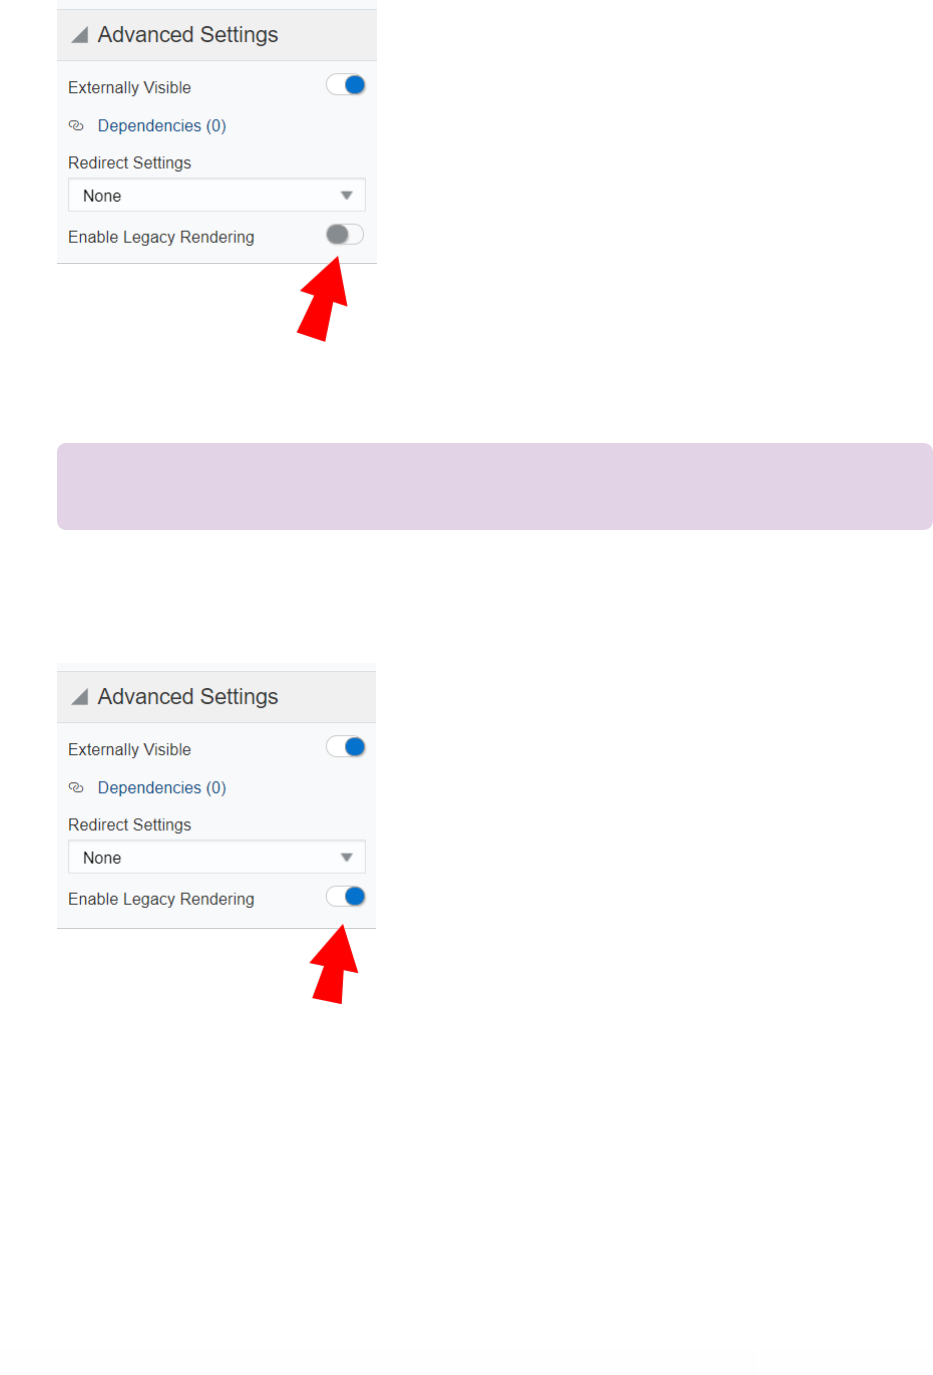
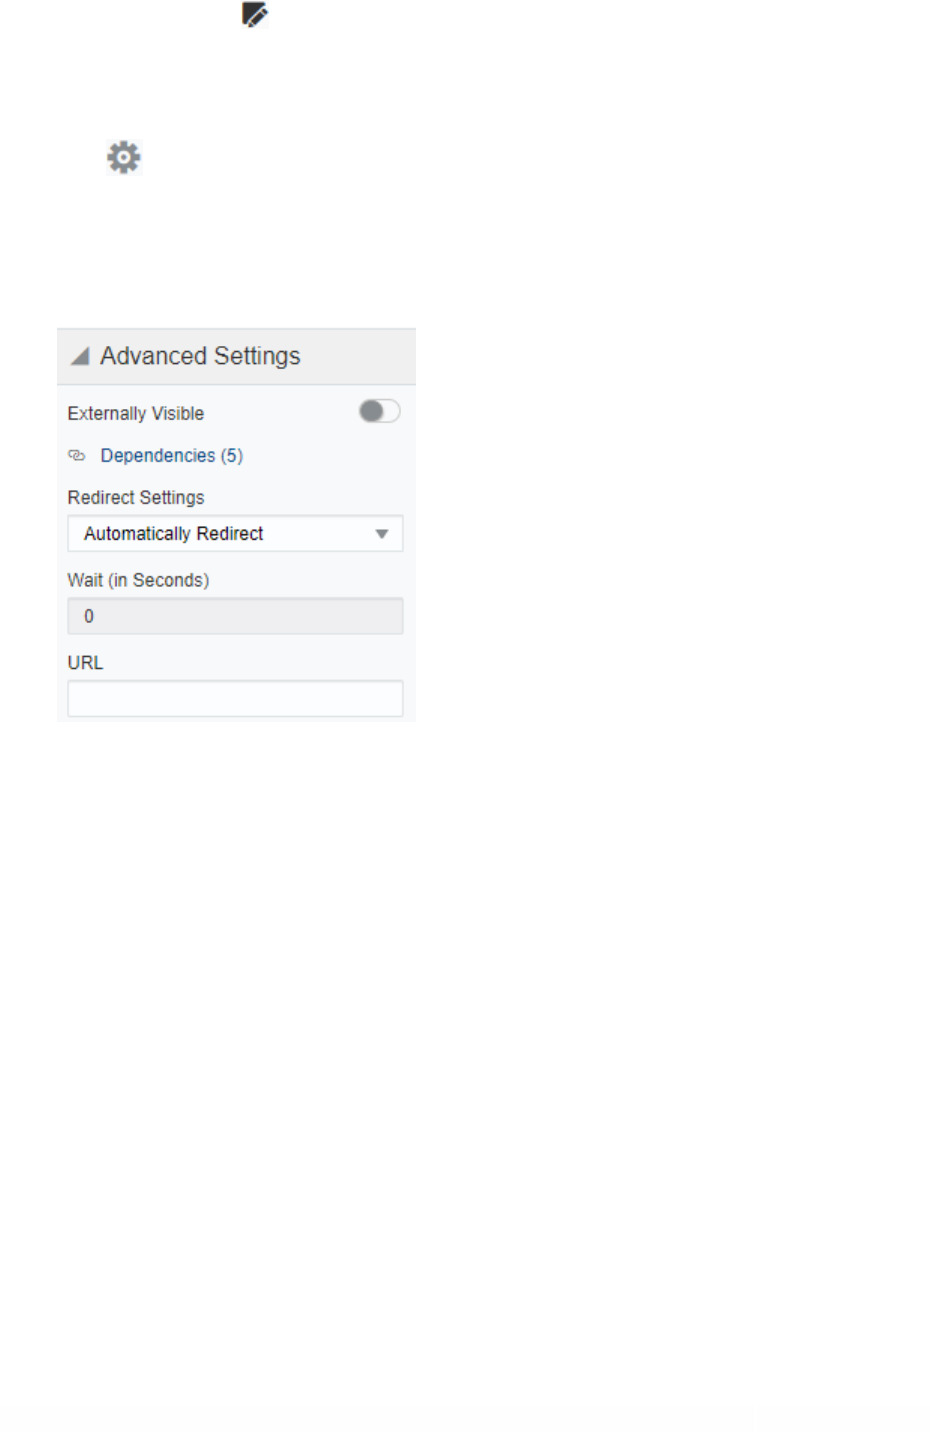
b. Advanced Settings:
l
To prevent visits to the landing page, toggle the Externally Visible option off. Visitors will not be able to
view the landing page until it is external. Learn more about changing the visibility of a landing page.
Choose the redirect option from the Redirect Settings section:
l
None: No redirect occurs.
l
Automatically Redirect: Redirect the user to a new page. You can specify how many seconds before
redirecting the visitor. The redirect will continue to work if you disable the Externally Visible option.
l
Automatically Close Window: No redirect and the browser window closes. You can specify how many
seconds before closing the window.
l
To set an expiry date for the landing page, toggle the Page Expiry Redirect option on. After the page
expires, visitors are redirected the specified page. Learn more about setting an expiration date for a
landing page.
Choose the expiry settings:
l
Set the Expires on date and time.
l
Enter the URL to redirect to after the page expires.
l
Choose the Time zone for the expiry date and time.
l
With the Enable Legacy Rendering option, you can choose between legacy rendering and the newer
rendering offered by Eloqua. The new rendering uses an updated HTML Doctype and will improve the
rendering experience in web browsers..
Z Important: If any existing landing page contains custom code through code cells, headers,
footers, dynamic content, shared content, or signatures, the new rendering might change the
way the landing page is displayed. If you enable the new rendering for existing landing pages,
make sure to test what the landing pages look like before sending them to contacts.
c. Code and Tracking:
l
Add Javascript or Meta Tags to your landing page.
©2024 Oracle Corporation. All rights reserved
21 of 104
6. Build your page using the components on the left pane of the landing page. Learn about
working with content components and layouts.
7. Click Save.
After saving your landing page, you can preview and test it or use the URL to test it in
different browsers.
Finding landing pages
You may need to find and open an existing landing page to continue a task, or you
may want to copy a landing page as a starting point for a new landing page. In both
cases, you can use the Landing Pages page to search for a specific landing page, or to
filter for certain criteria.
To find a landing page:
1.
Navigate to Assets , then click Landing Pages.
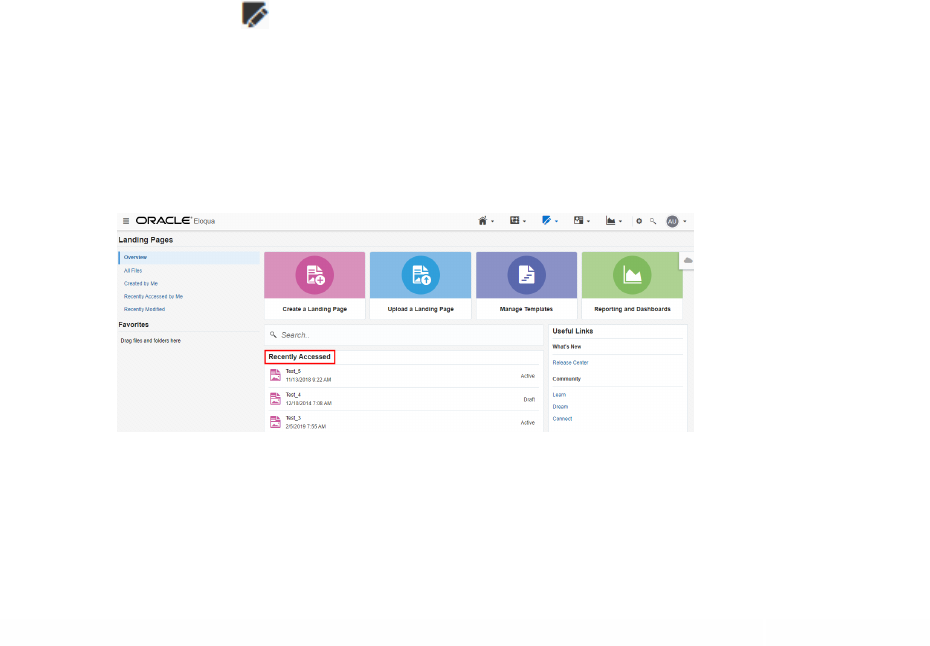
2. Locate the landing page that you want to use. Oracle Eloqua provides several ways to find a
landing page:
l
If you've had the landing page open recently, locate it in the Recently Accessed list.
©2024 Oracle Corporation. All rights reserved
22 of 104
l
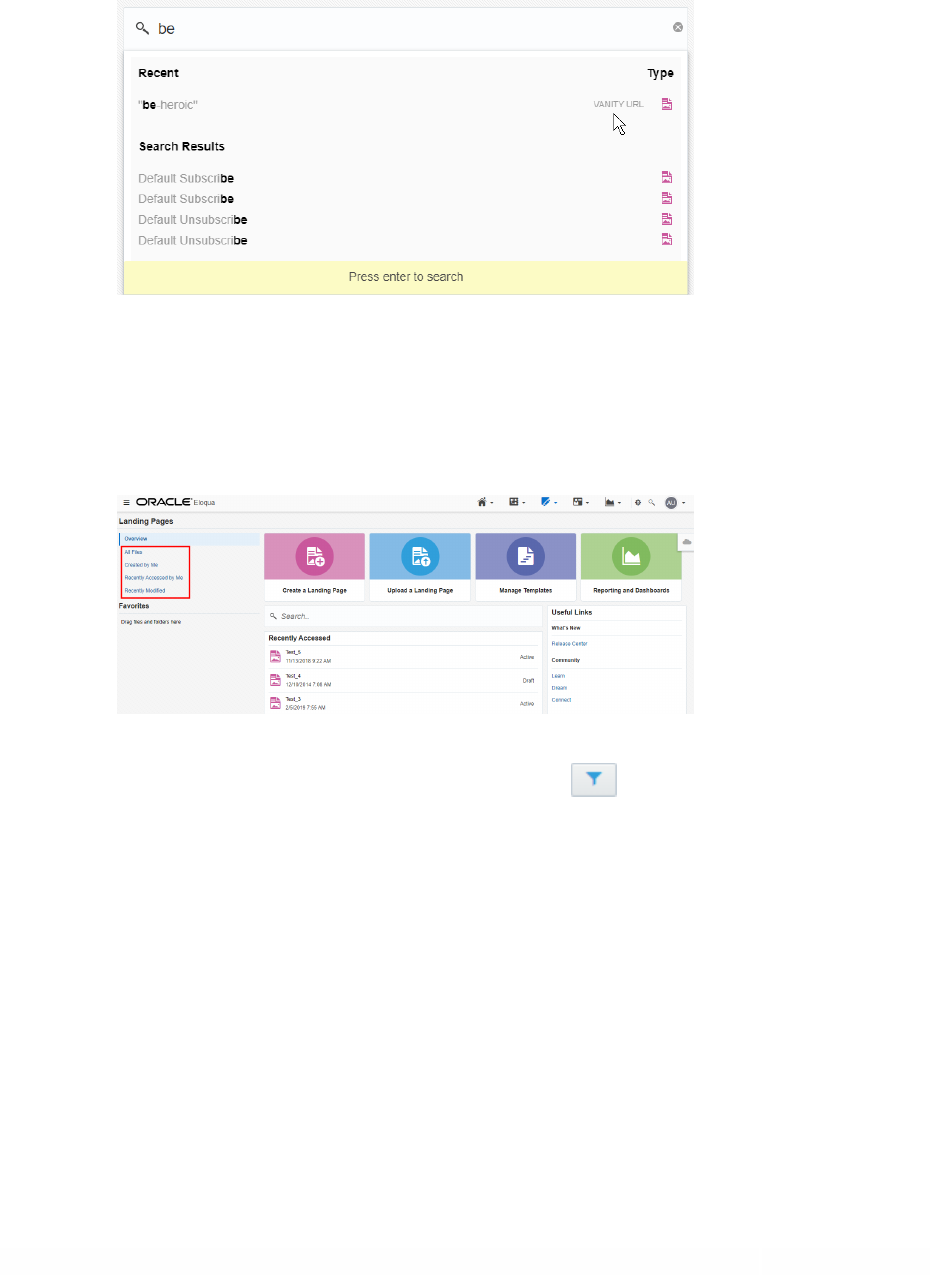
Type part of the landing page's title or vanity URL in the Search box. The 5 most recent landing
pages you've worked with appear at the top of the results, followed by the 10 next closest matches.
When the text is found in the vanity URL of a landing page, the results show a "Vanity URL" tag for
that landing page.
If you don't see the landing page you're looking for, you can type more text in the Search box, or
you can press Enter on your keyboard to view more search results on the All Files page.
l
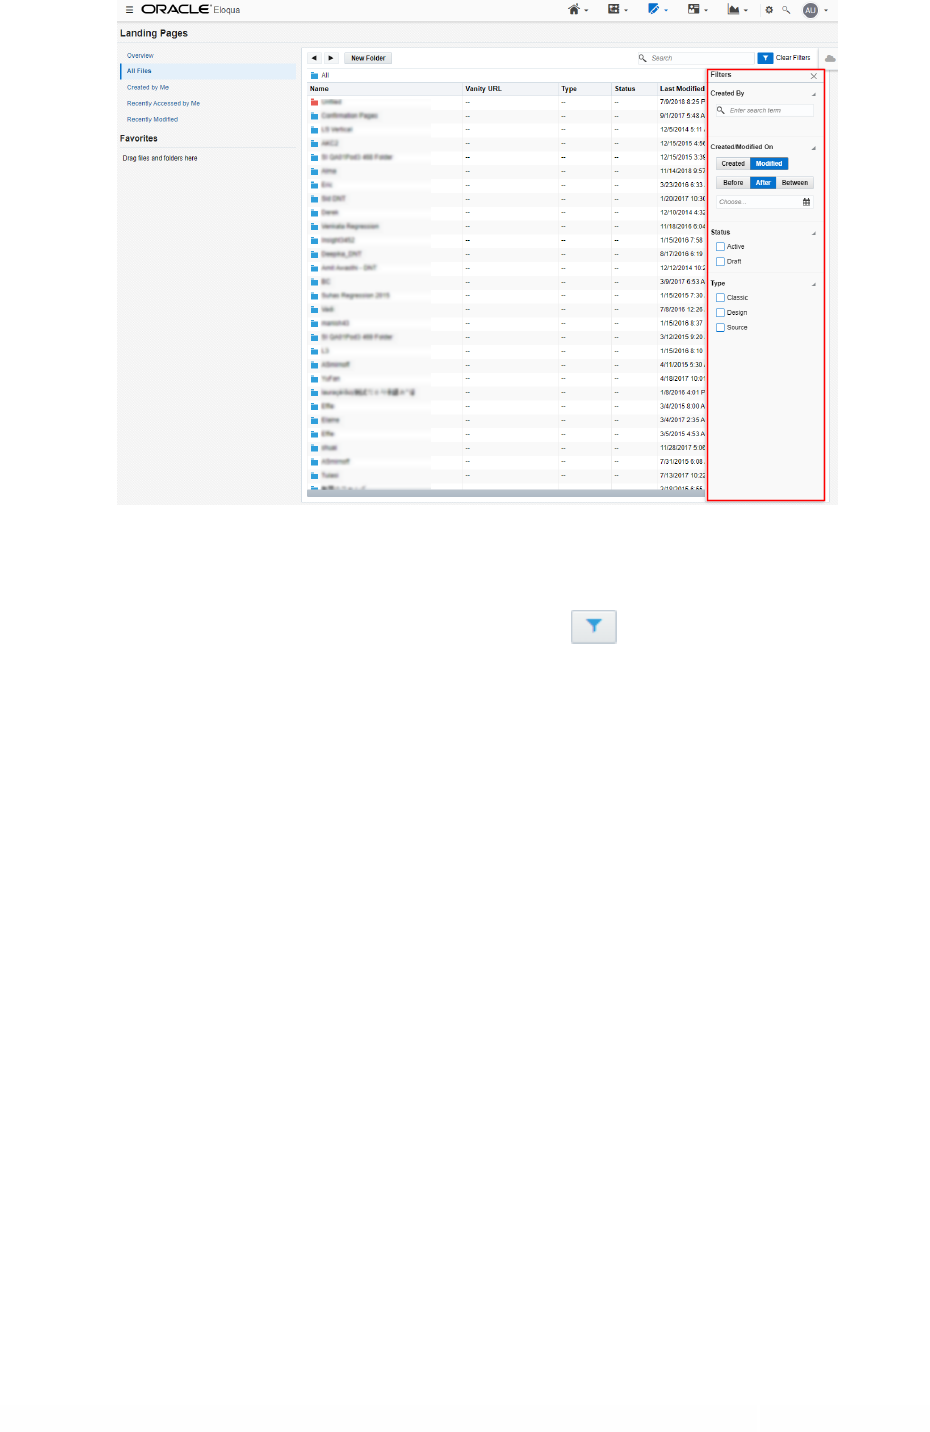
Click All Files to view all landing pages.
From this page, you can use the search box and Filters on the right side of the page to refine
the results.
For example, to find recently modified files, you could click Filters, and then click Modified, After,
and then select a recent past date.
©2024 Oracle Corporation. All rights reserved
23 of 104
l
Click Created by Me to view all landing pages you created.
From this page, you can use the search box and Filters on the right side of the page to
further refine the results. (Note that the Filters dialog will show that the results are already filtered
by you as the creator.)
l
Click Recently Accessed by Me to view all landing pages you recently opened.
l
Click Recently Modified to view all landing pages that were recently edited, including files
modified by others.
From this page, you can use the search box on the right side of the page to further refine the
results.
Legacy rendering for landing pages
In the Oracle Eloqua landing page Design Editor, you can choose between legacy
rendering and the newer rendering offered by Eloqua. The new rendering uses an

©2024 Oracle Corporation. All rights reserved
24 of 104
updated HTML Doctype and will improve the rendering experience in web browsers..
In this topic, you'll learn about:
l
Enabling legacy rendering when creating a new landing pages
l
Disabling legacy rendering for landing pages created prior to 20C
Z Important: If any existing landing page contains custom code through code
cells, headers, footers, dynamic content, shared content, or signatures, the new
rendering might change the way the landing page is displayed. If you enable the
new rendering for existing landing pages, make sure to test what the landing
pages look like before sending them to contacts.
To enable legacy rendering when creating a new landing page:
1. Create a new landing page in the Design Editor.
2.
Click to go into Landing Page Settings.
©2024 Oracle Corporation. All rights reserved
25 of 104
3. Under Advanced Settings, click Enable Legacy Rendering.
¤ Tip: Legacy rendering is enabled when the toggle is blue.
Legacy rendering will now be enabled.
To disable legacy rendering for landing pages created prior to 20C:
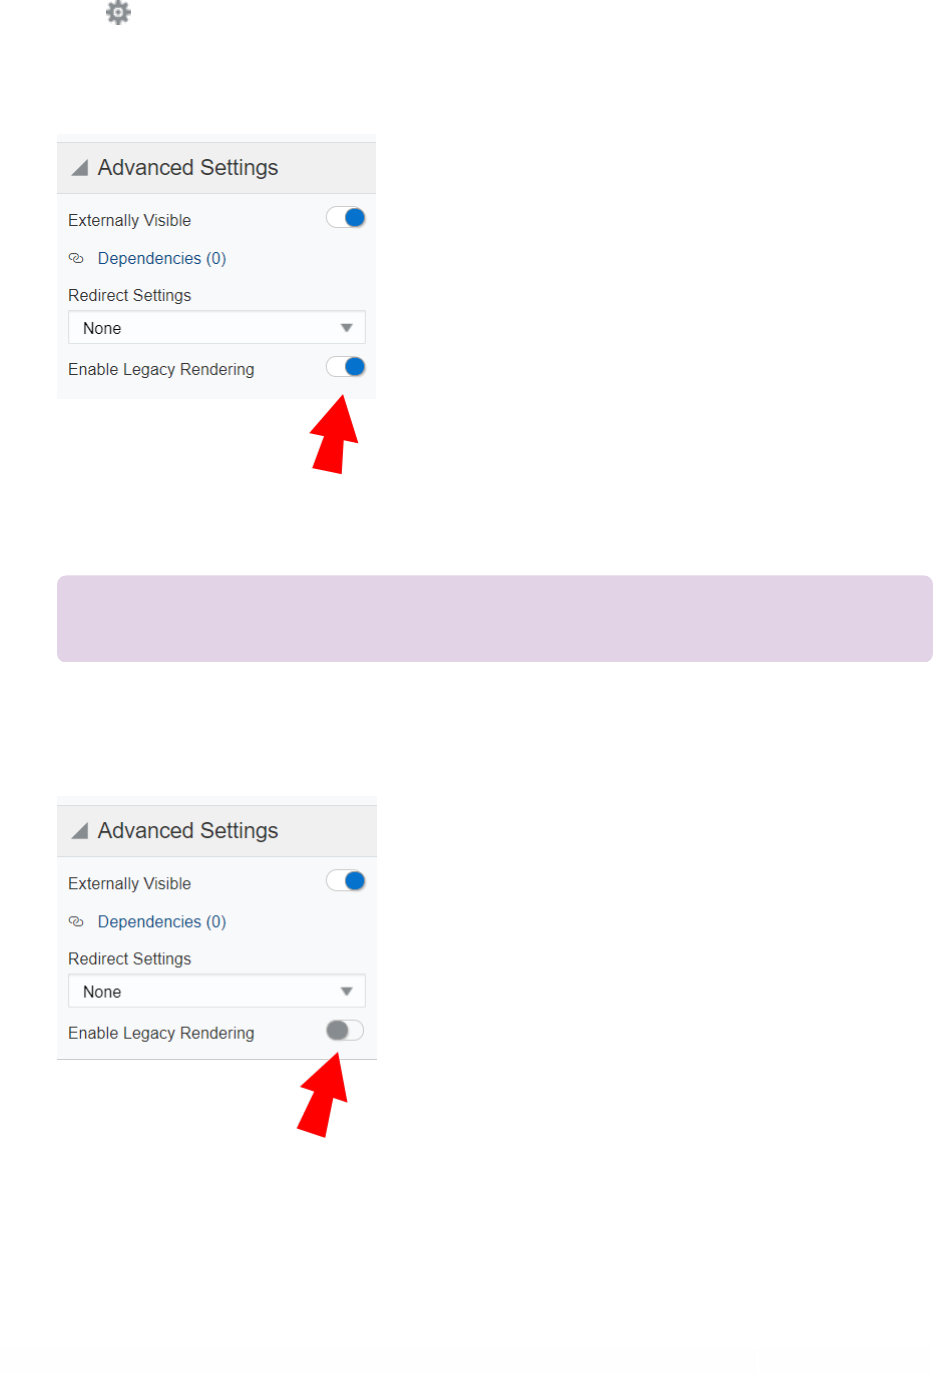
©2024 Oracle Corporation. All rights reserved
26 of 104
1. Open an existing landing page.
2.
Click to go into Landing Page Settings.
3. Under Advanced Settings, click Enable Legacy Rendering.
¤ Tip: Legacy rendering is enabled when the toggle is blue.
Legacy rendering will now be disabled.
©2024 Oracle Corporation. All rights reserved
27 of 104
Working with landing page content components and
layouts
The Oracle Eloqua landing page Design Editor uses content components and layouts
to help you build your landing page.
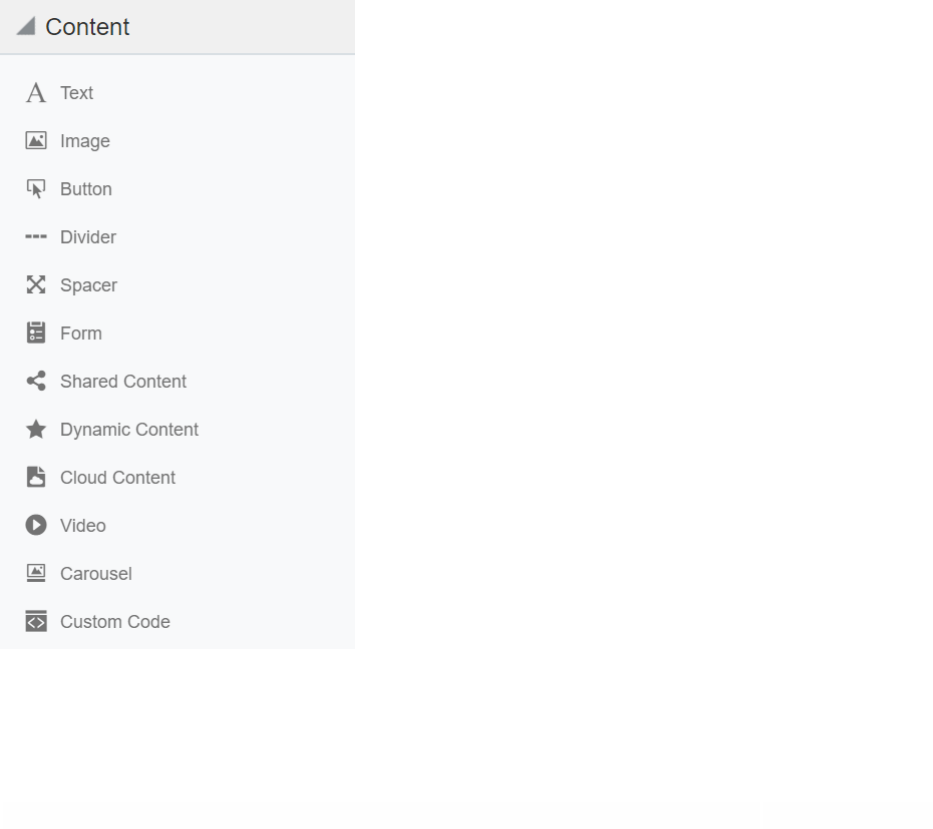
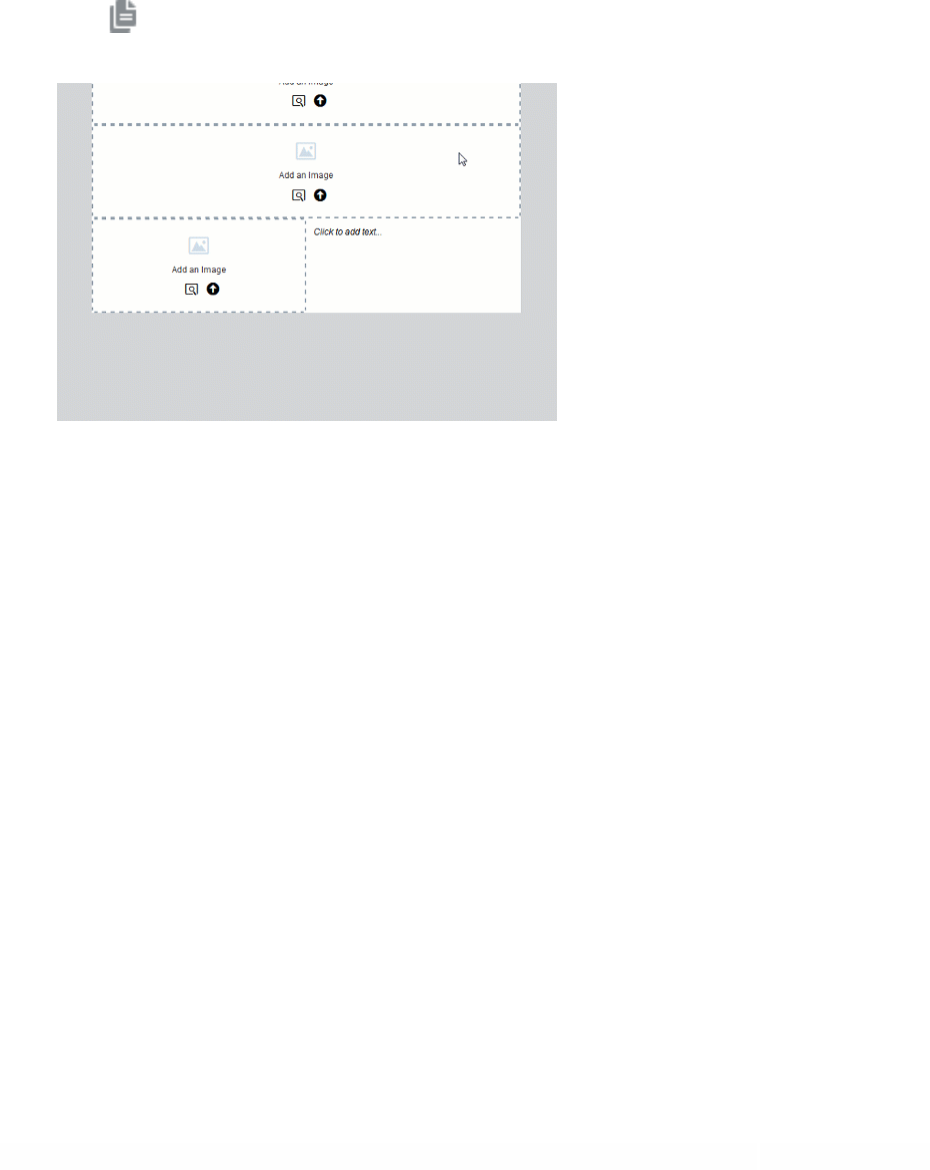
Content components
Content components are types of elements that you can include in your landing page.
Content types include text, buttons, images, forms, and more. You can add content
components to sections of a layout. Content added to layouts creates a content
component in your landing page.

©2024 Oracle Corporation. All rights reserved
28 of 104
The following content types are available:
l
Text: Add summaries, instructions, and other relevant information to your landing page
using the text content component. The default typeface and color will automatically be
applied, unless text is customized with the toolbar. Use the toolbar to insert hyperlinks and
field merges, modify text style and color, add bullets, and so on. You can also write right-to-
left.
l
Images: Add images from the Oracle Eloqua component library, from your machine, or
Oracle CXContent (formerly Oracle Content and Experience Cloud).
l
Buttons: Buttons are an effective way to create calls-to-action in your landing pages. Button
content is text only and cannot use images. Select hover state to better indicate when a
user hovers over the button. You can hide buttons in mobile and write-right-to-left when
adding button text.
l
Dividers: Dividers are horizontal lines used to visually separate content on your landing
pages.
l
Spacers: Spacers are used to create blank areas on your landing pages. The size, background
color, and border can be customized.
l
Shared content: Shared content is reusable content snippets that you can create once, then
reuse in different emails and landing pages. It allows you to "build once, re-use everywhere"
for your most valuable common pieces of content. Shared content is stored in the
component library.
l
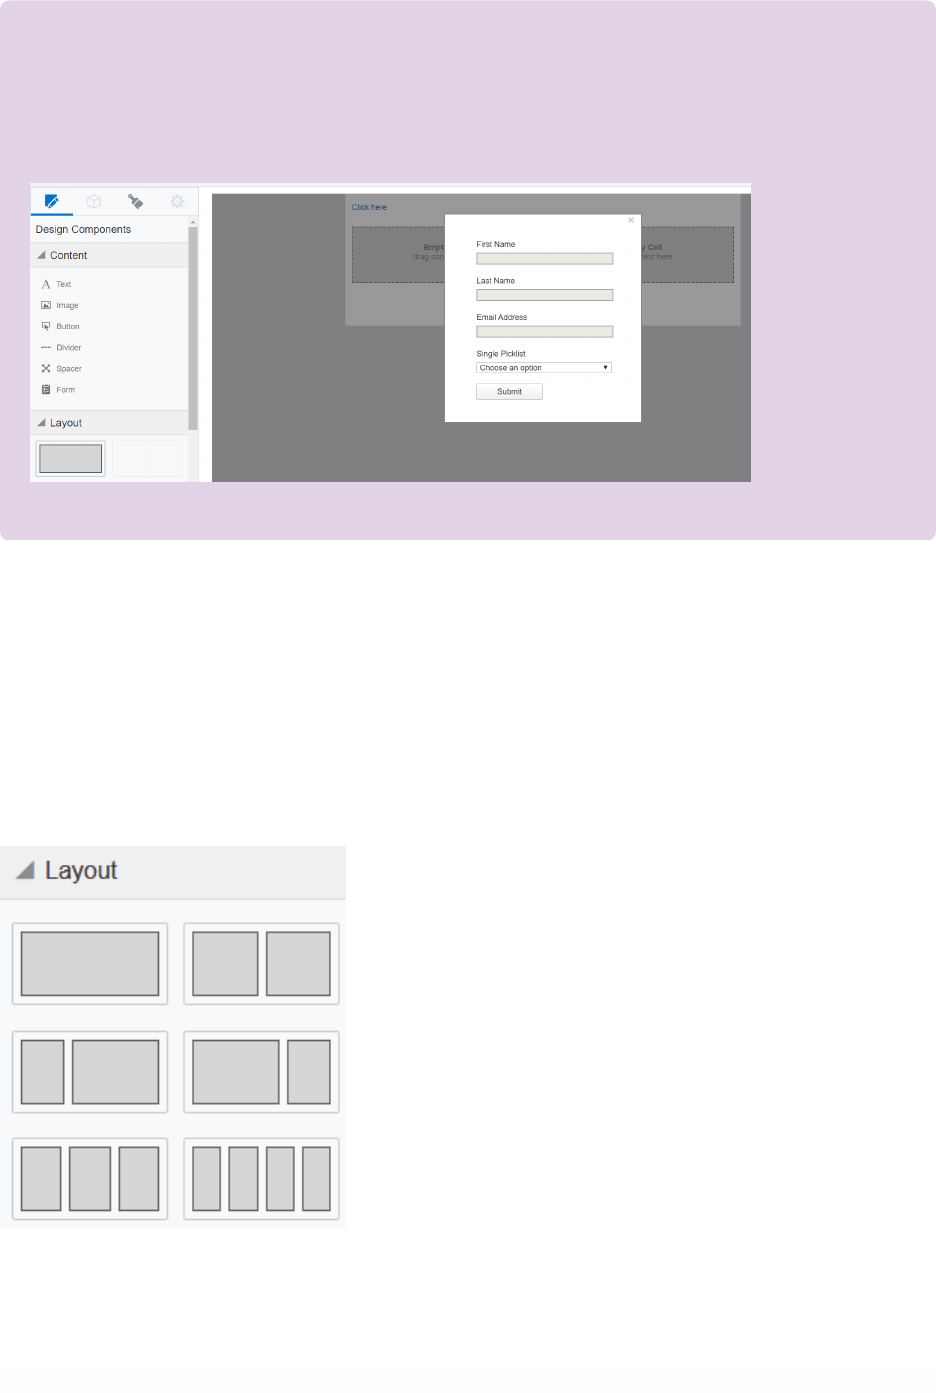
Forms: Easily insert Oracle Eloqua forms in your landing pages. The form's styling, such as
field spacing, background color, and font, can be customized in the Design Editor to match
the rest of your landing page. Existing Oracle Eloqua forms brought into the responsive
editor will be automatically responsive. Learn more about adding forms.
l
Dynamic content: Dynamic content allows you to display information that changes based on
specific rules and conditions. For example, you could personalize a landing page with the
recipient's sales rep information based on the city, state, country, or region specified in the
©2024 Oracle Corporation. All rights reserved
29 of 104
contact's profile. Dynamic content is reusable content stored in the component library. Learn
more about dynamic content.
l
Cloud content: Cloud content is content provided by an external service. Cloud content apps
must be installed by your administrator.
l
Video: Natively insert Vimeo or YouTube videos to your landing page to better engage users
and share rich media content. Learn more about adding videos.
l
Custom code: Adding custom code provides additional ways to style your landing pages.
l
Carousels: Image carousels cycle through several image slides automatically at a specified
speed or manually. They allow you to present similar and reinforcing content in the same
space and make for a more engage landing page. Learn more about adding image
carousels.
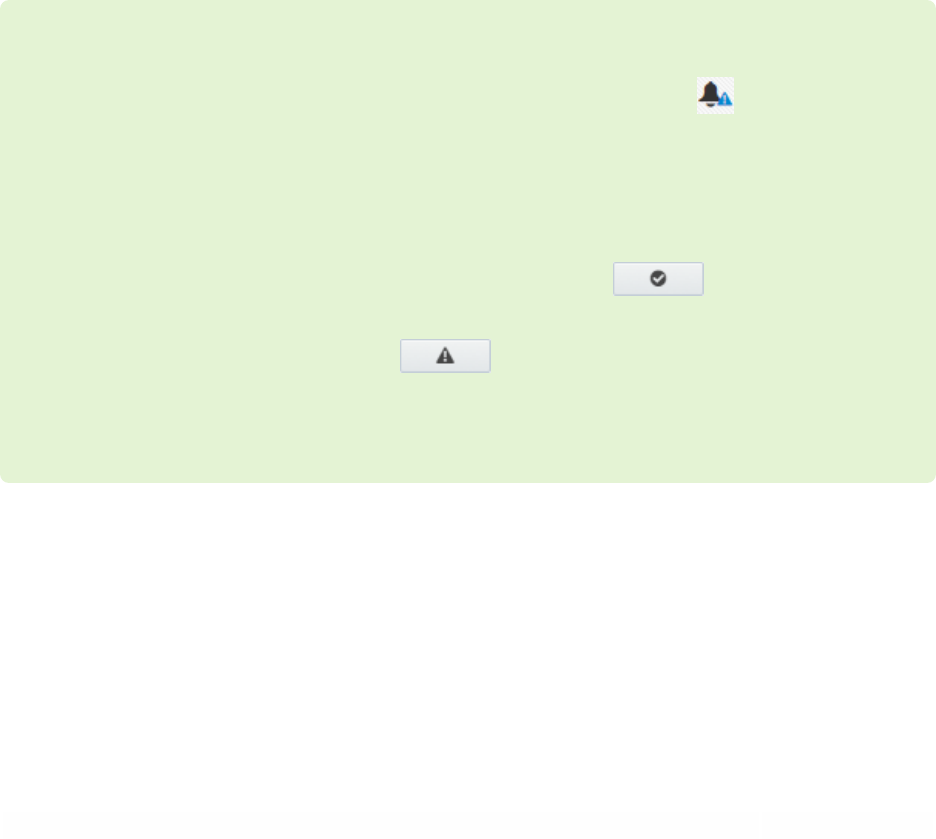
ëNote: Oracle Eloqua validates that dynamic and shared content is responsive.
If there are issues with responsiveness, a notification appears . Click the
notification icon to review the issues. You can edit the content components from
the Design Editor or from the component library. As you make changes, review
the responsive validation errors in the rich text editor. indicates that
there are no responsive concerns. indicates that there might be
responsive issues.
©2024 Oracle Corporation. All rights reserved
30 of 104
¤ Tip: When inserting hyperlinks on your landing page, you can select Lightbox
as your link type. Clicking the hyperlink displays a pop-up on your landing page
that can contain images, buttons, text, or a form.
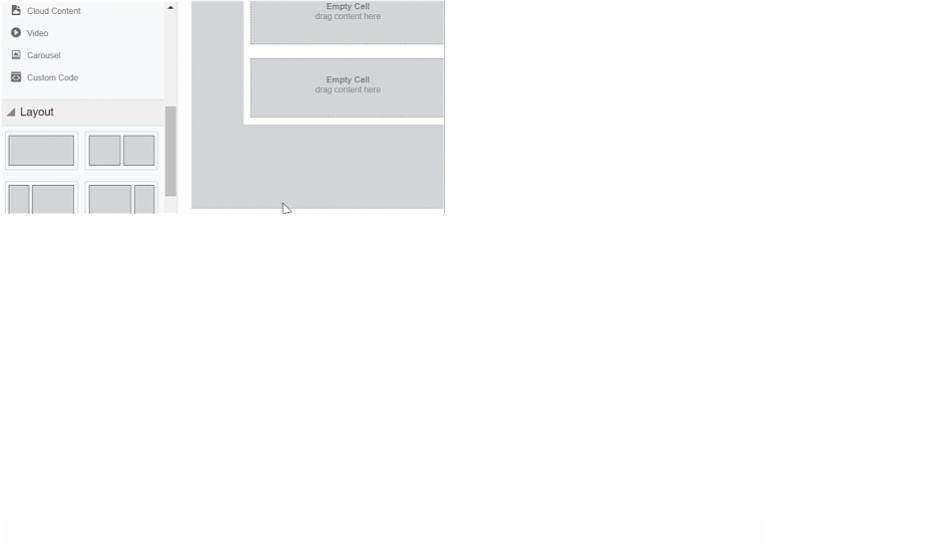
Layouts
Layouts determine where you can place content components. Layouts consist of one
or more columns that you can add content components to. Oracle Eloqua provides
you with several layouts that you can customize with content components.
©2024 Oracle Corporation. All rights reserved
31 of 104
Learn how to work with these design components:
l
Adding content components or layouts
l
Copying content components or layouts
l
Moving content components or layouts
l
Deleting content components or layouts
l
Resizing columns
l
Padding and borders
Adding content components or layouts
After you initially choose a layout for your landing page, you can add content
components and layouts to customize the landing page design.
To add content components or layouts:
1. With your landing page open, drag content component or layout to your landing page.
©2024 Oracle Corporation. All rights reserved
32 of 104
Copying content components or layouts
To copy content components or layouts:
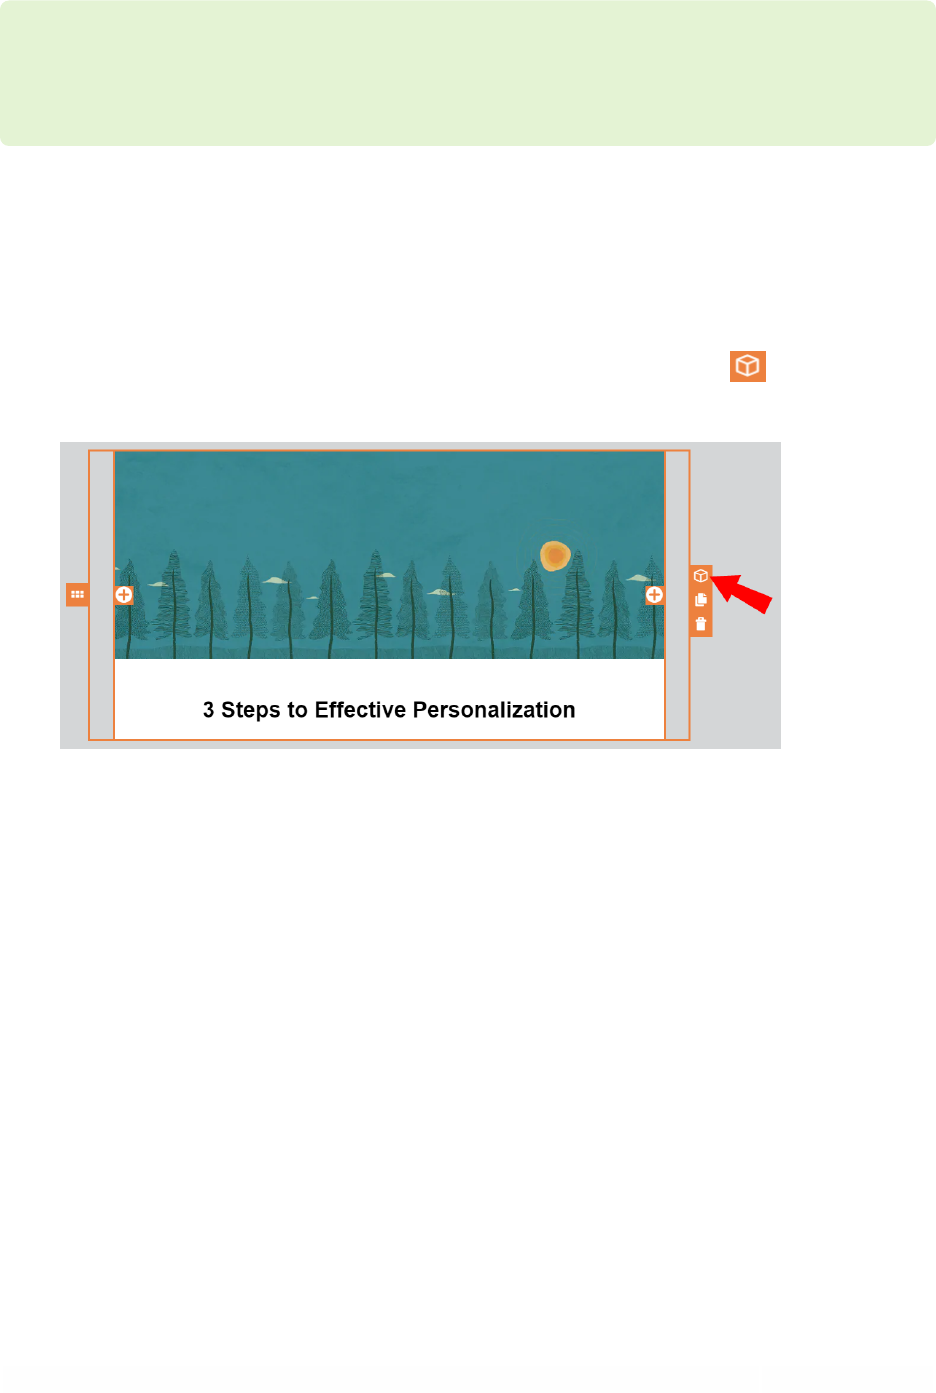
1. With your landing page open, click the content component or layout you want to copy.
2.
Click .
3. Move the content component or layout to the location you want it.
Moving content components or layouts
You can move a content component vertically or horizontally. You can move a content
component to a new layout. You can move a layout vertically.

©2024 Oracle Corporation. All rights reserved
33 of 104
ëNote: You cannot move content components if you are in the mobile view.
You can move a layout in mobile view.
To move content components or layouts:
1. With your landing page open, click the content component or layout you want to move.
2.
Click and drag the content component or layout to the new location.
Deleting content components or layouts
To delete content components or layouts:

©2024 Oracle Corporation. All rights reserved
34 of 104
1. With your landing page open, click the content component or layout you want to delete.
2.
Click . You can click to undo your change.
Resizing columns
To resize columns in a layout:
1. With your landing page open, click on the layout that contains the columns you want to
resize.
©2024 Oracle Corporation. All rights reserved
35 of 104
2.
Click on or to decrease or increase the size of the columns.
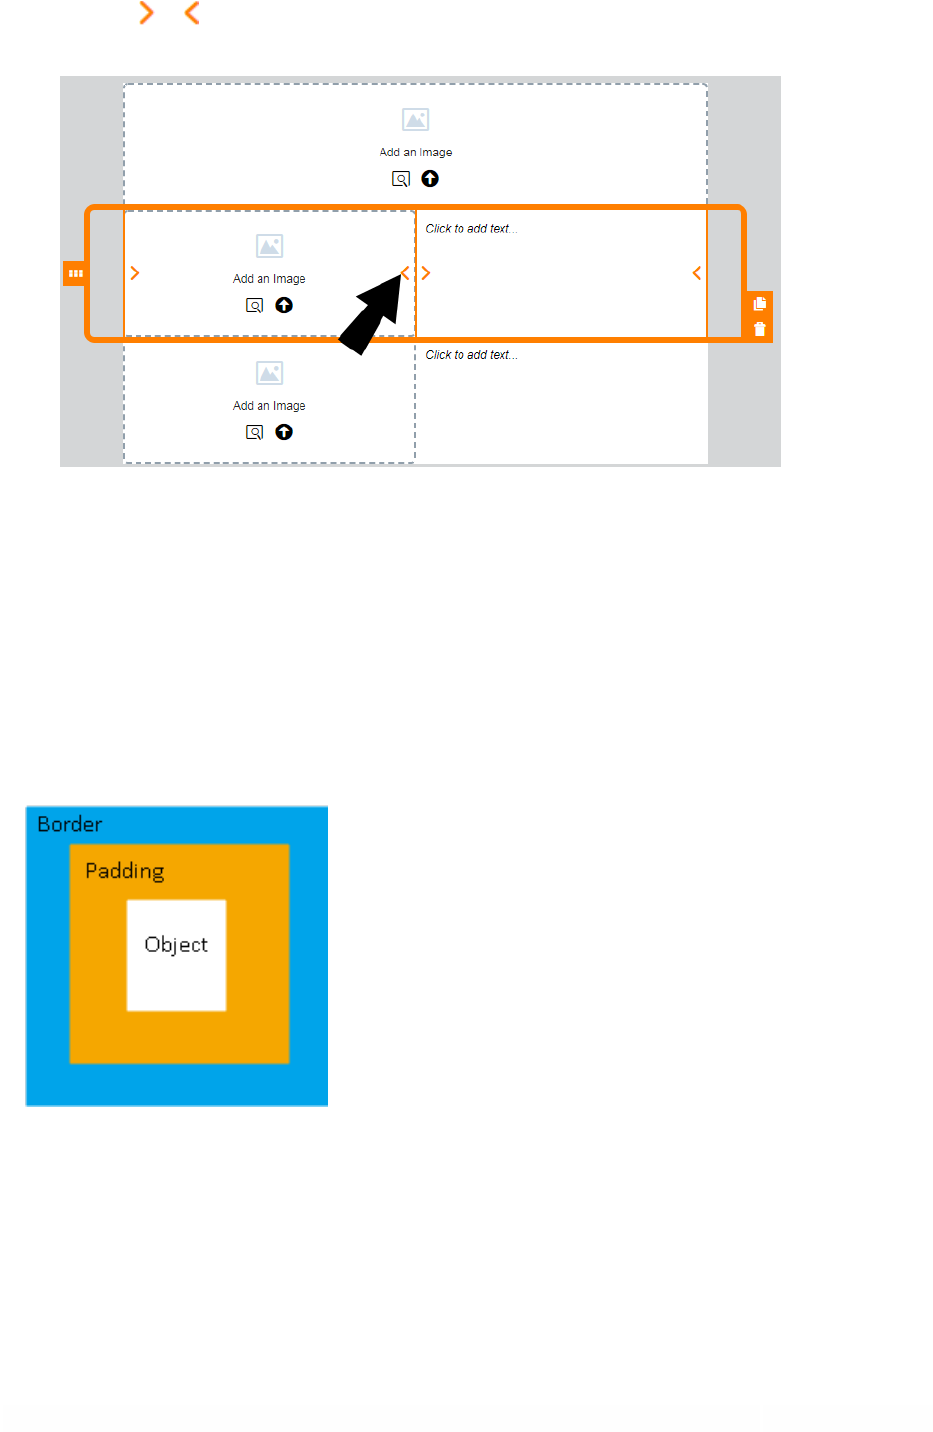
Padding and borders
You can add padding to most content components and add borders to both a content
component and layout.

©2024 Oracle Corporation. All rights reserved
36 of 104
Padding
You can adjust the space around a content component using the padding options
available from the panel. You cannot adjust the padding for a layout.
Borders
Add a border around the content component or layout by turning on borders. For
multi-column layouts, you can adjust the borders for each column.
The border goes around the padding.
Content Blocks
Content blocks are groups of layout containers and cells that can be re-used when
building responsive emails or landing pages. They can be a combination of different
cell types such as text, images, dynamic content, shared content, and more. By
breaking down your most commonly used components and re-assembling them to
meet the unique needs of each new email and landing page, you can more quickly
create brand-compliant content with ease.
For example, if you find yourself frequently using a particular portion of an email
template, you can save that section as a content block and re-use it in several emails
to achieve a consistent look and feel instead of maintaining a large template library.

©2024 Oracle Corporation. All rights reserved
37 of 104
ëNote: To create, edit, and delete content blocks, the Manage Blocks security
action permission needs to be enabled. Users without the Manage Blocks
permission can only use blocks that appear in the Blocks tab. However, if they
have email or landing page editing permissions, they can edit a block after it has
been added. For more information, refer to the list of security action
permissions.
Next steps:
Creating a content block
Adding a content block
Editing a content block
Searching for a content block
Locking a content block
Deleting a content block
Creating a content block
You can easily create content blocks and save them for future use. In addition to
elements like images and text, saved blocks can also include hyperlinks and field
merges.
©2024 Oracle Corporation. All rights reserved
38 of 104
ëNote: Cloud content cannot be saved into a block. If there is cloud content in a
row, you will not be able to save that row as a block.
To create a content block:
1.
Click the layout that you would like to save as a content block and click .
2. Enter a name and click Save.
The content block can now be accessed from the Blocks tab.
©2024 Oracle Corporation. All rights reserved
39 of 104
¤ Tip: For easier management, it is recommended that you have no more
than 50 content blocks.
Adding a content block
When you add a block to the canvas, it retains all applied cell, column, and row styling
from when it was saved. Any default styles present will reflect the defaults of the email
or landing page the block is added to.
If a block contains a hyperlink, that hyperlink will receive a new Eloqua tracking ID
each time it is copied or re-used to prevent duplication in reporting.
To add a content block:

©2024 Oracle Corporation. All rights reserved
40 of 104
1.
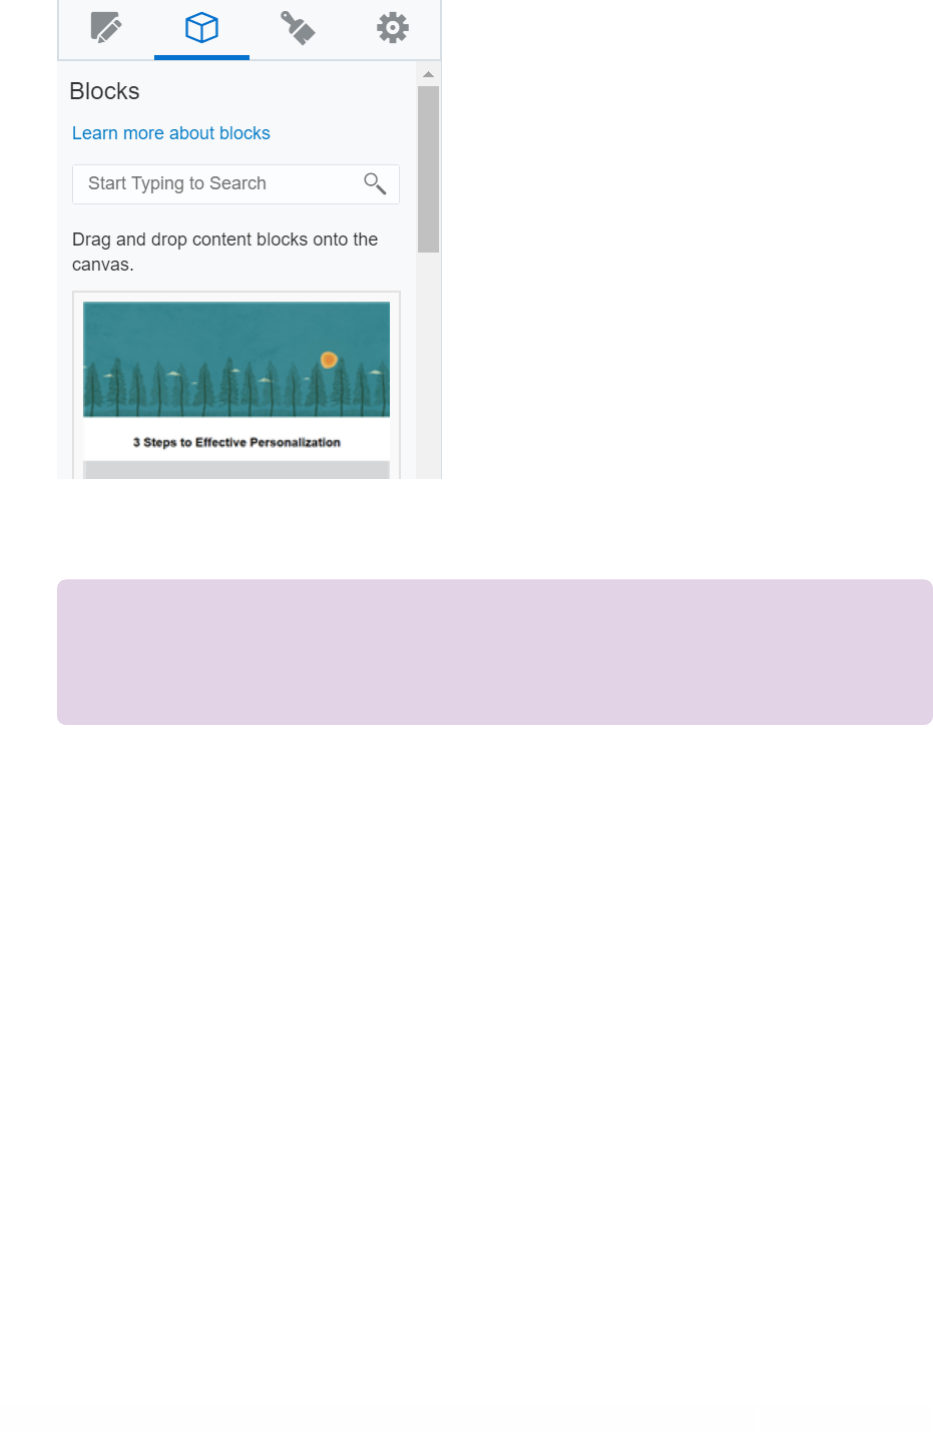
From the Design Editor, click to navigate to the Blocks tab.
2. Drag and drop the blocks that you would like to use.
Once a block is added to the canvas, it is separated from the original block and
can be edited. Any edits made to the canvas will not impact the original block
where the content came from.
Editing a content block
Once saved, a content block can be edited at any time.
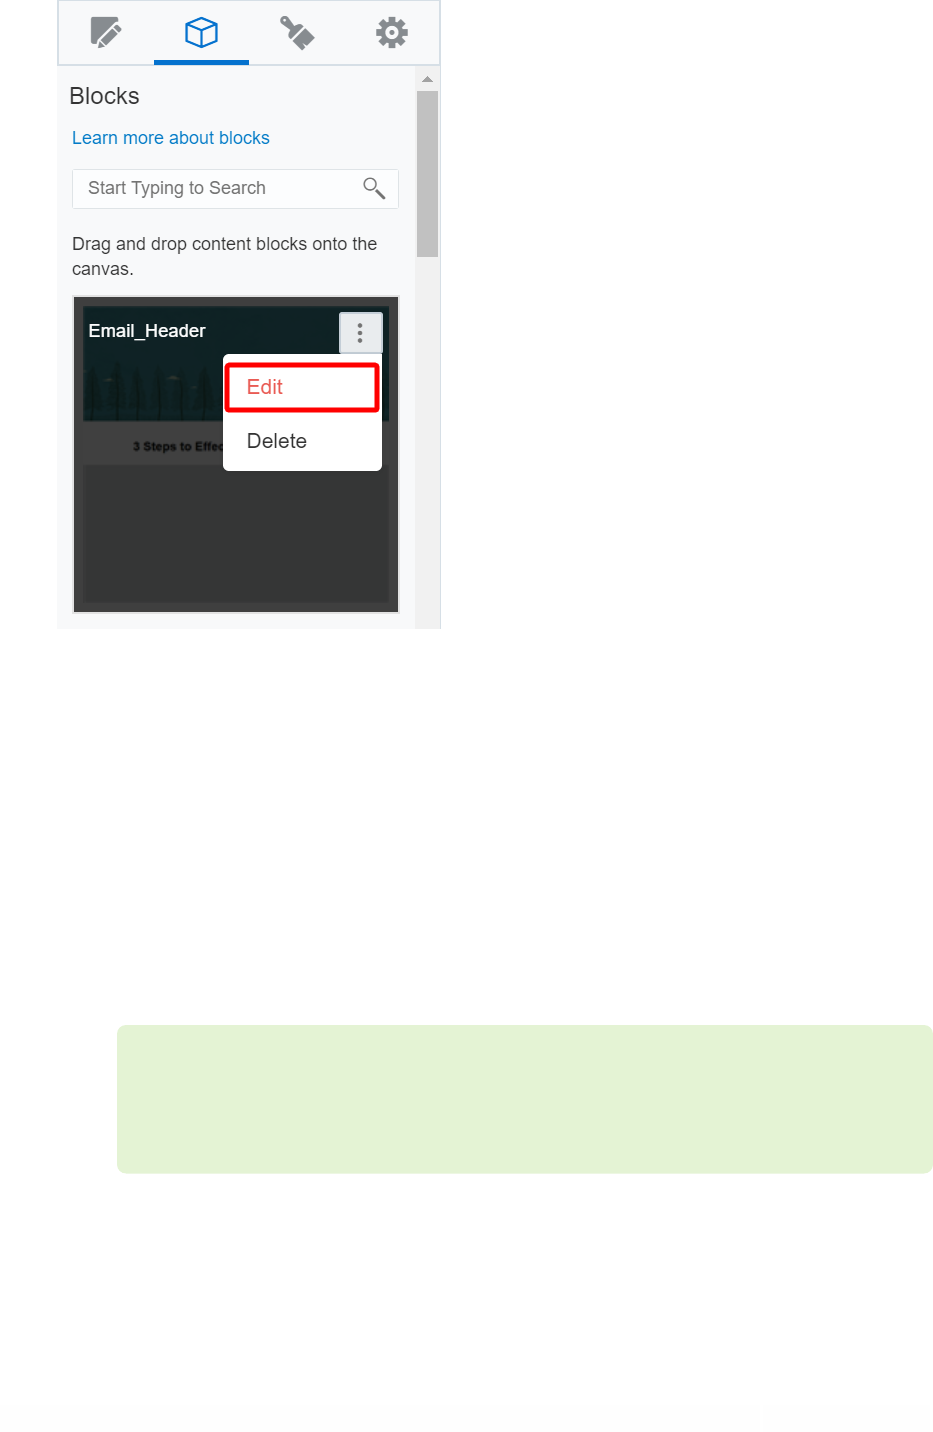
To edit a content block:
1.
In the Blocks tab, locate the content block you want to edit and click .
2. Select Edit.
©2024 Oracle Corporation. All rights reserved
41 of 104
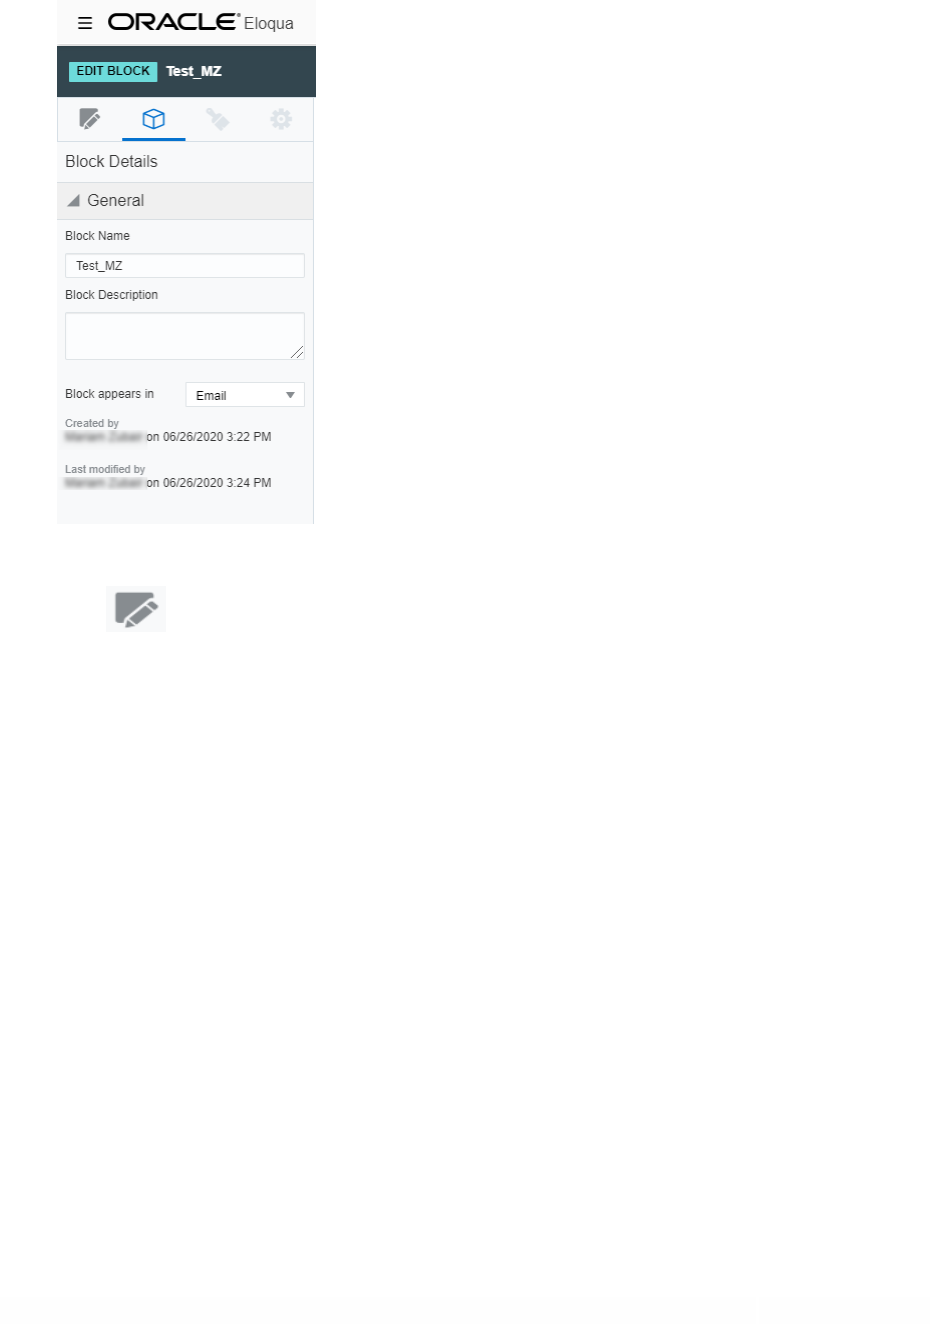
The Block Details tab opens on the left.
3. You can modify the following settings from the Block Details tab:
l
Block Name: Enter a new name for the content block.
l
Block Description: Enter a description for the content block.
l
Block appears in: Choose whether you want the block to appear in an email, landing page, or
both.
l
ëNote: If a signature rule, form, or carousel is present, the option to select where the
block appears in will be disabled. Only generic content can be shared across both email and
landing page.
©2024 Oracle Corporation. All rights reserved
42 of 104
View-only information such as Created by and Last modified by are also displayed here
along with the date and time stamps.
4.
Click if you want to add new content components or layout containers to your block.
You can also edit each individual content component such as an image or text in the existing
block by clicking on it directly, just like you would for any emails or landing pages.
When you are editing a block, it will show the text and color defaults saved from
the original block. However, the default styling will change once the block is
added to a new email or landing page.
©2024 Oracle Corporation. All rights reserved
43 of 104
ëNote: You can add a maximum of 3 layout containers for each content
block.
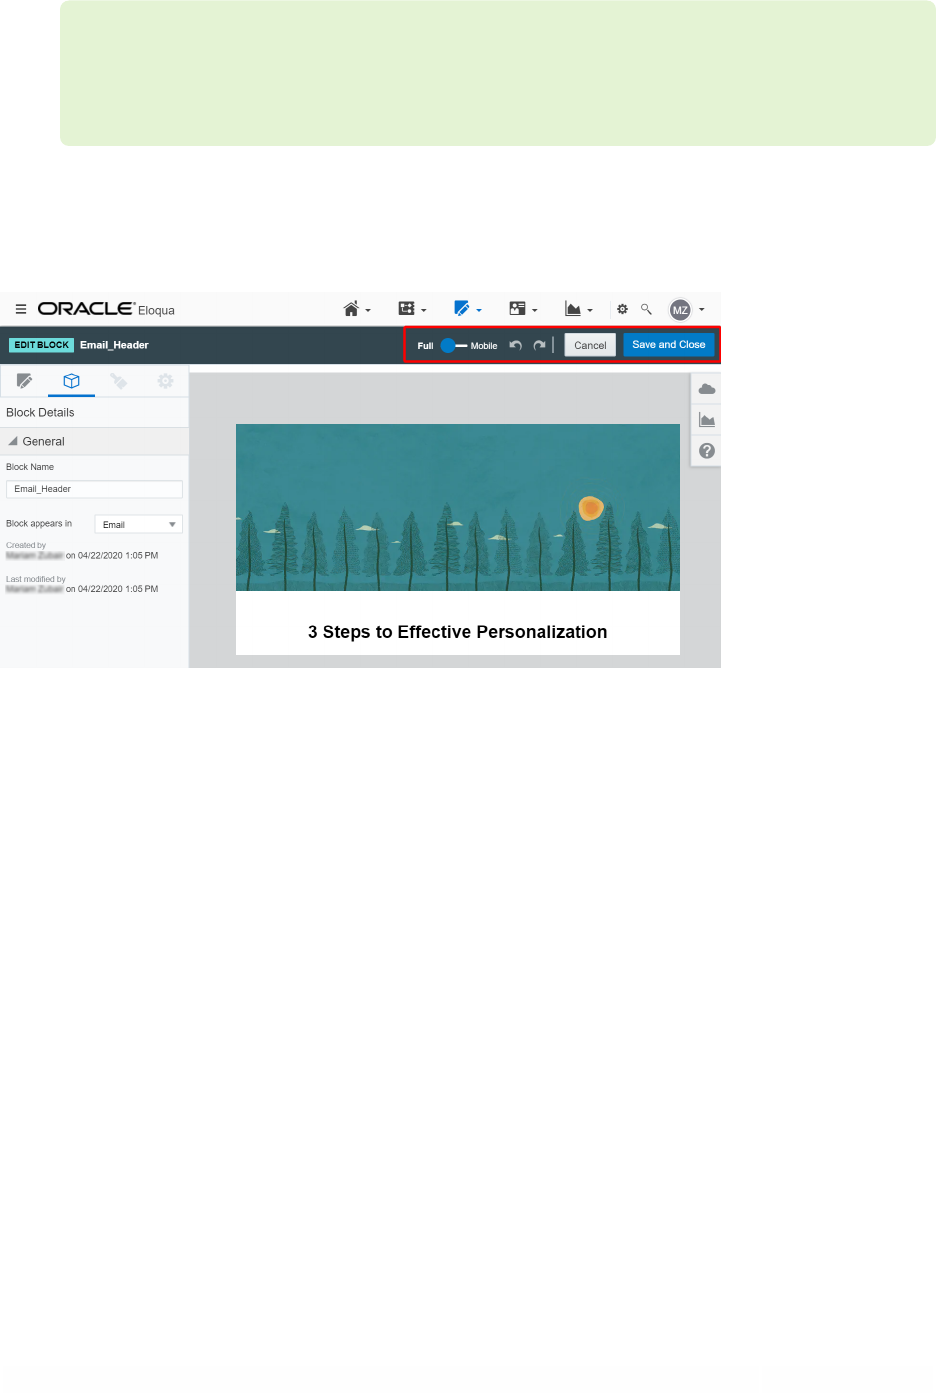
5. There are additional settings available on the top right of the editor:
l
Switch between Full and Mobile views.
l
Use the arrow buttons to undo and redo your changes.
l
If you click Cancel, a dialog will prompt you to save. To save your changes, click Save. To
return to the original content block and undo your changes, click Don't Save. To return to
the editor and continue editing, click Cancel.
l
When you are done editing, click Save and Close to save your changes.
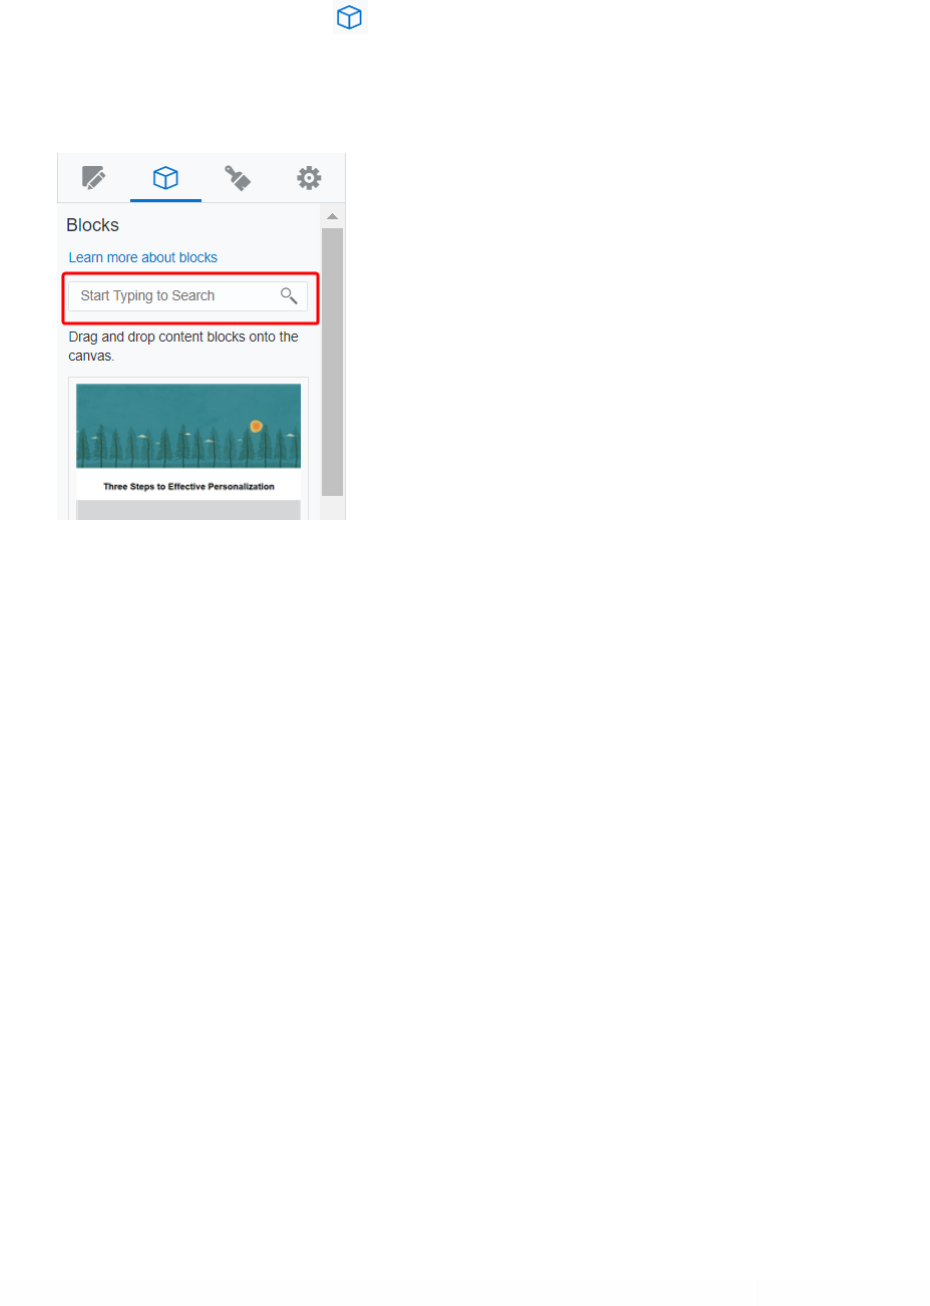
Searching for a content block
All content blocks are listed in alphanumeric order in the Blocks tab. You can narrow
down the list using the search functionality.
©2024 Oracle Corporation. All rights reserved
44 of 104
To search for a content block:
1.
From the Design Editor, click to navigate to the Blocks tab.
2. Enter a name or keyword in the search field to find the content blocks you are looking for.
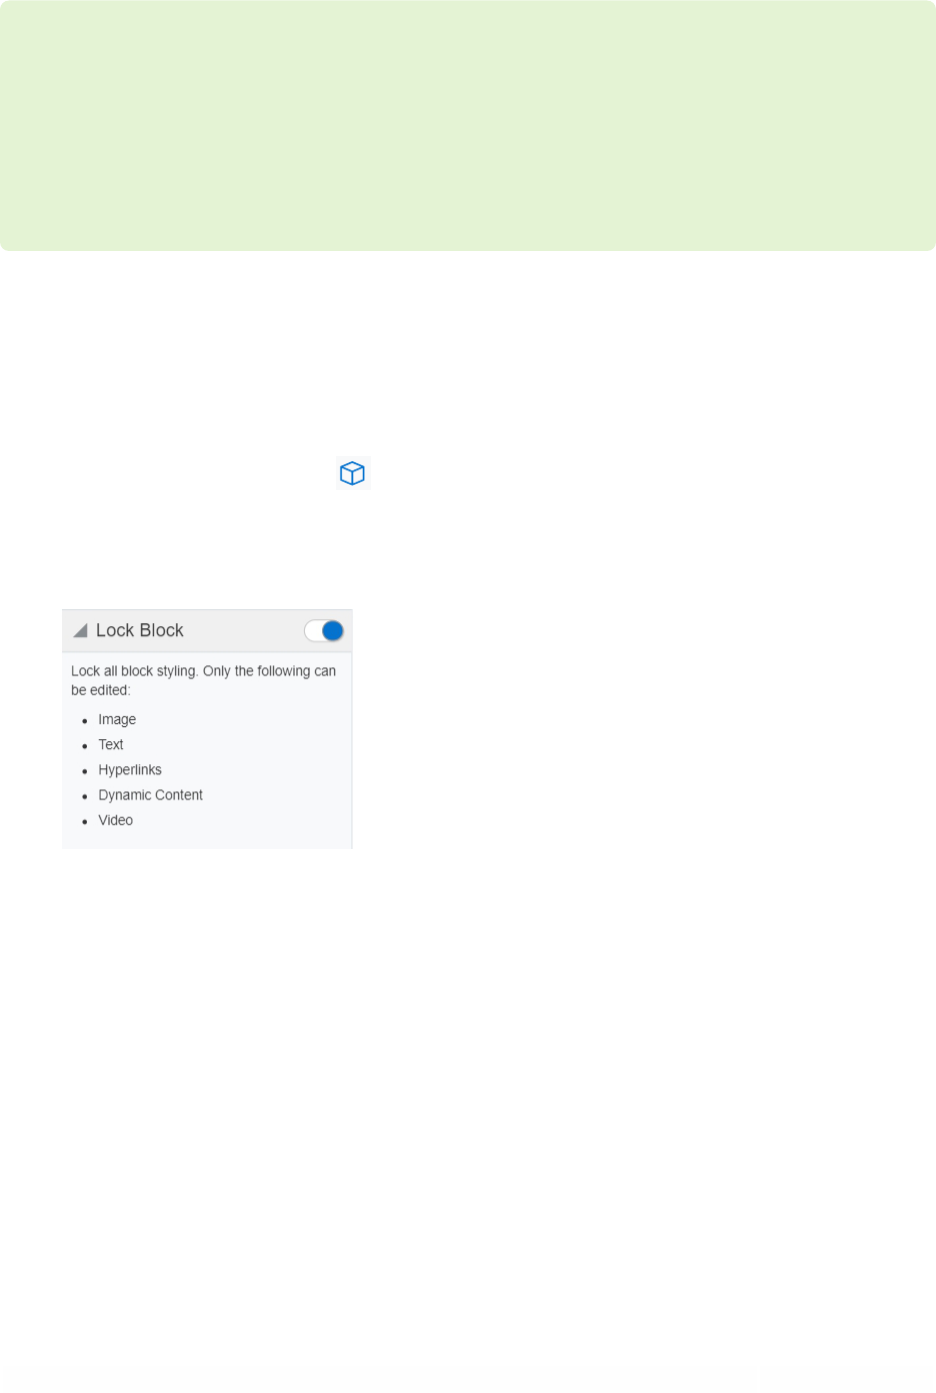
Locking a content block
Content Blocks are unlocked by default, but you can lock all styling changes and make
certain components uneditable. Once you have locked a block, you can only edit
images, text, hyperlinks, dynamic content, videos, and carousels (for landing pages)
without changing styling, such as colors, background, alignment, or column width.
This allows you to use content blocks while still enforcing brand compliance and
simplify content creation. All other components will be locked and can only be edited if
the content block is unlocked again. Once a locked block is added to an email or a
landing page it remains locked, even if the original block in the block library is
subsequently unlocked.
©2024 Oracle Corporation. All rights reserved
45 of 104
ëNote: Locked blocks are supported in Engage and styling restrictions are
respected. However, Locked blocks are not supported in the Oracle Eloqua Sales
Tools for the Microsoft Outlook add-in. Sales users will be able to edit the locked
block styling.
To lock a block:
1.
From the Design Editor, click to navigate to the Blocks tab.
2. Select Lock Block.
3. Click Save and Close to save your changes and close the content block.
4. Once it is locked, a lock symbol will display on the content block as shown in the following
image:
©2024 Oracle Corporation. All rights reserved
46 of 104
5. You can easily unlock a block by clicking Edit and disabling the Lock Block feature.
Deleting a content block
To delete a content block:
1.
In the Blocks tab, locate the content block you want to delete and click .
2. Select Delete.

©2024 Oracle Corporation. All rights reserved
47 of 104
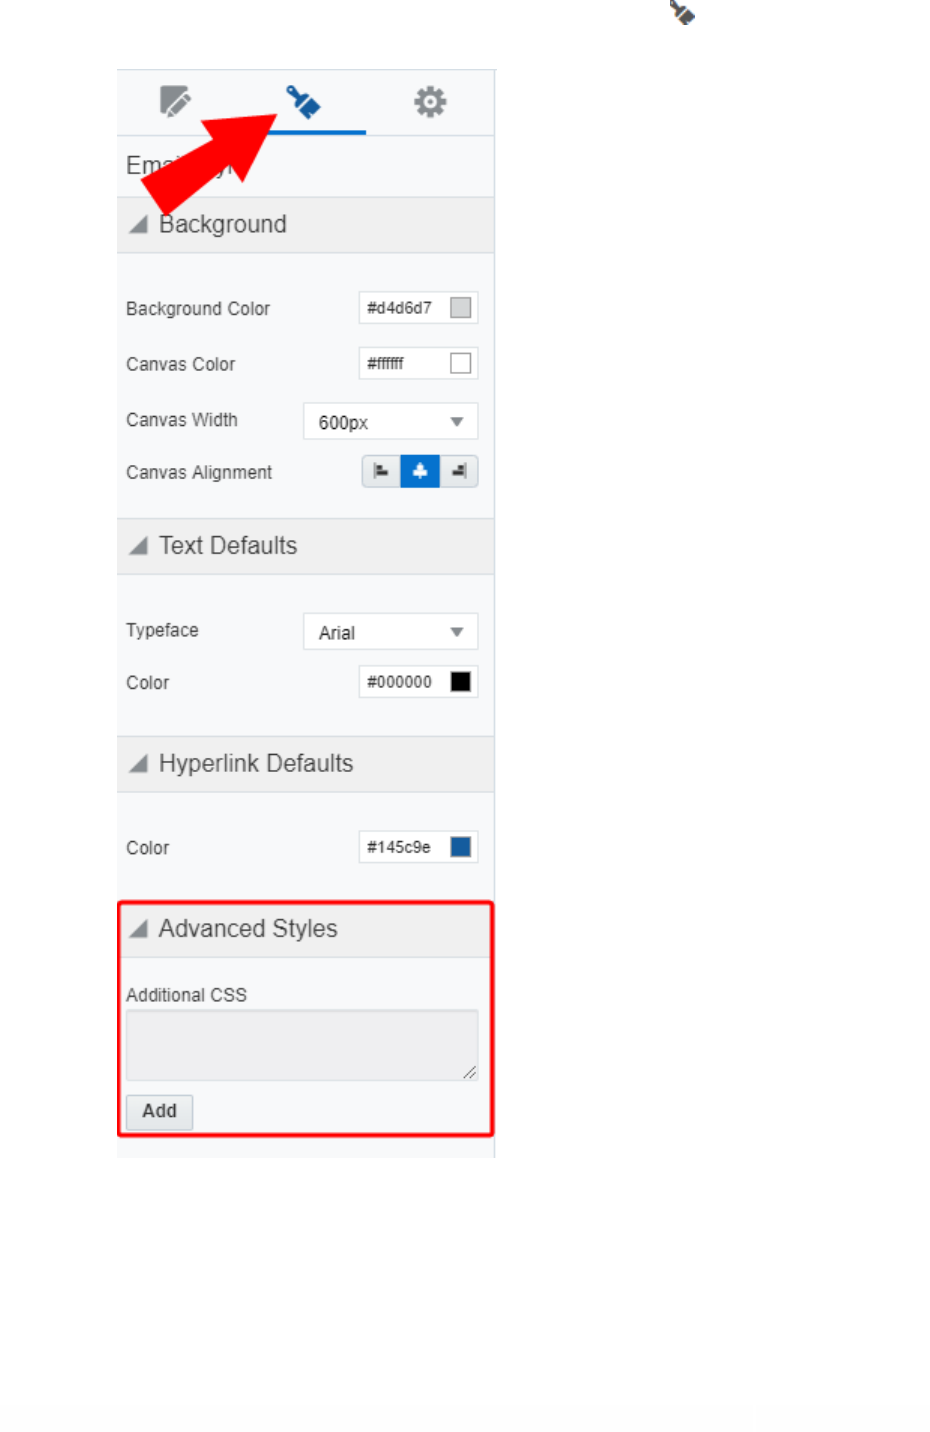
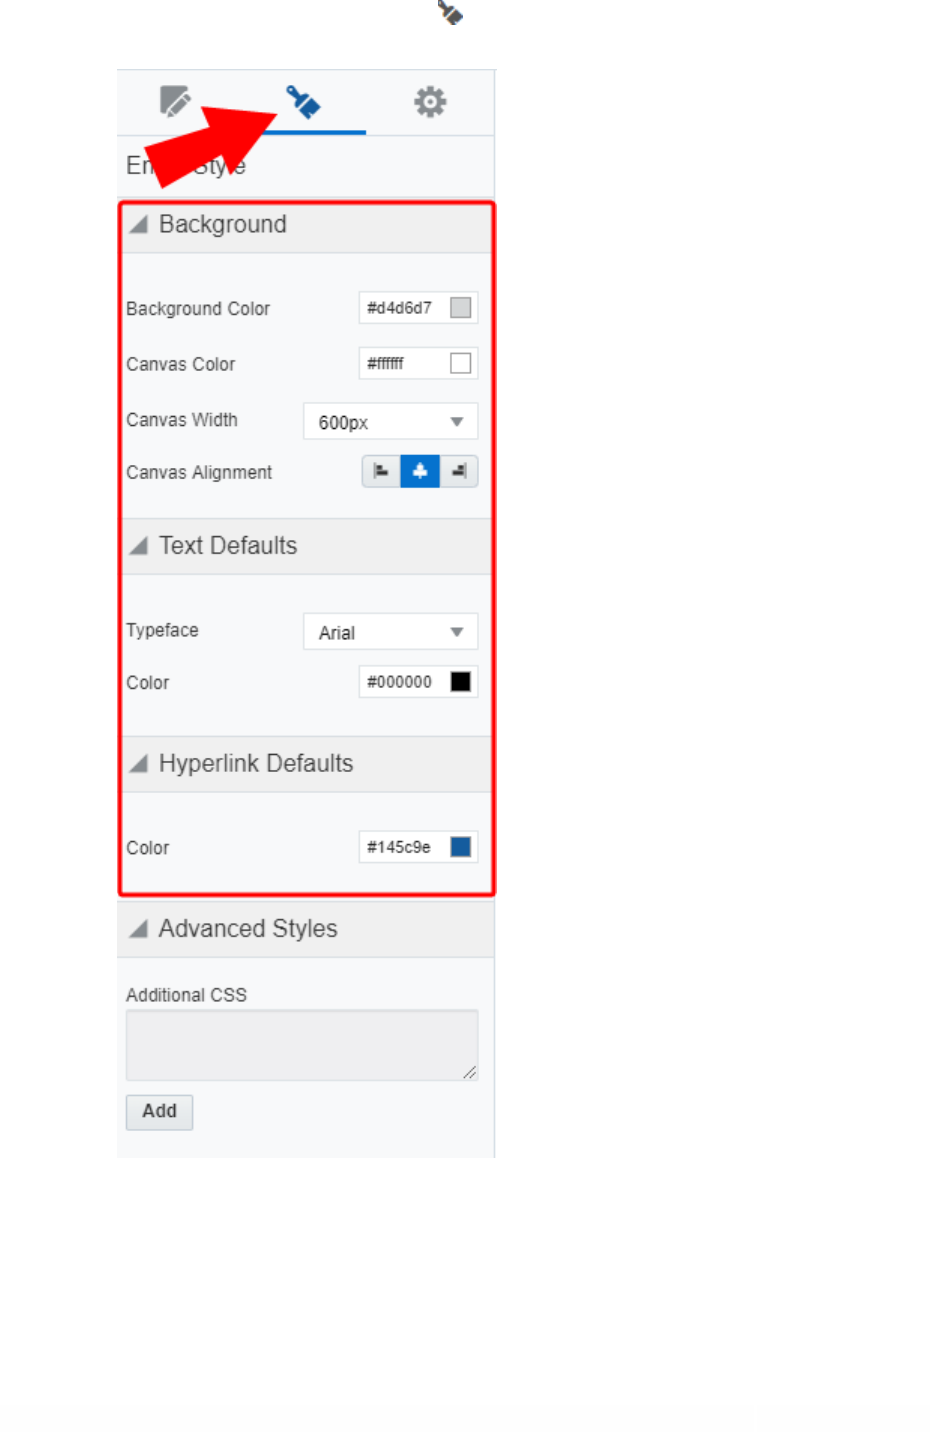
Landing page styling in the Design Editor
It's easy to style your landing pages to create a unique look and feel using the Design
Editor. Using the Style tab, you can quickly set a background image or video, text
and hyperlink defaults, and add custom CSS.
©2024 Oracle Corporation. All rights reserved
48 of 104

©2024 Oracle Corporation. All rights reserved
49 of 104
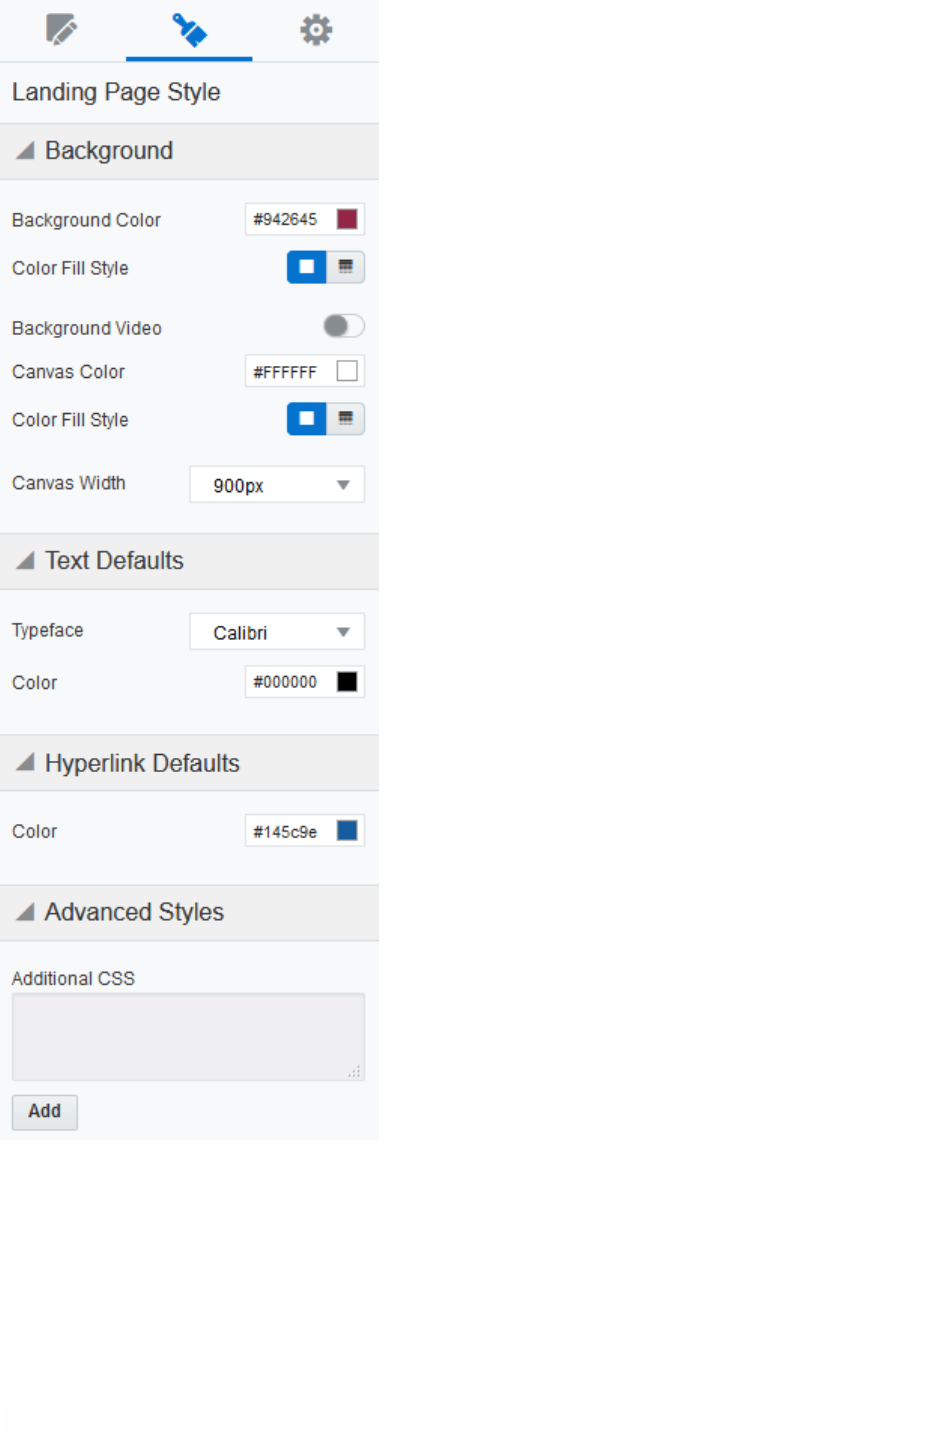
Background
Select abackgroundcolor for your landing page and the canvas area. Flat and
gradient options are available. You can also select a video to play in thebackgroundby
providing aURL. The video URL must be a direct link to the hosted video. YouTube or
Vimeo URLs will not work. The video link is validated for HTTPS as most browsers do
not render videos from unsecure links. When avideois present, the
colorbackgroundrests behind it. If thevideofails to play, the color will simply show
instead.
Select your canvas width from the available options: 600px, 756px, 900px, 1080px,
1320px, and 100% of the full browser width.
Text Defaults
Set your default font and color. These are applied automatically to any new text on
your landing page, and existing text that has not been customized. Additionally, these
styles are applied to any text in the Form content block.
Hyperlink Defaults
Set your default hyperlink color. This is applied to any new hyperlinks on your landing
page, and existing hyperlinks that have not been customized.
Advanced Styles
Add CSS to further customize your landing page. For example, you may want to add
your own web font to your landing page. CSS added in the CSS code block will

©2024 Oracle Corporation. All rights reserved
50 of 104
automatically render in the editing canvas, so that you can see how your CSS is being
applied without having to toggle between preview and edit mode.
Learn more by watching this video!
Adding an image carousel in the Design Editor
Using the landing page Design Editor, you can add image carousels to your landing
pages. The carousel cycles through up to 5 images. With a responsive design, the
images will be resized for desktop and mobile.
To add an image carousel to your landing page:
1. Open an existing landing page or create a new one.
2. In the Design Components tab, drag the Carousel content block to the desired layout cell.
3. Click the Carousel content block to select it.
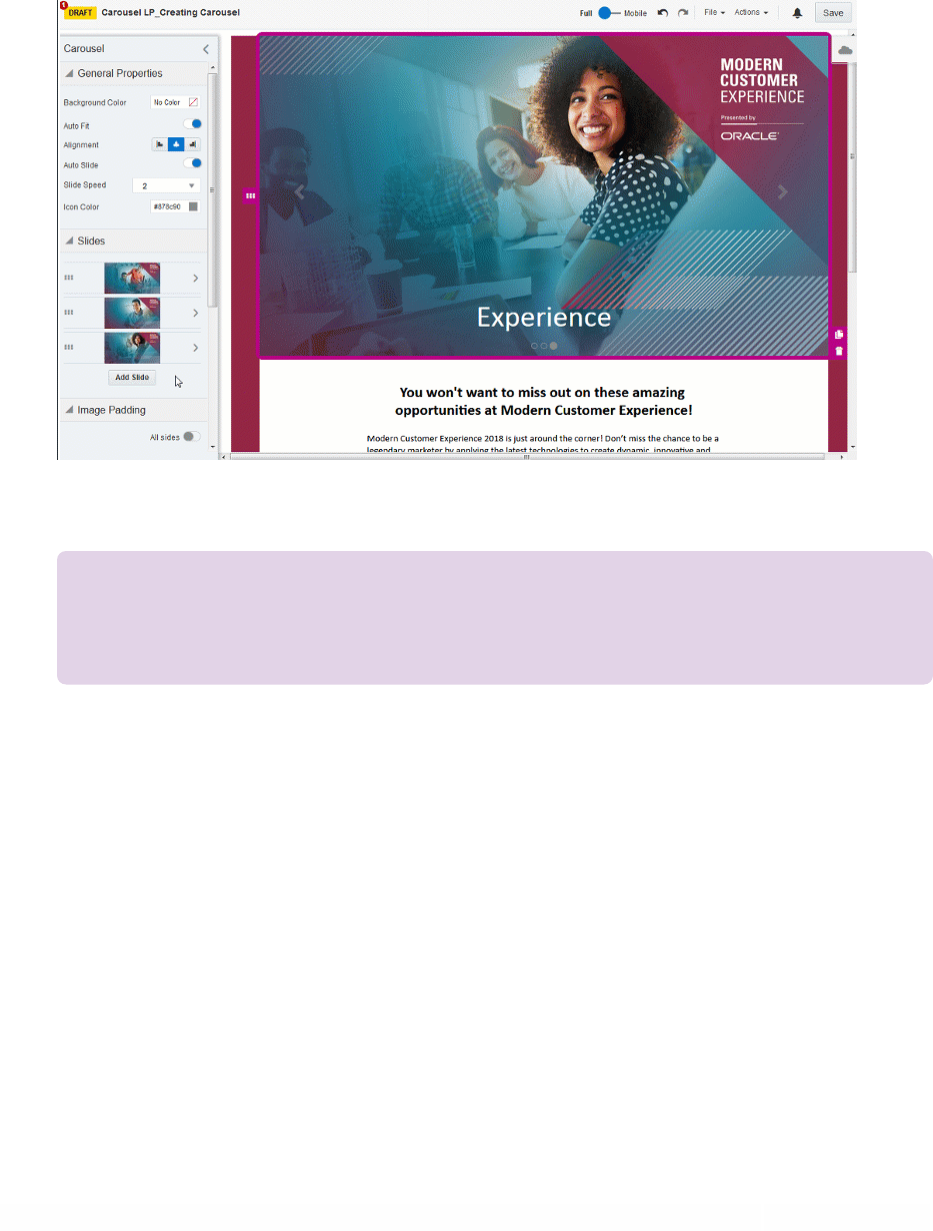
©2024 Oracle Corporation. All rights reserved
51 of 104
4. Click Add Slide in the left panel to add up to 5 images.
l
Click Browse to select an image from the Oracle Eloqua image library.
l
Click Upload to select an image from your machine.
l
Rearrange the images by dragging and dropping them in the desired order.
¤ Tip: The Browse and Upload options are also available by clicking on the carousel
block on the landing page canvas.
5. Customize the carousel content block by modifying the background color, alignment,
padding, and borders. Set your slide speed from 1-10 seconds. Learn more about working
with contents and layouts.
6. In the Slides section, click each image to add alt text, a hyperlink, or caption. You can also
replace or delete the slide using this menu.
7. Click Save.
©2024 Oracle Corporation. All rights reserved
52 of 104
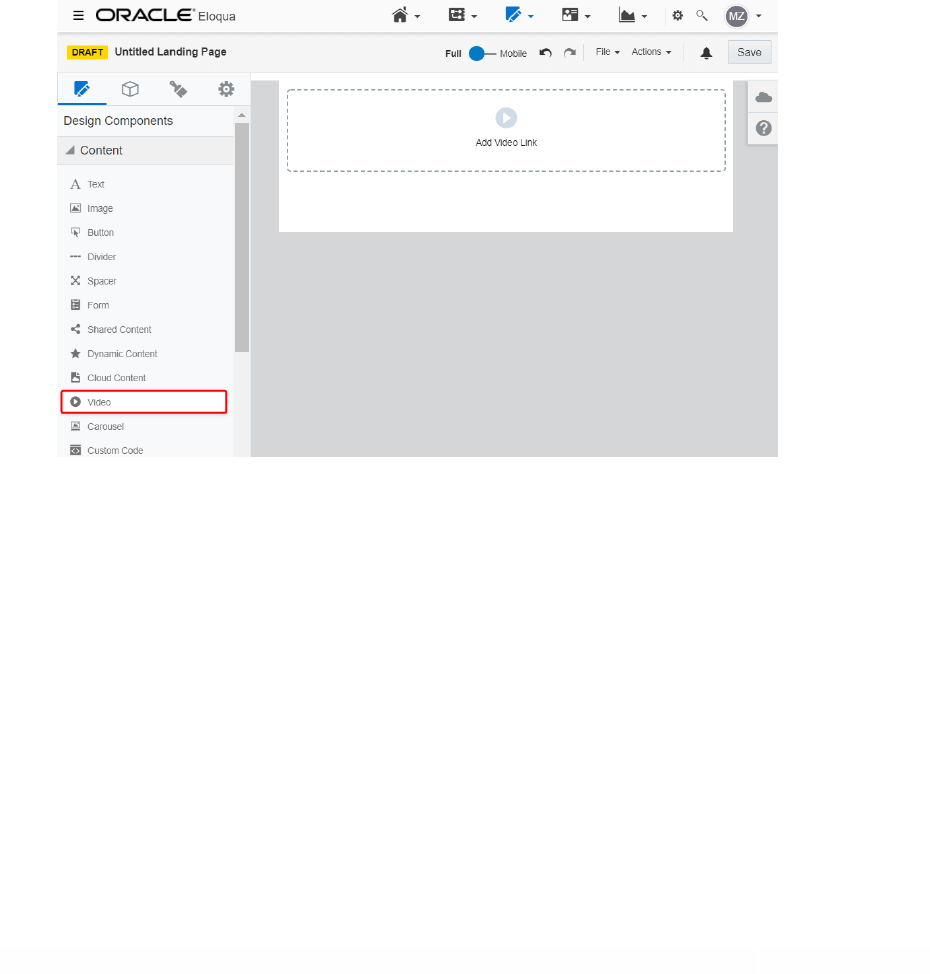
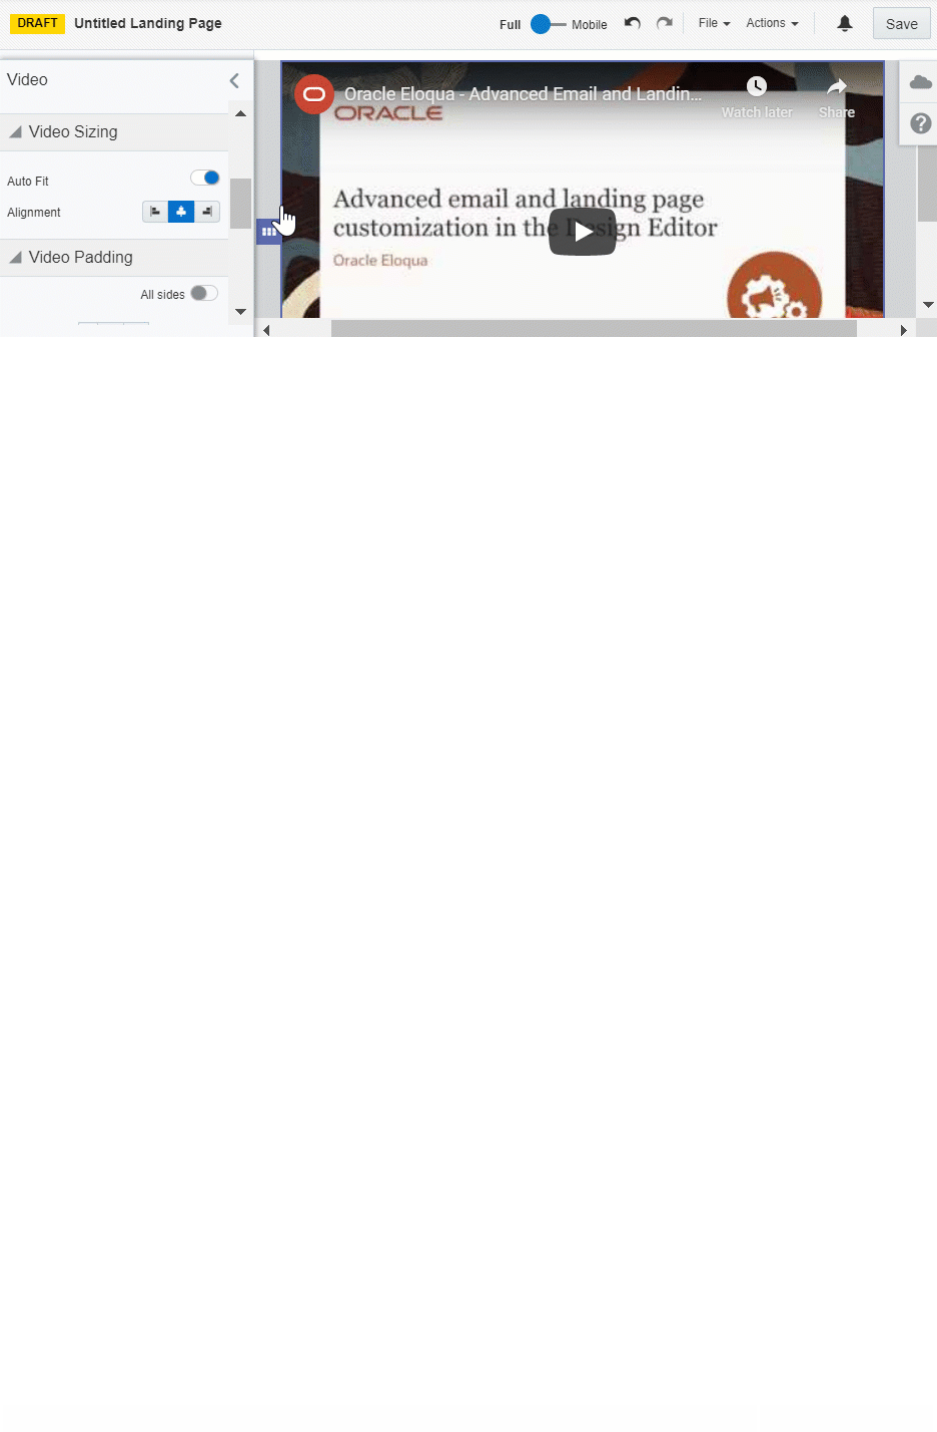
Adding a video to landing pages in the Design Editor
You can embed Vimeo or YouTube videos natively to your landing page to better
engage users and share rich media content.
To add a video using the Design Editor:
1. Drag the video content component onto the canvas.
2. Click Add Video Link.
3. Paste your video's URL in the Video Link field.
4. When you paste your video link, the following General Properties display:
l
Alt text: Alternate text allows you to describe your video for recipients that have videos blocked or
turned off.
l
Autoplay: Plays the video automatically when the user scrolls to it on the landing page.
©2024 Oracle Corporation. All rights reserved
53 of 104
l
Loop: Repeatedly replays the video without pausing.
l
Background Color: Allows you to select a custom background color for your video.
Sizing and Alignment
Use the Video Sizing options available from the Video panel to change the video
alignment or to scale the video.
l
Auto Fit: Enabling Auto Fit allows you to adjust the video height and width proportionality to
fit the entire content component.
l
Scale: If you turn off Auto Fit, you can manually scale the width of the video by percentage.
l
Alignment: Lets you align the video to the right, center, or left of the content component.
©2024 Oracle Corporation. All rights reserved
54 of 104
Padding and Borders
Adjust the padding and borders around the content component using the options
available from the Video panel. Learn more about padding and borders.
Adding a form in the Design Editor
Using the landing page Design Editor, you can easily insert Oracle Eloqua forms in
your landing pages. The form's styling, such as field spacing and background color,
can be customized in the Design Editor to match the rest of your landing page. Oracle
Eloqua forms will be automatically responsive.
To add a form to your landing page:
1. Open an existing landing page or create a new one.
2. In the Design Components tab, drag the Form content block to the desired layout cell.
3. Click the Form content block to select it.
4. Click Browse and select the form you want to add.

©2024 Oracle Corporation. All rights reserved
55 of 104
5. Customize the form content block by modifying the background color, alignment, font,
padding, and borders. You can also replace or delete the form using this menu. Learn more
about working with contents and layouts.
6. Click Save.
Hide landing pages using the Design Editor
You can hide a landing page from Oracle Eloqua visitors. For example, you may want
to hide a page after an event completes or you are drafting a landing page and are not
ready to make it publicly available.
Here are the options available:
l
Visibility setting - Change the visibility of the page
l
Expiry setting - Set an expiry date for the landing page
Changing the landing page visibility
After you change the visibility of a landing page, note the following:
l
The landing page remains available in Oracle Eloqua and no dependencies are impacted.
l
You can no longer access the landing page from its URL. A message displays instead
indicating the page is unavailable.
l
You cannot change what is displayed to a landing page visitor in place of the landing page.
To change the visibly of a landing page in the Design Editor:
©2024 Oracle Corporation. All rights reserved
56 of 104
1.
Navigate to Assets , then click Landing Pages.
2. Open the landing page you want to change.
3.
Click .
4. In the Advanced Settings section, toggle the Externally Visible option off. When the setting
is off, the page is only visible within Oracle Eloqua.
5. Choose the redirect option from the Redirect Settings section:
l
None: No redirect occurs.
l
Automatically Redirect: Redirect the user to a new page. You can specify how many seconds
before redirecting the visitor. The redirect will continue to work if you disable the Externally Visible
option.
l
Automatically Close Window: No redirect and the browser window closes. You can specify how
many seconds before closing the window.
6. Click Save and save your changes.
After you finish: You can make the page externally visible again by toggling the
option on.

©2024 Oracle Corporation. All rights reserved
57 of 104
Setting an expiry date for a landing page
Before you begin:
l
After the landing page expires, visitors are redirected to the URL you provide.
l
Your expiry schedule includes a time zone setting.
To set an expiry date of a landing page in the Design Editor:
1.
Navigate to Assets , then click Landing Pages.
2. Open the landing page you want to change.
3.
Click .
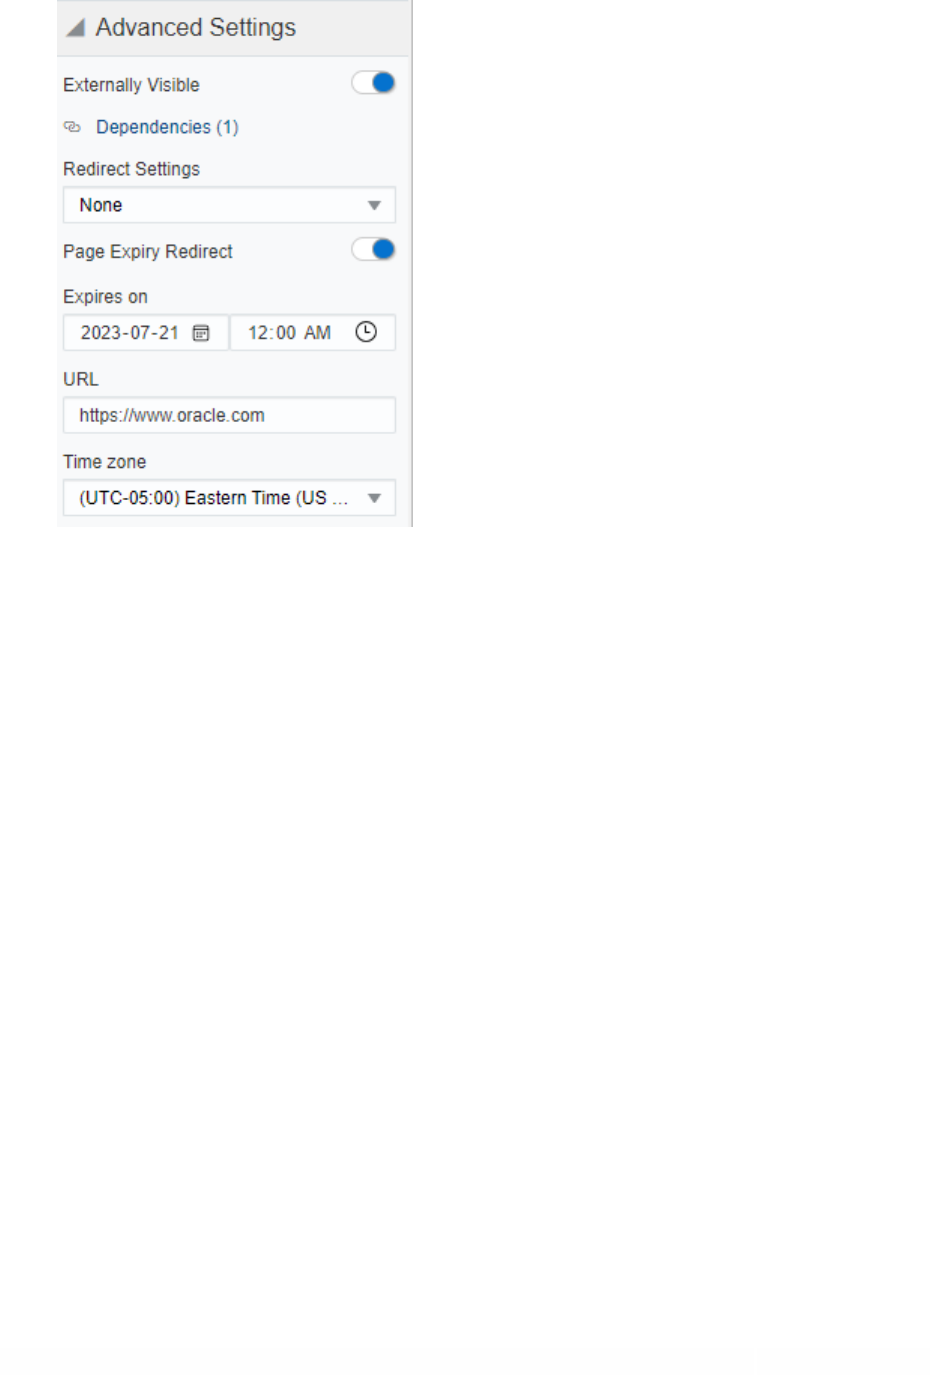
©2024 Oracle Corporation. All rights reserved
58 of 104
4. In the Advanced Settings section, toggle the Page Expiry Redirect option on.
5. Set the Expires on date and time.
6. Enter the URL to redirect to after the page expires.
7. Choose the Time zone for the expiry date and time.
8. Click Save and save your changes.
Customizing Design Editor emails and landing pages with
CSS
CSS can be used to heavily customize the layout of emails and landing pages.
Standalone CSS classes allow for more flexibility with email and landing page designs,
and custom styles in the Design Editor. Custom CSS will be reflected immediately in

©2024 Oracle Corporation. All rights reserved
59 of 104
the editing canvas. It's best practice to confirm your styling in preview mode as well as
testing live.
In this topic, you'll learn about:
l
Class names
l
Sample code
l
Things to consider
Learn more by watching this video!
Class names
Use these classes to identify the parts of your email or landing page that you would
like to customize.
Design Editor Element Class Name Description
Text .elq-text-cell This class targets the text in text
cells.
Images .elq-image-cell This class targets image cells.
Button .elq-button-cell This class targets button cells.
Shared rules/signature
rules
.elq-external-cell This class targets both shared
content and signature rules.
Divider line .elq-divider-cell This class targets divider cells.
Dynamic content .elq-dynamic-content-cell This class targets dynamic
content cells.
Cloud content .elq-cloud-cell This class targets cloud content
cells.
Spacers .elq-space-cell This class targets spacer cells.
Custom code cells .elq-code-cell This class targets custom code
cells.

©2024 Oracle Corporation. All rights reserved
60 of 104
Design Editor Element Class Name Description
Cells by location .row
.col
.cell
Target specific rows, columns,
and cells.
Sample code
See the following design goals and the corresponding example code samples to
achieve these goals:
Goal Code Sample
Adding
a
webfon
t
@font-face {
font-family: 'Roboto Slab';
font-style: normal;
font-weight: 400;
src: local('Roboto Slab Regular'),
local('RobotoSlab-Regular'),
url
(https://fonts.gstatic.com/s/robotoslab/v8/BngMUXZYTXPIvIBgJJSb6uf
A5qWr4xCCQ_k.woff2)
format('woff2');
unicode-range: U+0460-052F, U+1C80-1C88, U+20B4, U+2DE0-2DFF,
U+A640-A69F, U+FE2E-FE2F;
}
@import url('https://fonts.googleapis.com/css?family=Roboto+Slab');
Style
Header
.elq-text-cell h1 {

©2024 Oracle Corporation. All rights reserved
61 of 104
Goal Code Sample
s 1-6
color: red;
text-decoration: underline;
}
Style
bullets
and
number
ed lists
in text
cells
Unordered list:
.elq-text-cell ul {
color: #666666;
font-weight: bold;
}
Ordered list:
.elq-text-cell ol {
color: #444444;
font-weight: normal;
}
Linking
to
external
style
sheets
</style>
<link href="http://exampledomain.com/mystyles.css" rel="stylesheet">
<!-- here we are in html, so re-open the style to get back to CSS -->
<style>
Style
specific
cells
using
their
location
.row-0 .col-0 .cell-1 {
color: blue;
}

©2024 Oracle Corporation. All rights reserved
62 of 104
Goal Code Sample
The editor counts left-to-right, top-to-bottom.
Style
body
text in
every
text cell
.elq-text-cell > div > div {
font-family: 'Roboto Slab';
font-size: 1.3em;
}
Use both <div> elements, otherwise you will style all text in all cells.
Things to consider
l
Old Shared Content, Dynamic Content, Header, and Footer content components use the
<font> tag rather than <span>. Newly created component library assets will use the <span>
tag.
l
If you use the "em" unit inside the CSS block, it may be scaled up or down to the "px" fonts
that the <div> defaults have been overridden with by styles within the text cell itself.
l
Font size for Spacer and Divider cells is default coded to 0.
l
The default styles from the Styles tab, as well as other styles needed for consistent
rendering, are inserted into the document at the column level, via a style attribute.
©2024 Oracle Corporation. All rights reserved
63 of 104
l
Oracle Eloqua prioritizes CSS styling in the Design Editor as such:
1. Styles defined at the local cell level (when you click on a content component and configure it).
©2024 Oracle Corporation. All rights reserved
64 of 104
2.
Custom CSS (as defined in the Advanced Styles section in the Style panel).
©2024 Oracle Corporation. All rights reserved
65 of 104
3.
Global defaults (as defined in the Style panel).
©2024 Oracle Corporation. All rights reserved
66 of 104
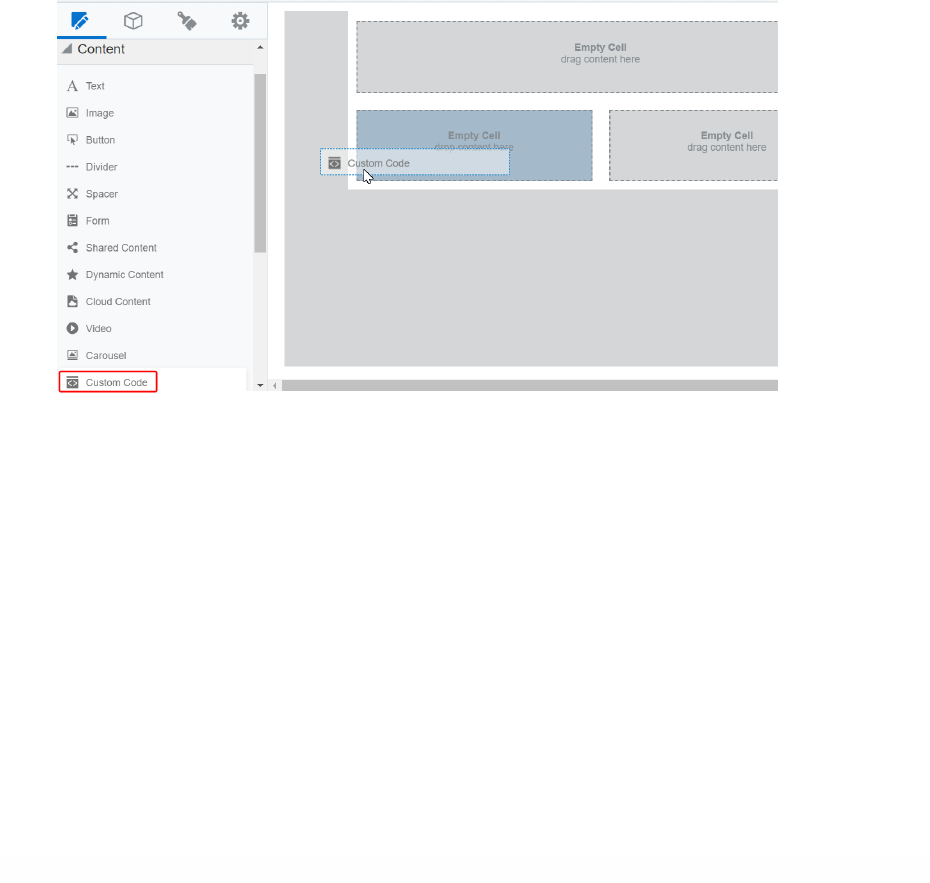
Customizing landing pages with HTML code in the
Design Editor
Add your custom HTML code to an Oracle Eloqua landing page using the Design
Editor. For example, you can use a code block to fully customize some of your landing
page's HTMLcode.
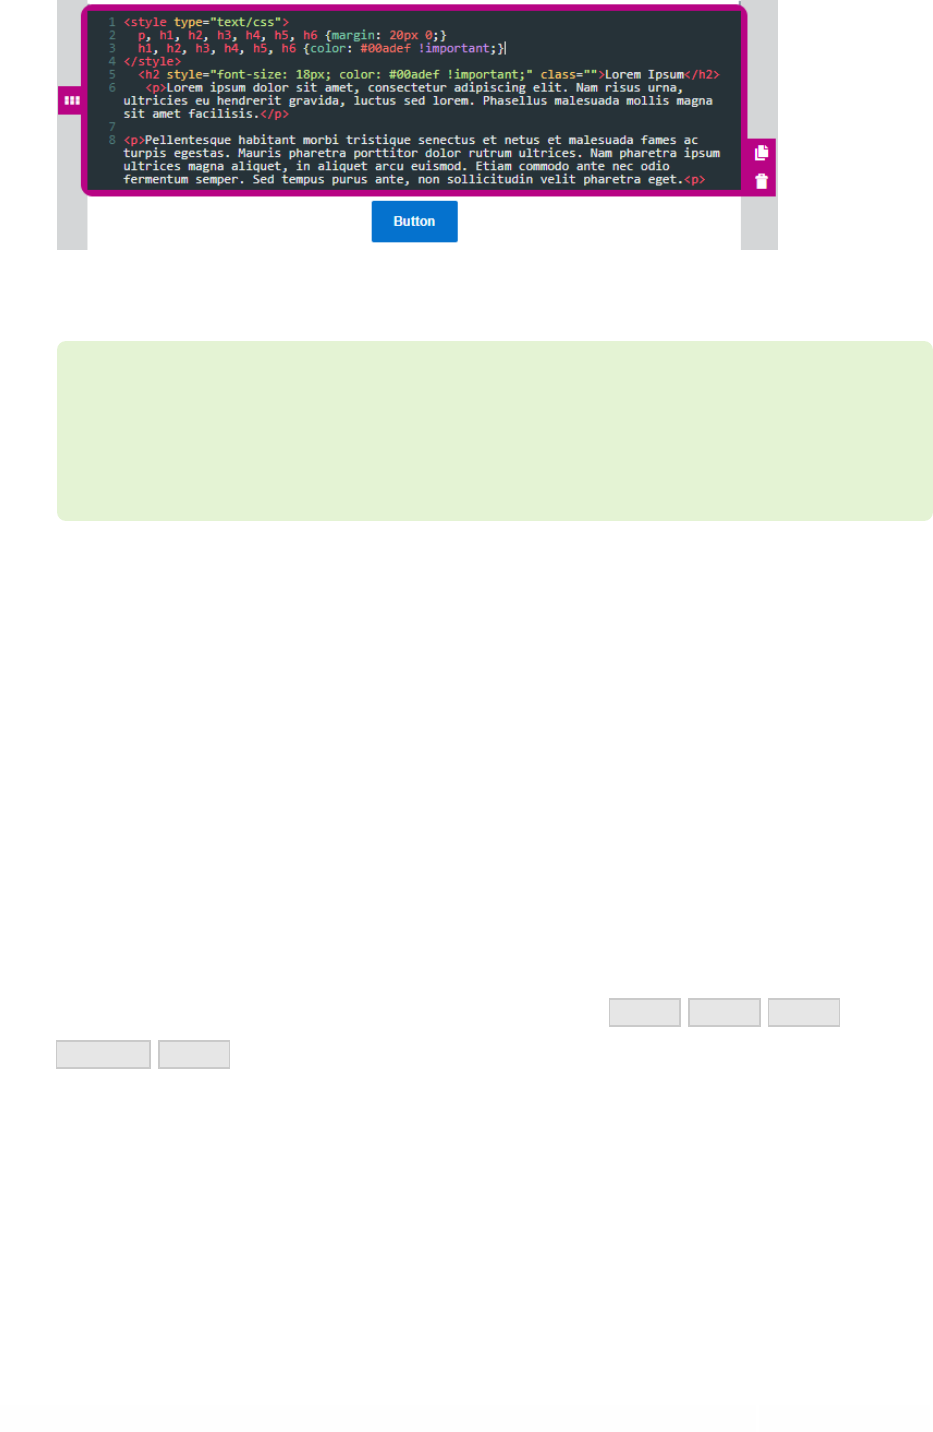
To add custom HTML code to your landing page:
1. With your landing page open, drag the code content to the layout.
2. Click the code block and use the HTML editor to add your HTMLcode. Use the Custom Code
panel to format the content block.
©2024 Oracle Corporation. All rights reserved
67 of 104
ëNote:You must click outside of the code block to preview your changes. If you
need a full feature editor, create an HTML landing page instead using the Source
Editor. Learn more about HTML landing pages.
HTML guidelines
The code content in the Design Editor is intended for snippets of custom HTML code.
If you need greater control over the landing page, you should use the Source Editor to
create an HTML landing page. Learn more about HTML landing pages.
Here are some guidelines for your HTML code:
l
Write HTML code that is standards compliant. For example, be sure to nest and close
elements correctly and use lowercase element names, attributes, and values.
l
Avoid using the following HTML elements in a code block: <html>, <head>, <body>,
<iframe>, <form>. The Design Editor does not support the use of some of these elements.
l
Be aware of reserved characters like <, >, and &. These characters make up the HTML
language. If you want them to appear in the content of your landing page, you must use the
entity name or number instead. For example <, >, and &.

©2024 Oracle Corporation. All rights reserved
68 of 104
l
To prevent CSS conflicts with Oracle Eloqua:
l
Avoid the following class names: .body, .ExternalClass, .button.
l
Always name classes to be applied to <table> elements. If you are using tables, note the potential
responsive issues below.
l
If your HTMLcode contains tables or long text strings, a notification appears in the
Design Editor. Tables and long strings can potentially cause responsive issues, preventing
content from adapting to different screen sizes. For landing pages, it's a best practice to use
<div> instead of tables. Oracle Eloqua doesn't prevent you from using a landing page with
these potential issues, but you should test your content on different screen sizes and
browsers.
Padding and borders
Adjust the padding and borders around the content block using the options available
from the Custom Code panel. Learn more about padding and borders.
Background color
Set the background color of the content block using the Custom Code panel. You can
set the color using hexadecimal or RGB values.
Previewing landing pages
Eloqua provides a rich suite of tools that you can use to build, preview, and test your
landing pages before you publish them. The preview feature lets you view your page
as your contacts will see it, including any field merges and dynamic or cloud content.
This way, you can be sure that the personalization features you've used in your
landing pages will display properly when a contact visits the landing page.
©2024 Oracle Corporation. All rights reserved
69 of 104
The preview window also lets you view the asset as it will display in a desktop/laptop
browser, on a tablet, or on a smart phone, letting you test responsiveness across
device types.
To preview a landing page:
1.
Navigate to Assets , then click Landing Pages.
2. Open an existing landing page, or create a new one.
3.
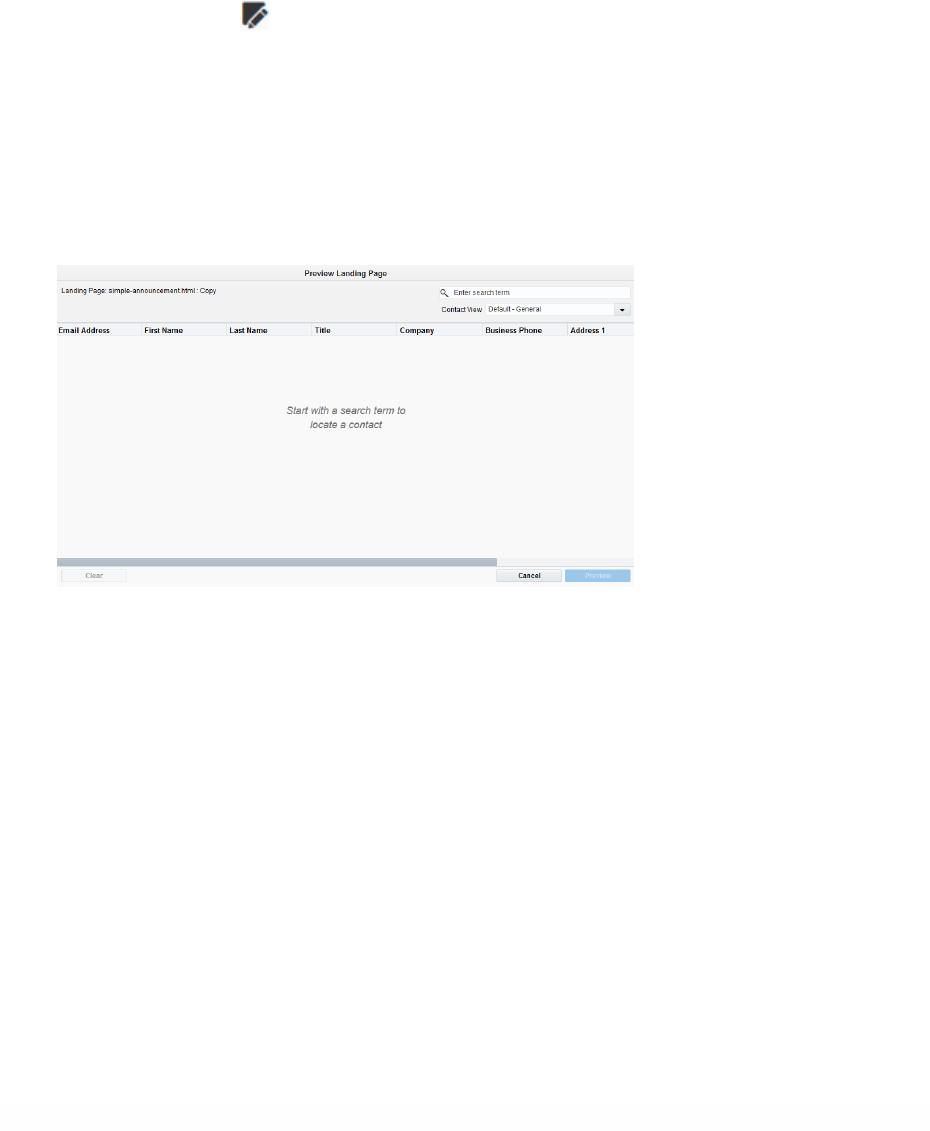
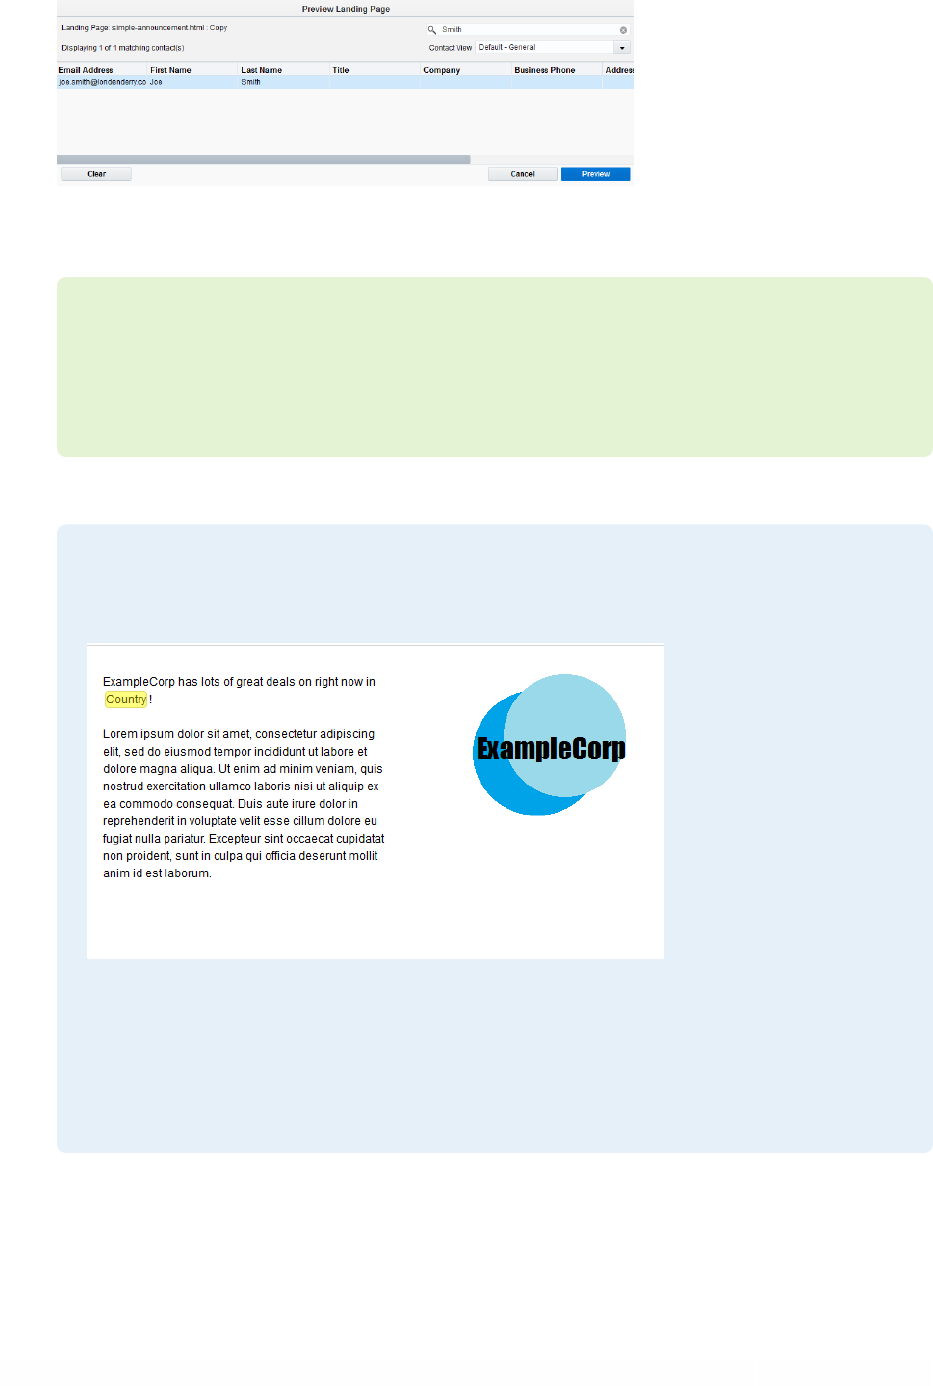
Click Actions, then select Preview to open the Preview Landing Page window.
4.
Search for the names of the contacts for whom you wish to see the preview. Select a contact
from the list then click Preview, the landing page preview opens displaying any personalized
content for the selected contact.
©2024 Oracle Corporation. All rights reserved
70 of 104
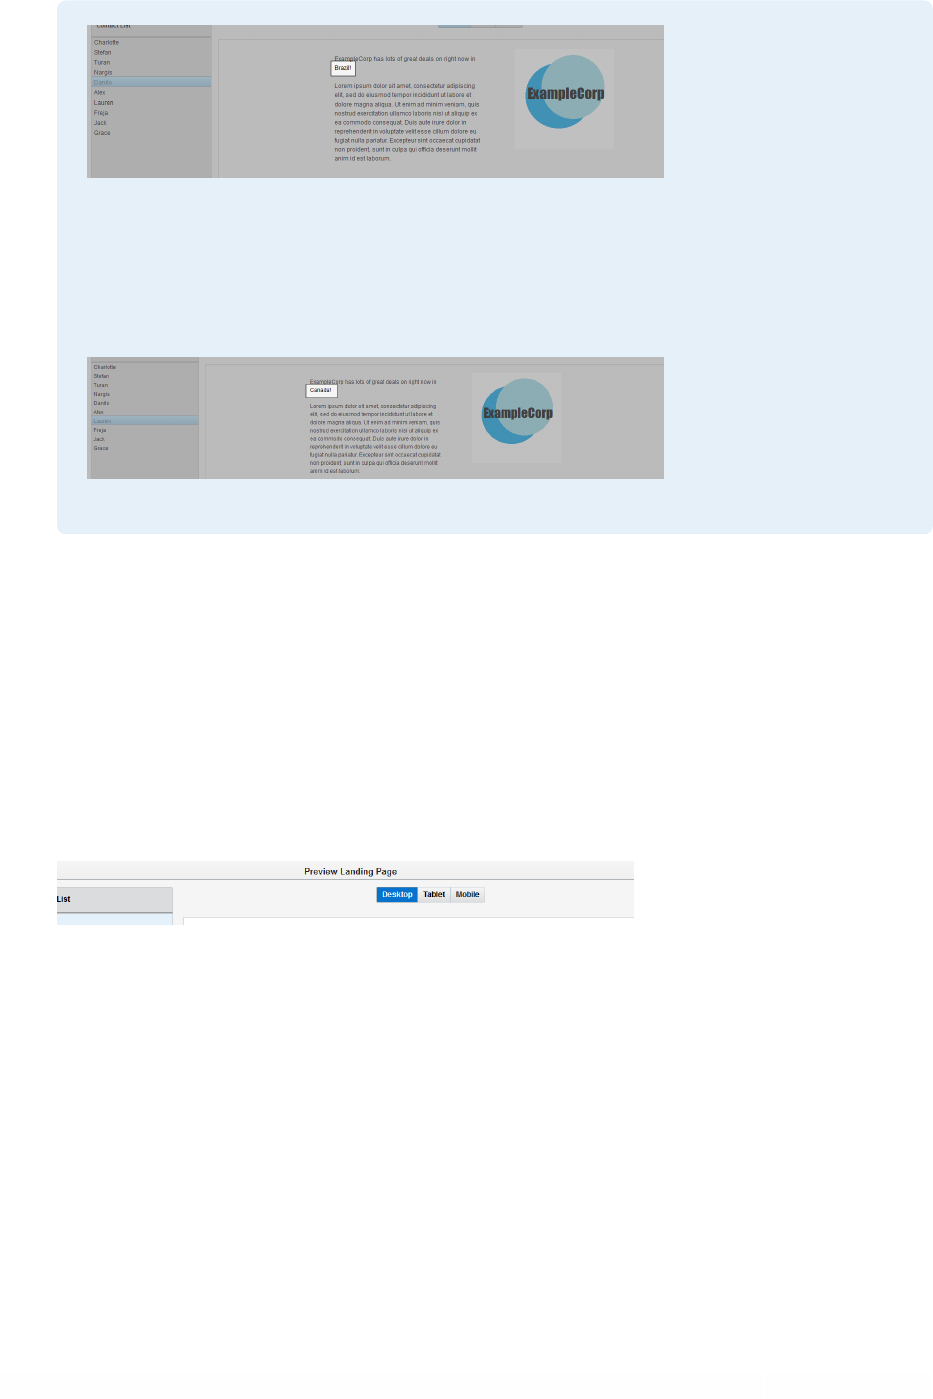
ëNote: You can select up to ten contacts by pressing the Ctrl or Shift key then
clicking the contacts on the list. You can then view the landing page for these different
contacts by clicking their names in the left-hand panel.
-Example: This landing page includes a field merge for the contact's country.
Danilo is located in Brazil
©2024 Oracle Corporation. All rights reserved
71 of 104
Lauren is located in Canada:
5.
Click Desktop, Tablet, or Mobile, at the top of the preview window to view the landing page
as it will display on different devices. Here you can ensure that any responsive features are
behaving as expected, you can click the rotate icon in the upper left-hand corner of the
window to view the landing page in both portrait and landscape form in the tablet and
mobile views.
6. Click Cancel to close the preview window when you are done.
©2024 Oracle Corporation. All rights reserved
72 of 104
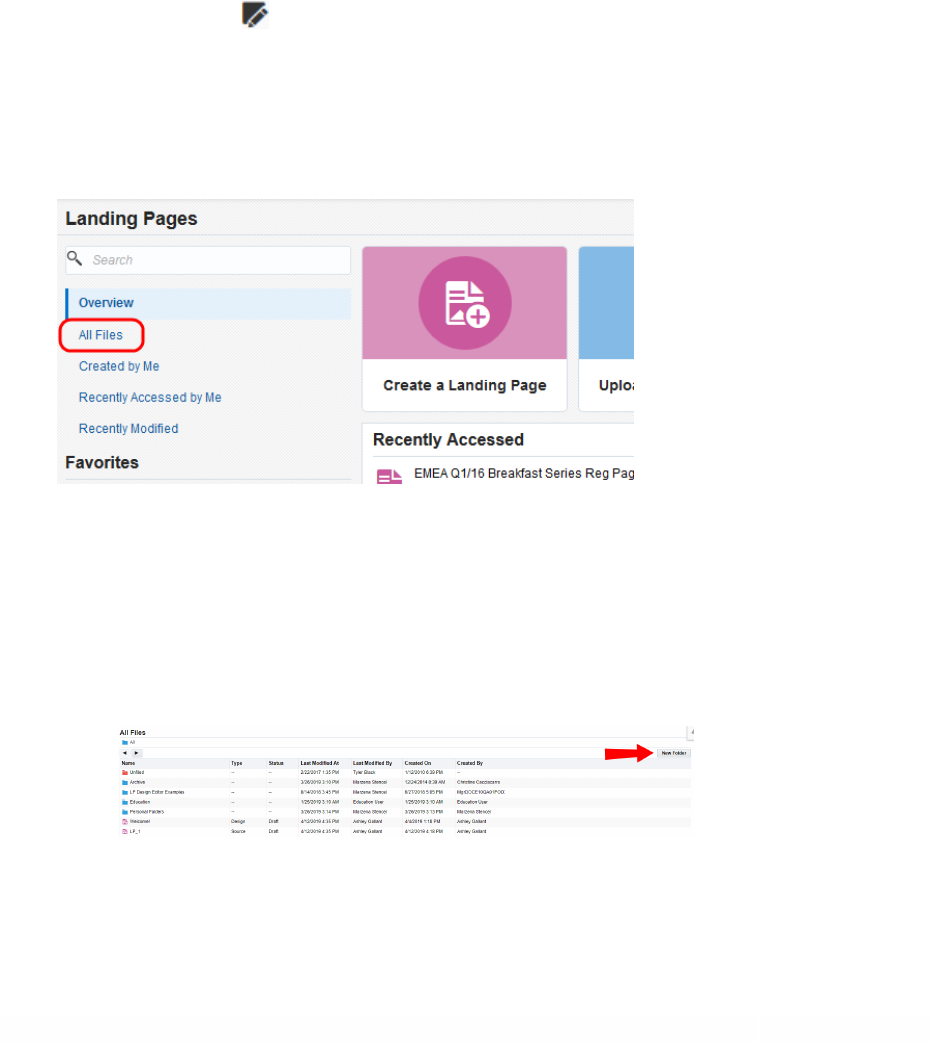
Creating folders for landing pages
You can create different folders in which to store similar landing pages, this makes it
easier to locate the landing page that you need, when you need it.
To create a landing page folder:
1.
Navigate to Assets , then click Landing Pages.
2.
Click on All Files on the left side menu to bring up a list of all currently existing folders and
files available to you.
3. (Optional) Click on a folder to navigate into a sub-folder location.
4.
Do one of two things:
l
Click New Folder in the upper-right corner.
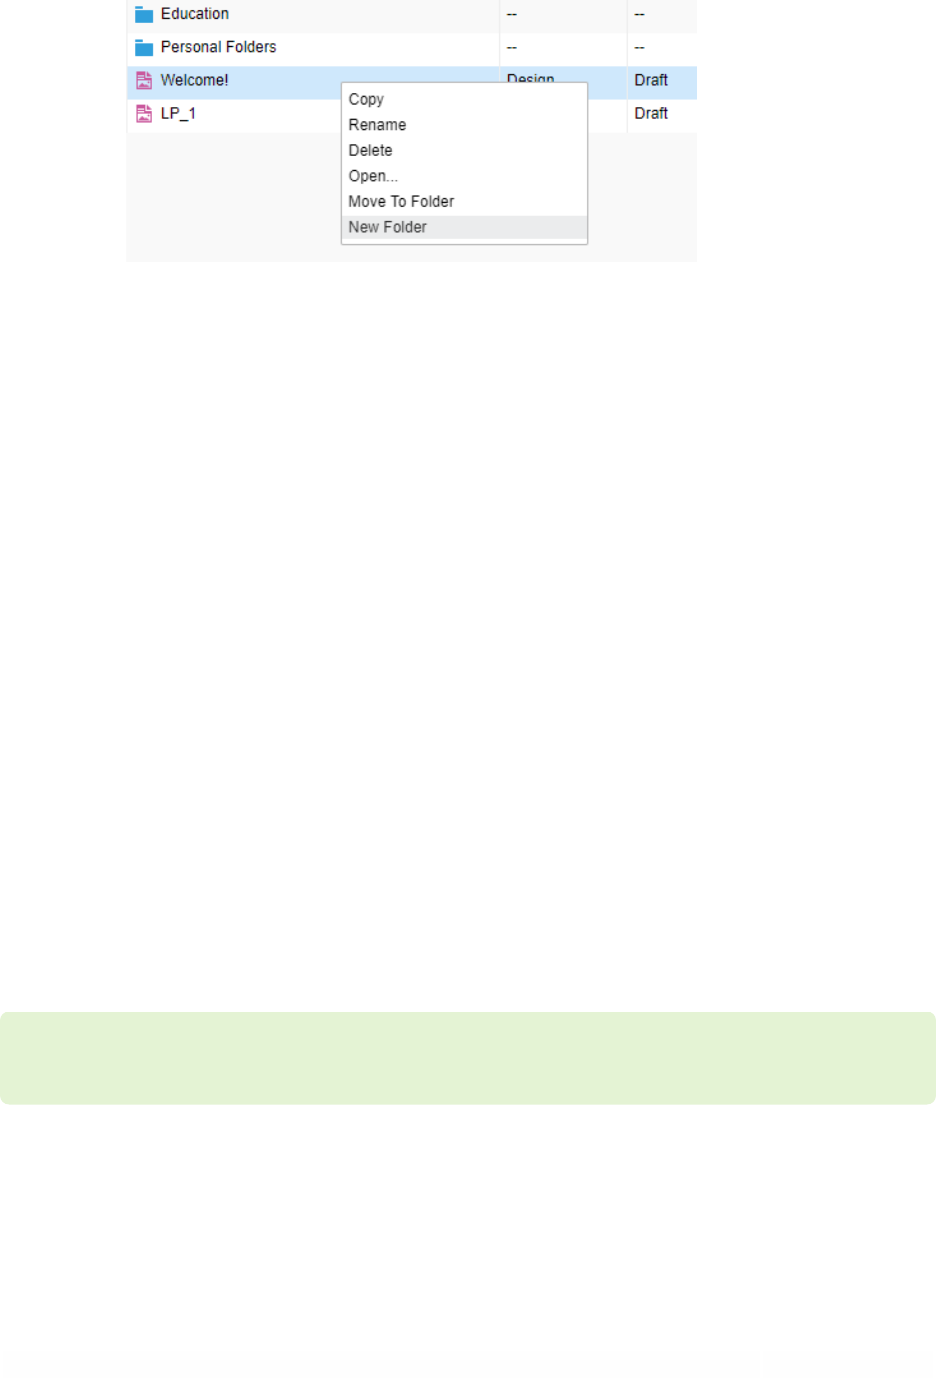
©2024 Oracle Corporation. All rights reserved
73 of 104
l
Right-click any file or folder, then select New Folder.
A new folder titled Untitled Folder is created at the top of the list.
5. Right-click the new folder, then select Rename.
6. Type in a new name, then press Enter.
You now have a new folder in which to keep landing pages.
If you want to add any emails to the new folder, drag-and-drop existing files onto the
folder.
Editing landing pages in the Design Editor
You can update a landing page at anytime. This allows you to fix problems or add new
content.
ëNote:You cannot change the URL of an Active lading page.

©2024 Oracle Corporation. All rights reserved
74 of 104
To edit a landing page:
1.
Navigate to Assets , then click Landing Pages.
2. Open the landing page you want to change.
¤ Tip: Use the search to quickly find an asset in your instance. To search
for an asset which has a colon in the name, you must specify that you are
searching for the name of the asset. For example, to search for an asset
named events:tradeshow:march, type the following into the search field
name:"events:tradeshow:march".
3. Edit the landing page as required.
4. Click Save.
Exporting landing page HTML
You can export the HTML for landing pages created in the Design Editor. The
exported HTML also includes custom CSS, JavaScript, and meta tags. This enables you
to share content and utilize the output for other use cases, giving you greater
flexibility while also having the benefit of the editor. You can also easily re-upload the
HTML back into Oracle Eloqua using the Source Editor.
Prior to exporting HTML, note the following:

©2024 Oracle Corporation. All rights reserved
75 of 104
l
Exported HTML does not include package images. It will always reference the images hosted
in Oracle Eloqua.
l
Cloud content is removed when HTML is exported as it will not function outside of Oracle
Eloqua, and may not function if re-uploaded to Oracle Eloqua.
l
Changes to exported HTML are not guaranteed to be responsive. Oracle Eloqua content
spans may not work outside of Oracle Eloqua.
To export landing page HTML:
1.
Navigate to Assets , then click Landing Pages.
2. Open an existing landing page, or create a new one.
3.
Click Actions, then select Export HTML.
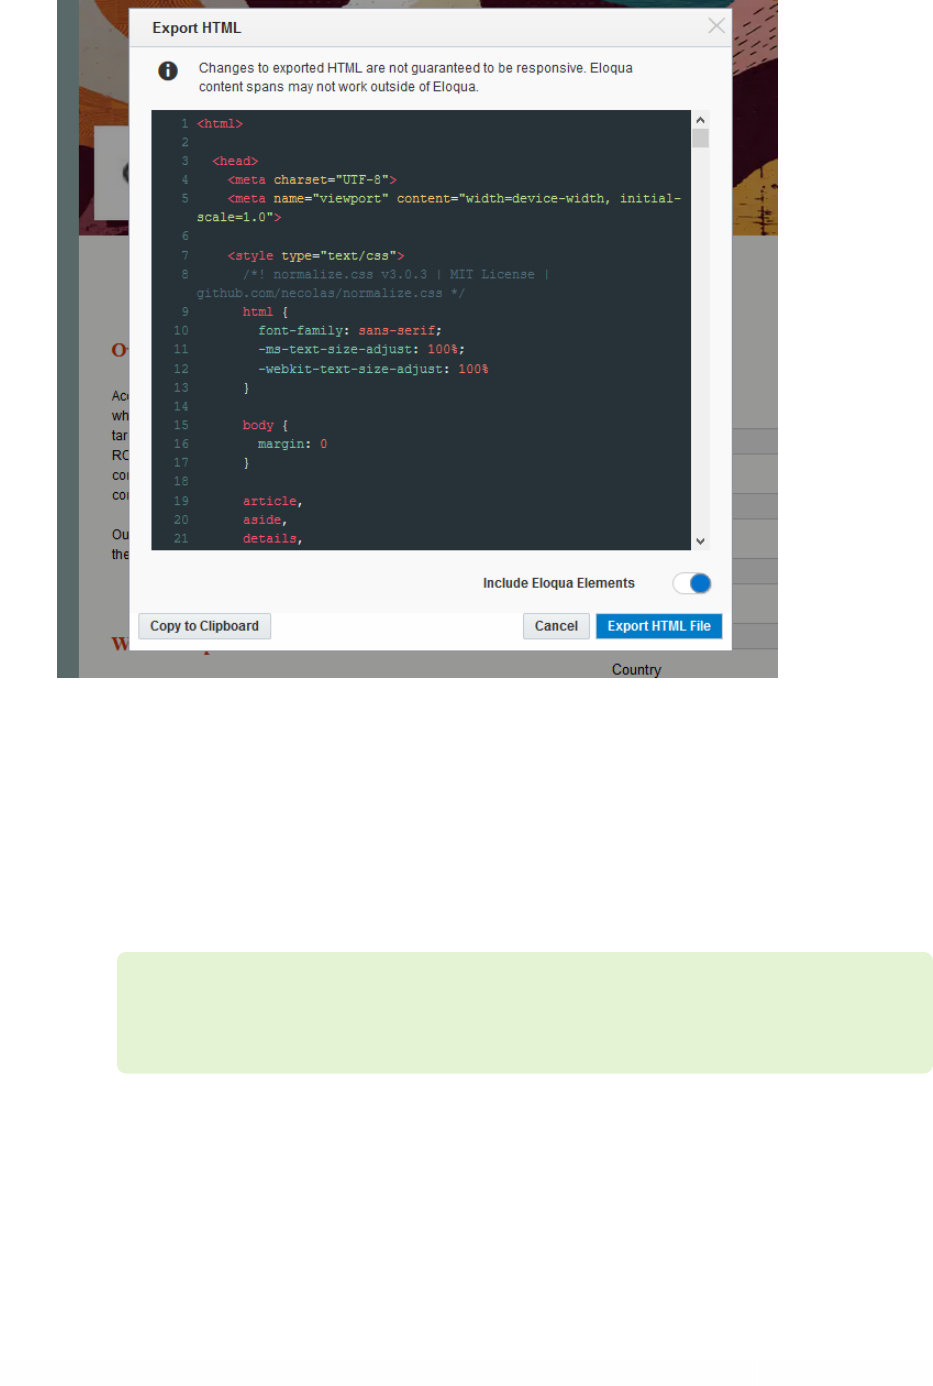
©2024 Oracle Corporation. All rights reserved
76 of 104
4. With the Include Eloqua Elements option, indicate whether to include Oracle Eloqua-specific
component spans such as dynamic content, shared content, field merge, and so on.
l
If you want to use the HTML outside of Oracle Eloqua, toggle this option off.
l
If you want to re-upload and use the HTML in Oracle Eloqua, toggle this option on.
ëNote: If the Include Eloqua Elements toggle is on, and you attempt to use that HTML
outside of Eloqua, images and Eloqua-specific elements will not work.

©2024 Oracle Corporation. All rights reserved
77 of 104
5. Click Export HTMLFile, then open or save the file.
¤ Tip: You can use the Copy to Clipboard option to quickly copy and paste your
HTML.
6. Click Cancel to close the Export HTML window when you are done.
Making copies of landing pages in the Design Editor
You can make a copy of an existing landing page, this allows you to create a new
landing page with slight variations without having to start from the beginning.
To make a copy of a landing page:
1.
Navigate to Assets , then click Landing Pages.
2.
To search for existing landing pages, click one of the following from the left menu:
l
All Files: Displays a list of all currently existing files available to you, and this includes files
authored by others.
l
Created by Me: Displays a list of files authored by you.
l
Recently Accessed by Me: Displays a list of files recently opened by you.
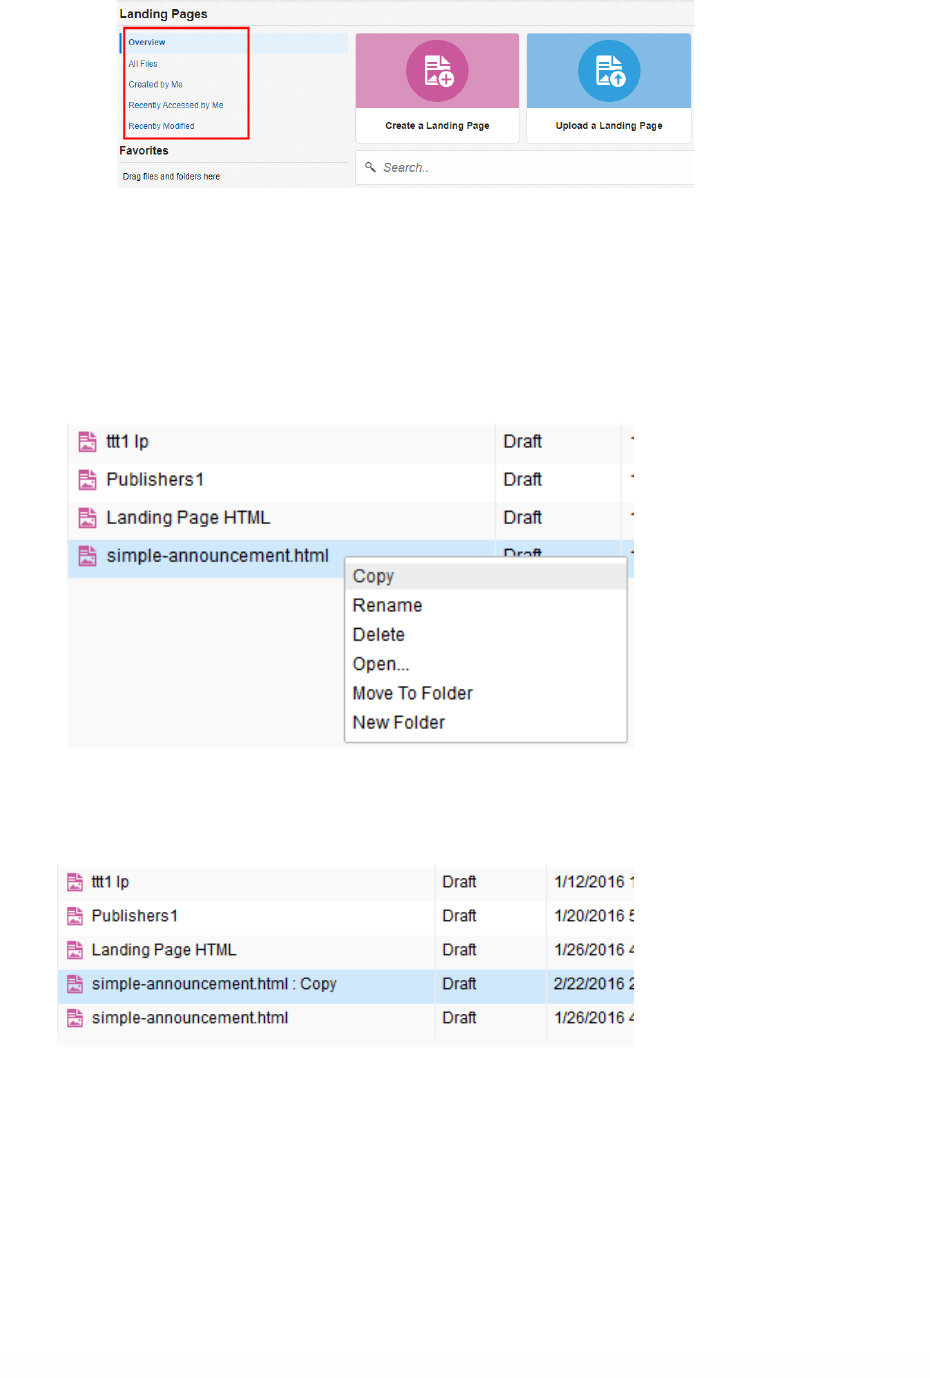
©2024 Oracle Corporation. All rights reserved
78 of 104
l
Recently Modified: Displays a list of recently edited files, including files modified by others.
Alternatively, find your landing page in the Recently Accessed panel or type the name of the
desired file in the Search field.
3.
Right-click the landing page you want to copy, then select Copy.
The copied form appears in the list as "Original Name: Copy."
4.
Open the copied landing pages through one of two ways:
©2024 Oracle Corporation. All rights reserved
79 of 104
l
Double-click the file.
l
Right-click the file, then select Open.
5.
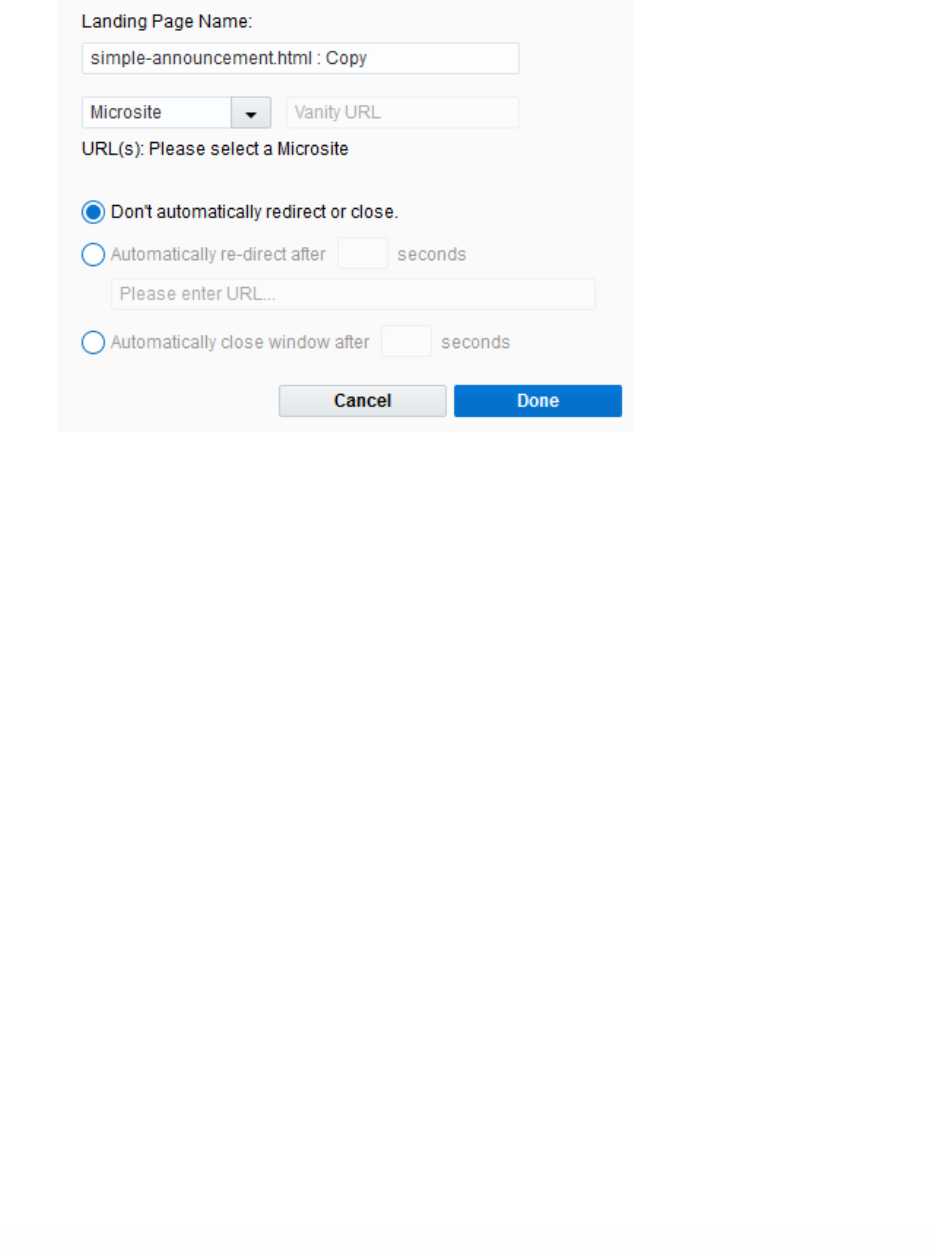
Click Actions, then select Settings to open the settings window.
6.
Configure the landing page settings:
l
Name: Name the landing page. The name will help you find this landing page later when you need
it.
l
URL: Select a microsite and enter a vanity URL.
l
Redirect/Close: Choose one of the redirect/close options and add additional information if
required for your chosen action.
7. Click Done when you are finished with configuration.
8. Add, remove, or modify the landing page as needed.
9. Click Save in the upper-right corner.
You now have a renamed copy of the landing page which you can edit further without
deleting or modifying the original file.
©2024 Oracle Corporation. All rights reserved
80 of 104
Deleting landing pages
You can delete a landing page if it is no longer needed and you have the necessary
permissions. Once deleted, it is no longer available to be used in a campaign and
cannot be loaded if the landing page URL is accessed.
ëNote: You cannot delete a landing page that has dependencies (for example, if
it is active and being used in a campaign). Oracle Eloqua shows all dependencies
when you attempt to delete. You can prevent the page from being accessed by
changing the visibility.
To delete a landing page:
1.
Navigate to Assets , then click Landing Pages.
2. Search for the landing page you want to delete.
©2024 Oracle Corporation. All rights reserved
81 of 104
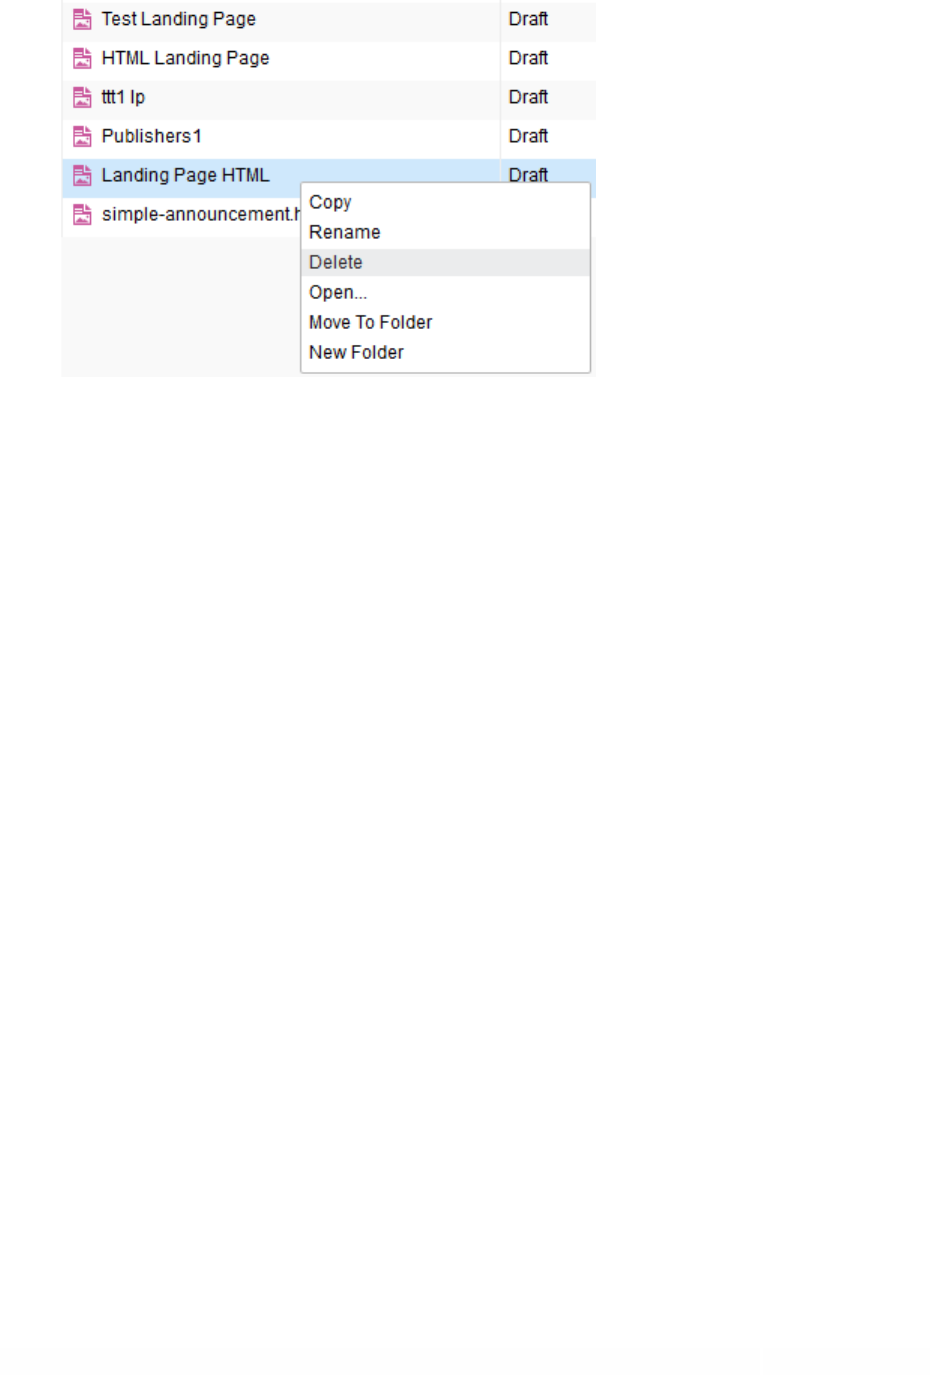
3. Right-click the landing page and select Delete.
©2024 Oracle Corporation. All rights reserved
82 of 104
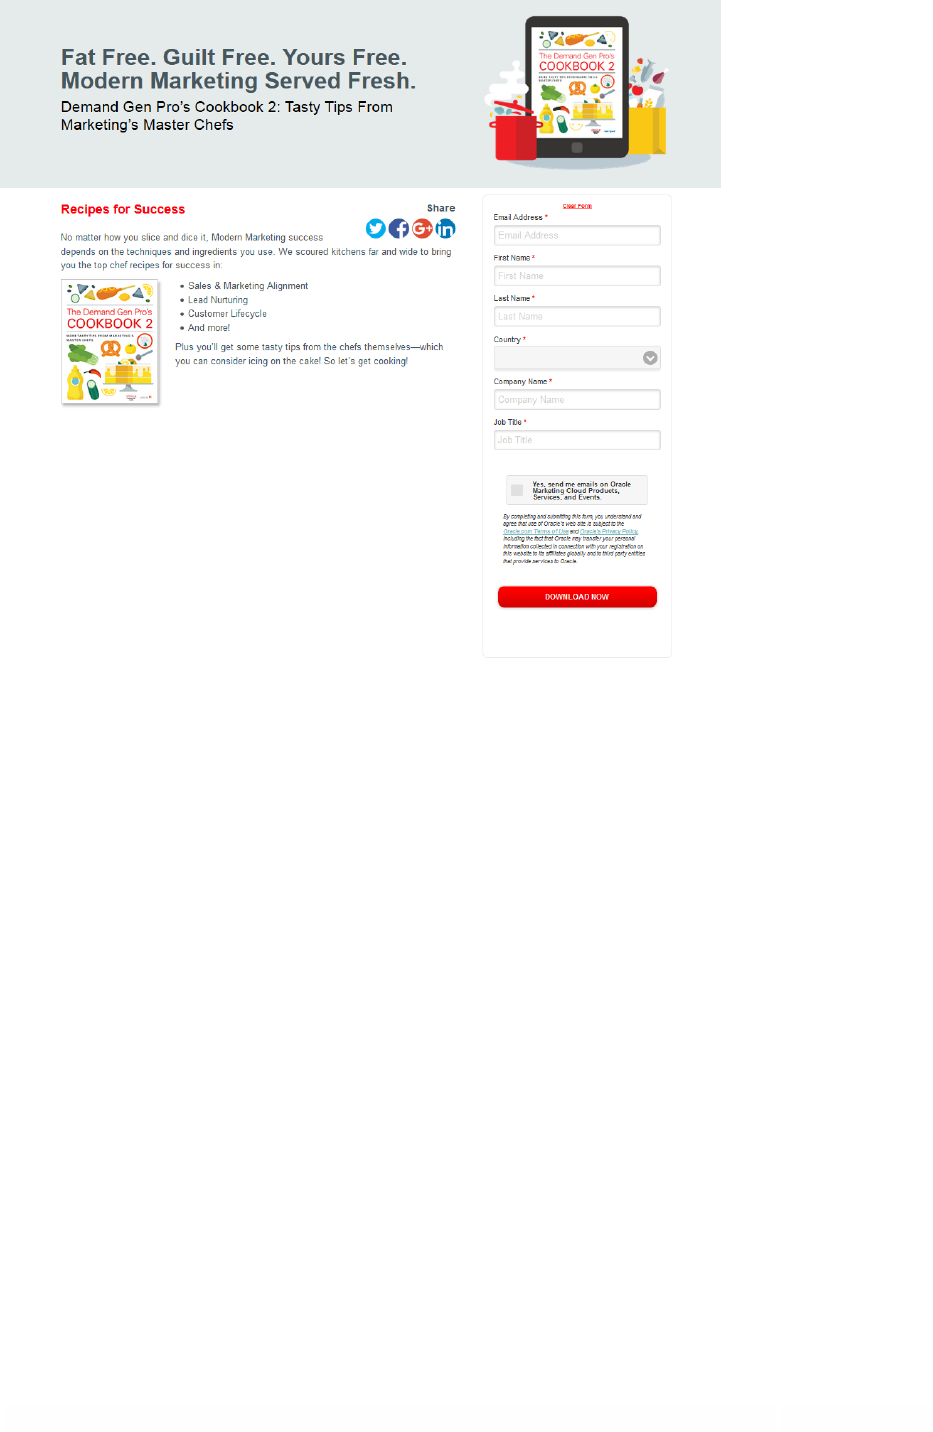
Creating landing pages using the Source
Editor
Using Oracle Eloqua, you can build your landing page using the HTML Source Editor.
Using the Source Editor, you use a combination of HTML code and standard Oracle
Eloqua shared content such as images, forms, field merges, and so on. Learn more
about creating a landing page using the Design Editor or uploading an HTML landing
page.
To create an HTML landing page:
1.
Navigate to Assets , then click Landing Pages.
2. Click Create a Landing Page to open the Template Chooser window.
©2024 Oracle Corporation. All rights reserved
83 of 104
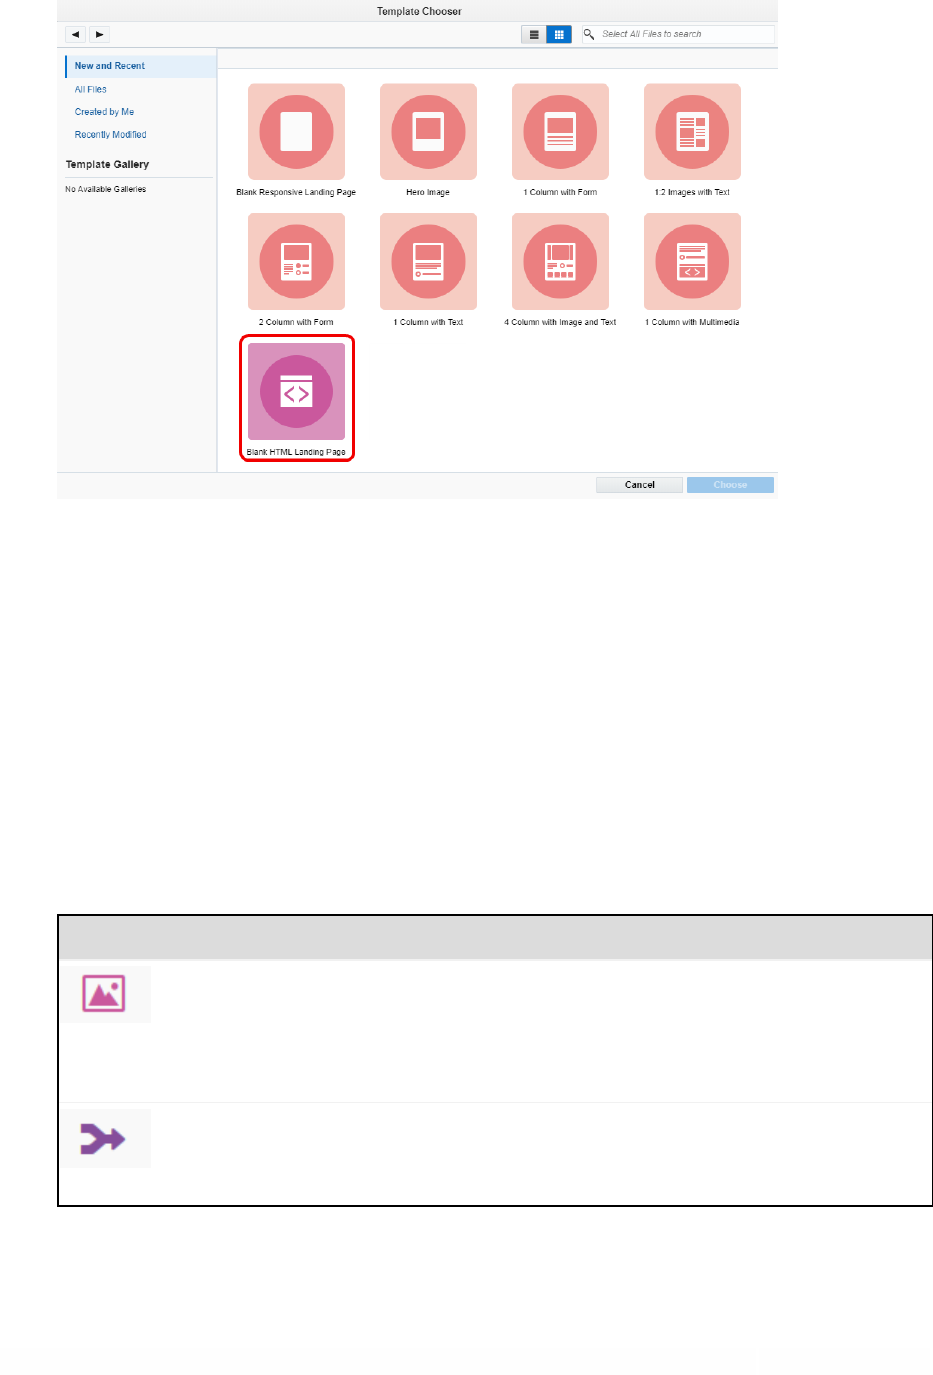
3. Choose a template for the landing page or click Blank HTML Landing Page.
4. Select the microsite that you want to add the landing page to from the Microsite drop-down
list. Learn more about microsites.
5. To make the landing page URL more descriptive, add a Vanity URL. The vanity URLmust be
unique. Otherwise, Oracle Eloqua uses an ID for the landing page's URL.
6. Build your page using the source pane and components on the left pane of the landing page
Source Editor. Learn more about the HTML landing page code requirements.
Click for an overview of the editor components
Component Description
Image: Add images to your landing page. Click the icon to open the Image
Browser, then drag-and-drop an image from the browser onto the landing
page canvas.
Field Merge: Add a field merge to your landing page. Field merges personalize
landing pages by drawing information from specified fields in contact profiles.
©2024 Oracle Corporation. All rights reserved
84 of 104
Component Description
Click the icon to open the Field Merge Browser, select the text that you want to
convert to a field merge, then double-click on the field name in the browser.
Form: Insert a form on your landing page. Click this icon to open the Form
Browser window. Locate a form in the browser then place it in your landing
page by dragging it from the browser and dropping it onto the page.
Shared Content: Add shared content to your landing page, this is content that
can be reused in multiple Oracle Eloqua assets.
Click the icon to open the Shared Content Browser, then drag-and-drop shared
content from the browser onto the landing page canvas.
Dynamic Content: This component allows you to configure your landing page
to substitute different content depending on specific rules and conditions.
Cloud Content: Cloud content is content that is provided by an external
service. (Cloud content can be added to the browser from Apps in the Settings
area of Oracle Eloqua.) Click the icon to open the Cloud Content browser, then
drag-and-drop the service that you want to add from the browser onto the
landing page canvas.
ëNote: After you add the cloud component to your landing page, you
must configure it. Double-click on the component on the landing page,
the Cloud Content Configuration window opens. You are prompted to
log in to cloudconnectors.eloqua.com, from here you can configure the
component as needed.
Tools: Click this icon to open the Tools window. This component allows you to
access settings related to the component you are working with, or to change

©2024 Oracle Corporation. All rights reserved
85 of 104
Component Description
the overall landing page settings (like page size, alignment, etc.). If you are
using the landing page Design Editor, this component also allows you to
access code snippets.
7. To redirect visitors, change the landing page visibility, set an expiry date, click Actions, then
select Settings.
l
To prevent visits to the landing page, click the Internal (Only visible within Eloqua) option.
Visitors will not be able to view the landing page until it is external. Learn more about changing the
visibility of a landing page.
Choose the redirect option from the Redirect Settings section:
l
Don't automatically redirect or close: No redirect occurs.
l
Automatically re-direct: Redirect the user to a new page. You can specify how many seconds before
redirecting the visitor.
l
Automatically close window: No redirect and the browser window closes. You can specify how many
seconds before closing the window.
l
To set an expiry date for the landing page, select the Expires on check box and choose the expiry
date and time. Learn more about setting an expiration date for a landing page.
l
Set the Expires on date and time.
l
Enter the URL to redirect to after the page expires.
l
Choose the Time zone for the expiry date and time.
8. Save your landing page.
After saving your landing page, you can preview and test it or use the URL to test it in
different browsers.

©2024 Oracle Corporation. All rights reserved
86 of 104
Code requirements for uploading HTML landing pages
Z Important: If you have asked a third-party to create the code for your landing
page, it is important that you provide them with this information in order to
avoid integration problems in Eloqua.
In order for your HTML to render properly in Eloqua and across all browsers, it is
recommended to use the following guidelines:
l
DocType is XHTML-1.0-Strict (except for migrated pages). This DocType is used to ensure
the best possible rendering of landing pages across browsers, and therefore all uploaded
content must also use this DocType:
<!DOCTYPE html PUBLIC "-//W3C//DTD XHTML 1.0 Strict//EN"
"http://www.w3.org/TR/xhtml1/DTD/xhtml1-strict.dtd">
l
Code must validate properly according to W3C Markup Validation Service at
http://validator.w3.org/.
l
JS code must pass the JSLint JavaScript Code Quality Tool (see http://www.jslint.com/):
l
All JS should live in the header tag.
l
Broken JS will cause your page to not render in Internet Explorer.
l
Do not target the <BODY> tag with CSS.
l
Ensure compatibility with the following basic Eloqua CSS reset included in the application for
proper rendering across different browsers:

©2024 Oracle Corporation. All rights reserved
87 of 104
html
{color:#000;background:#FFF;}body,div,dl,dt,dd,ul,ol,li,h1,h2,h3,h4,h5,h6,p
re,code,
form,fieldset,legend,input,button,textarea,p,blockquote,th
td{margin:0;padding:0;}table{border-
collapse:collapse;borderspacing:0;}fieldset,img{border:0;}address,
caption,cite,code,dfn,em,strong,th,varoptgroup{font-style:inherit;font-
weight:inherit;}del,ins{text-decoration:none;}caption,th{text-
align:left;}input,button,textarea,select,optgroup,option{font-
family:inherit;font-size:inherit;font-style:inherit;font-
weight:inherit;}input,button,textarea,select{*font-size:100%;}
l
Do not use these System class names:
l
.sc-view
l
.sc-view-overflow
l
.sc-container-view
l
.overlays-active
l
.inline-styled-view
l
.inline-styled-view{}
l
.hidden-border
l
.body
l
.sc-view.static-layout
l
.main
l
.elq-form
l
.elq-form-ce
l
Use static or absolute positioning, and avoid relative or fixed-positioned elements.
l
Use of tables is permitted.
l
Do notuse relative paths to reference images, stylesheets, and so on.

©2024 Oracle Corporation. All rights reserved
88 of 104
l
Do not use <html>, <head>, <body> opening or closing tags within a text or shared content
section.
l
Ensure all elements have correct opening and closing tags.
ëNote: If you re-save any transitioned content in the landing page editor, you
must reset the following: page dimensions, body background color/images,
document background color/images.
After you have verified that all requirements have been met, you can proceed to
upload the HTML code for your landing pages. See Creating landing pages using the
HTML upload wizard.
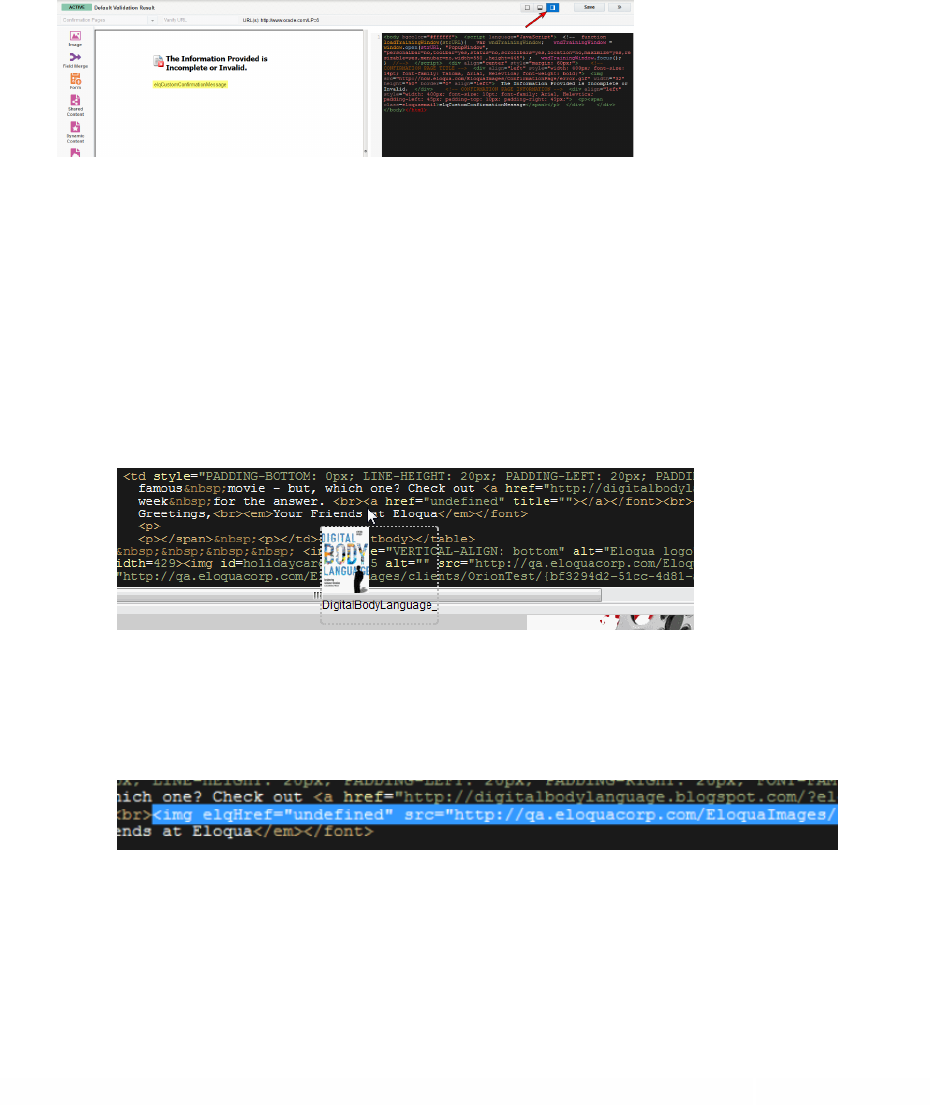
Editing HTML landing pages using the Source Editor
After you create an HTML landing page or upload a landing page using the HTML
upload wizard, you can edit the contents of the page using the Source Editor. You can
use the editor to drag and drop elements into the code or change the code directly.
ëNote: You cannot change the URL of an Active lading page. Landing pages
created using the HTML upload wizard cannot be edited using the Design Editor.
©2024 Oracle Corporation. All rights reserved
89 of 104
To edit a landing page in the Source Editor:
1.
With the landing page opened in the Source Editor, click one of the page view buttons in the
upper right-hand corner of the canvas. You can choose to set the pane to the right, or along
the bottom of the screen. This pane gives you access to the code for the email you are
editing.
2.
Add or edit the landing page using one of the following methods:
l
Type the HTML code directly into the HTML pane. You can use standard keyboard shortcuts in the
HTML pane.
l
Click one of the icons on the left-side pane. Locate the element that you want to add in the
browser, then drag-and-drop the element into the code at the desired location.
l
After the element is released, it is converted to code and the preview pane reflects the change in
the HTML code.

©2024 Oracle Corporation. All rights reserved
90 of 104
ëNote: If you use dynamic content, shared content, or signature layouts in your HTML
landing page, the source code that displays for this content is limited. You cannot edit this
content (for example, its dimensions) directly via the source code editor.
Instead, right-click the content on the left design panel, click Edit, and then edit that
content in its respective editor. Learn more about editing dynamic content, shared content,
and signature layouts.
3. To redirect visitors or change the landing page visibility, click Actions, then select Settings.
Learn more about changing the visibility of a landing page.
4. Save your changes.
Creating new landing pages and templates using the
HTML upload wizard
With Eloqua, you are able to upload HTML landing pages that were created outside of
the application, after uploading the content you can edit the code using the Source
Editor. The content can be uploaded as a new landing page that can be used directly,
or as a template that can be reused within the application to create new landing pages.
Z Important: When creating an HTML landing page outside of Eloqua, you
should make sure that your code adheres to the code requirements.
©2024 Oracle Corporation. All rights reserved
91 of 104
Before you begin:
l
Make sure your code adheres to the code requirements.
l
You can upload an HTML file or a ZIP file. If you upload a ZIP, Oracle Eloqua will extract the
files during the upload process.
l
The maximum file size you can upload is 10 MB.
l
Files uploaded will be scanned for malware before the upload process will complete. Any
files with malware detected will not be uploaded.
To create a landing page or template using the HTML upload wizard:
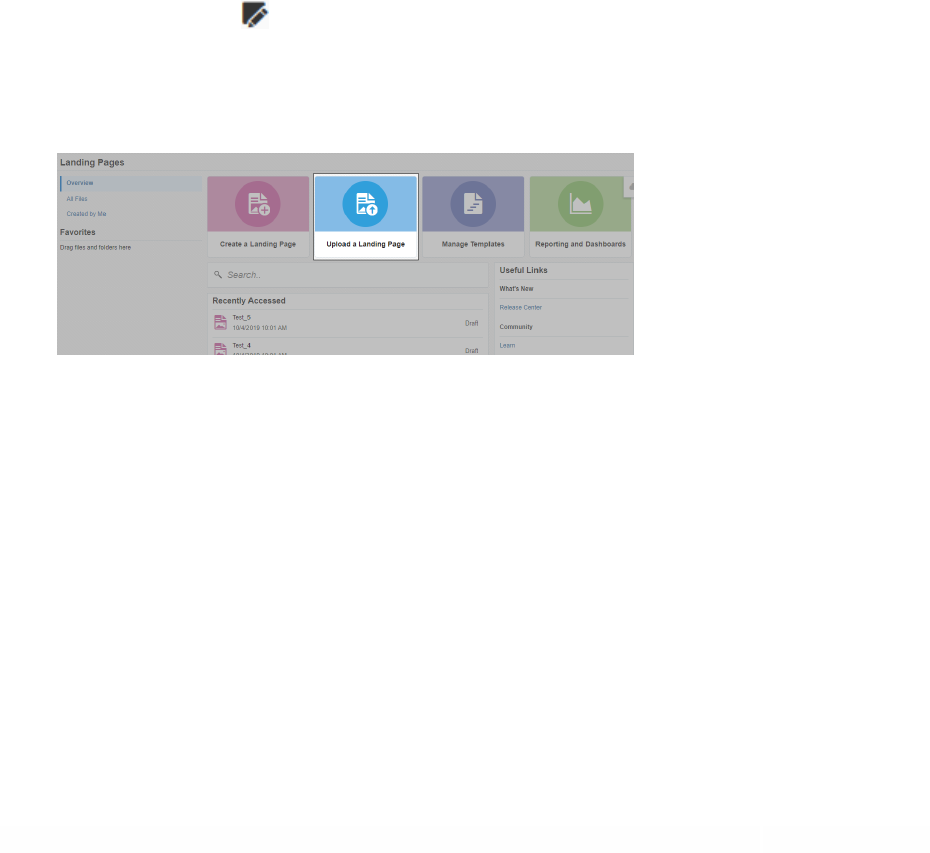
1.
Navigate to Assets , then click Landing Pages.
2.
Click Upload a Landing Page.
3.
Click Upload Landing Page to import a landing page, or click Upload Template to import a
landing page template.
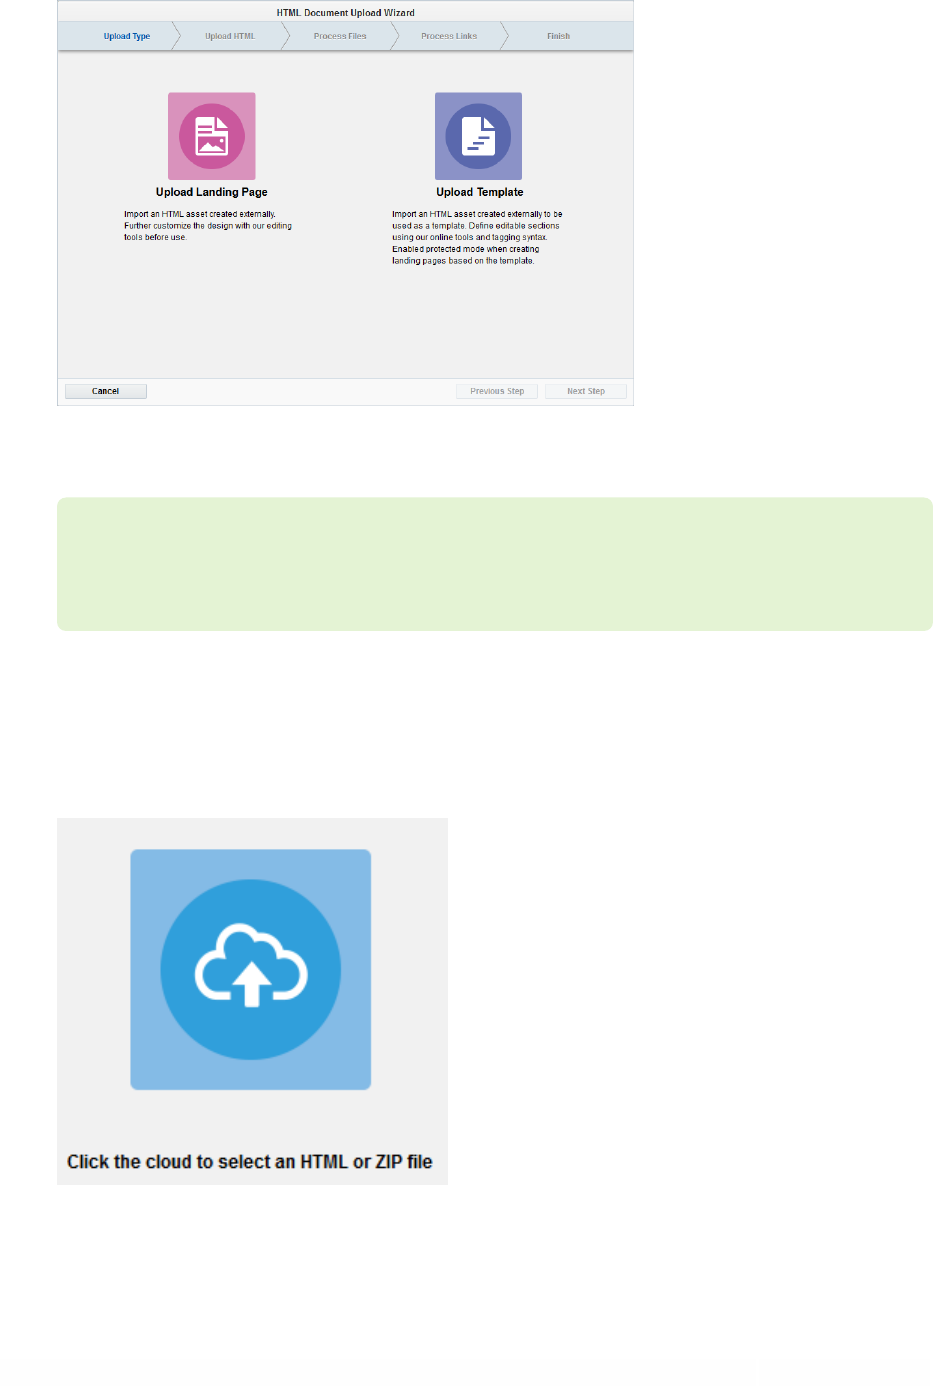
©2024 Oracle Corporation. All rights reserved
92 of 104
ëNote: The following steps are the same for both uploading a landing page and
uploading a template.
4.
Click on the cloud graphic to begin the wizard. Browse to the location of your HTML or ZIP
file for the landing page that you want to upload, then click Open. Then, click Next Step.
©2024 Oracle Corporation. All rights reserved
93 of 104
ëNote: Files uploaded will be scanned for malware. If malware is detected, you will be
presented with an error that the upload of the file failed due to a corrupt file. You will
have to upload a new file to continue.
5.
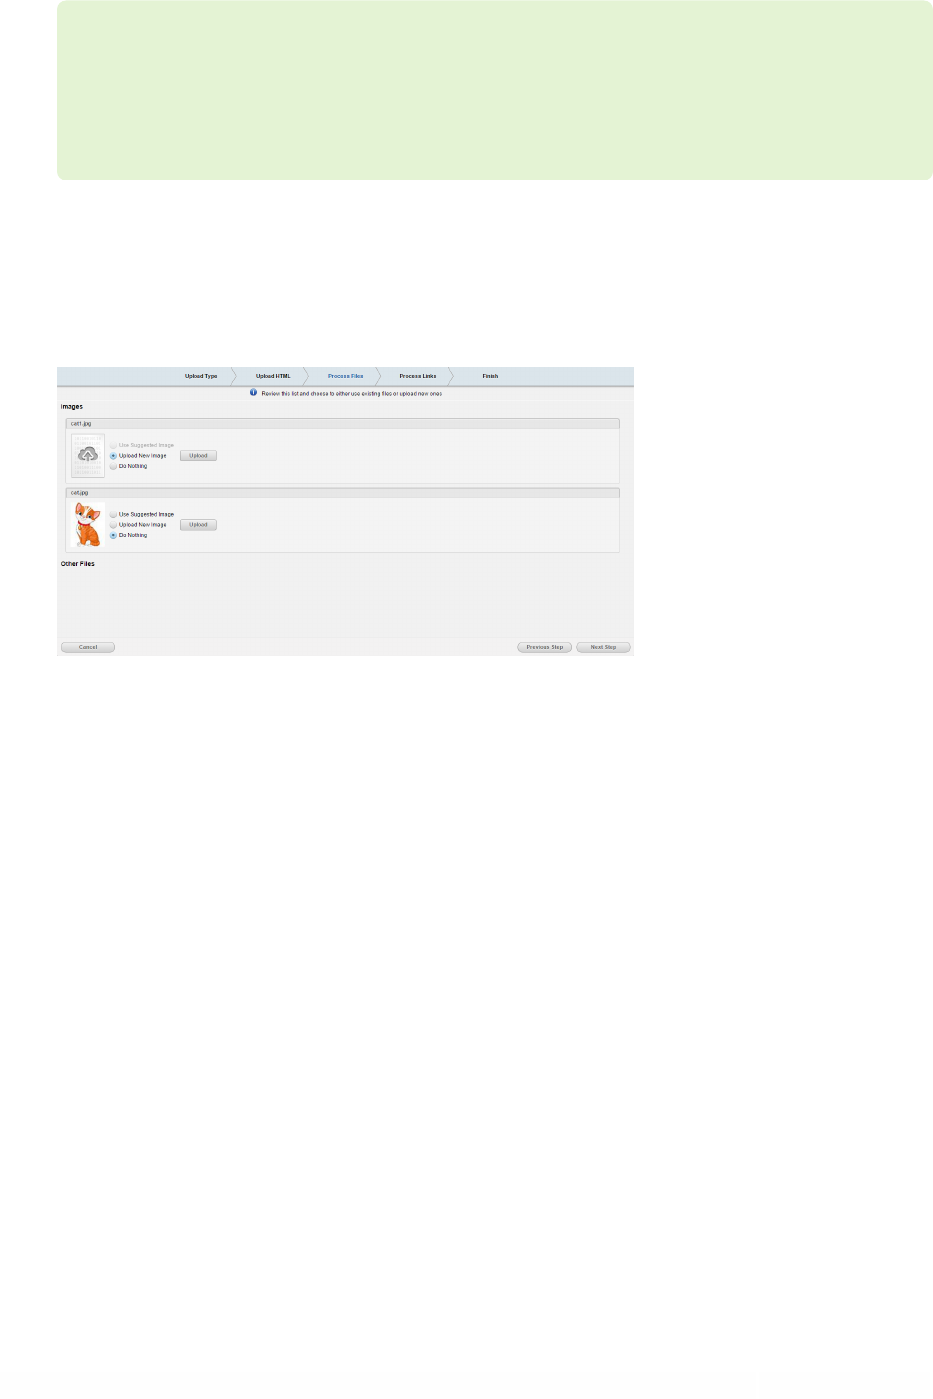
In the Process Files step of the upload wizard, review the list of images and other files and
choose to either use the existing files or upload new ones.
Choose one of the options listed beside each image:
l
Use Suggested Image: Choose this option if the image is already in the image library. If an image
is available that matches the title of the image file in the HTML code, the application will
automatically suggest that file as the correct mapping.
l
Upload New Image: Choose this option if the image is not in the library. Click the Upload New
button, then navigate to the designated file (often in a subfolder of the HTML file), double-click on
the file name, then click Upload to upload the image to Eloqua. Once uploaded, a thumbnail of the
image is shown.
l
Do Nothing: Choose this option if you do not wish to change the image shown in the thumbnail,
select for that image.
Click Next Step, when you are finished.

©2024 Oracle Corporation. All rights reserved
94 of 104
6.
In the Process Links step, all hyperlinks in the uploaded landing page are listed. If you want
to track these hyperlinks and ensure that clickthroughs are reported in Eloqua, select the
Track Link check box next to each hyperlink. If you wish to track visits to all links in the
landing page, click the Track All button in the upper-left hand corner. Repeat as required,
then click Next Step.
7.
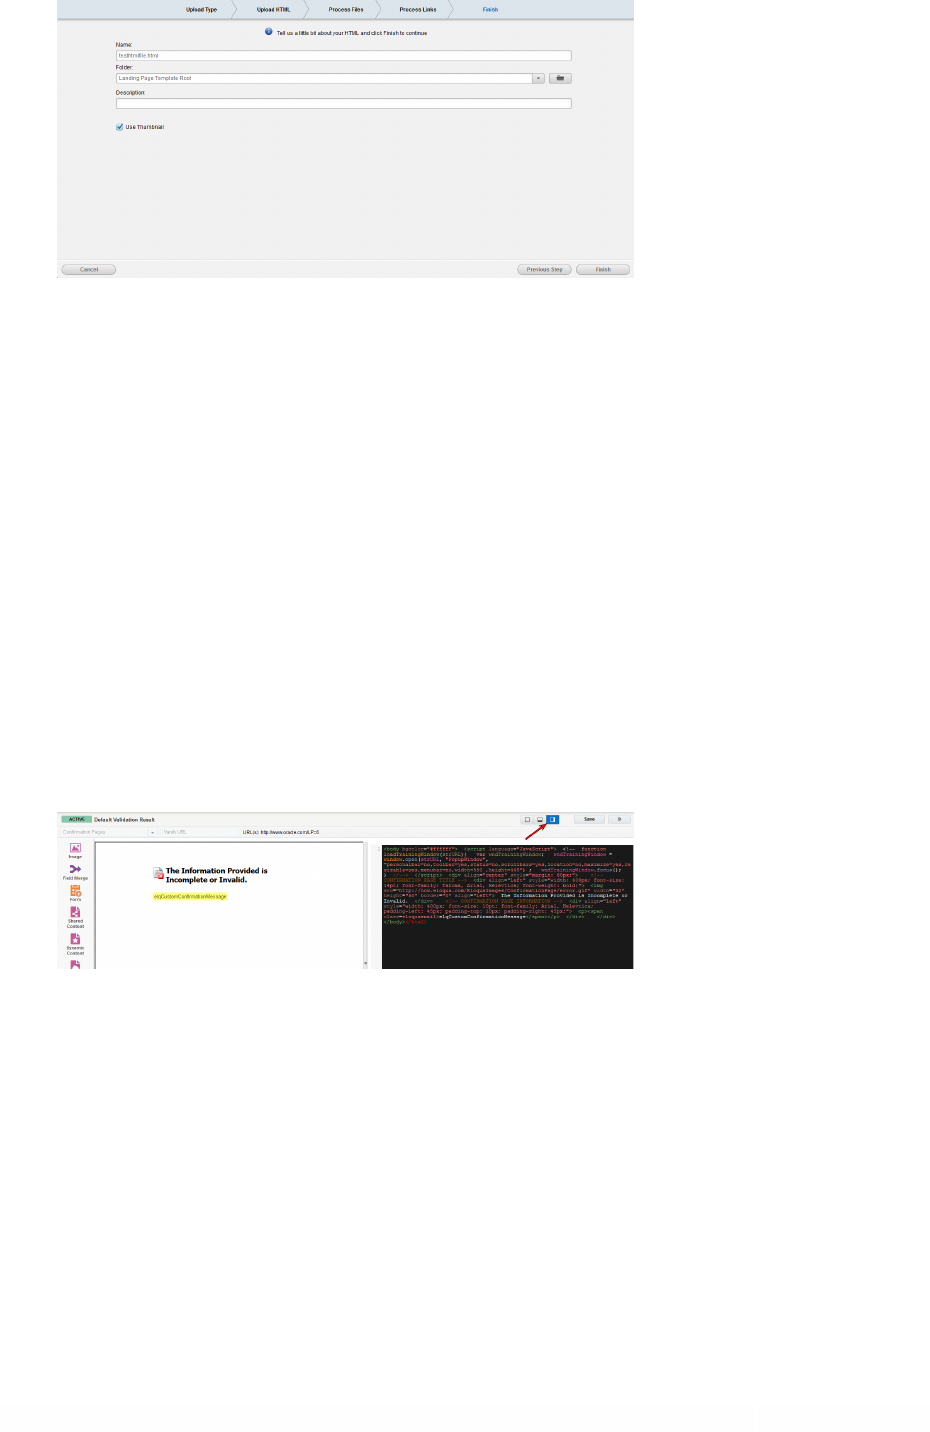
In the Finish step of the upload wizard, name your HTML document and, if needed, change
the destination folder where you want it to be stored. This is an optional step, the location
can be changed at a later date if required.
If you are uploading a template, you also have the option to add a description, and choose
the image that will represent this template in the Template Chooser.
©2024 Oracle Corporation. All rights reserved
95 of 104
Select the Use Thumbnail check box if you want a thumbnail image of your template to be
shown in the Template Chooser. If you clear this check box, you are presented with the
option to select either a generic (blue) icon, or by clicking Change Icon, you can choose one
of the available icon designs shown below.
8.
Click Finish to complete the upload process. The upload wizard closes and the Source Editor
opens.
9.
If you want to make changes to the uploaded landing page, click one of the page view
buttons in the upper right-hand corner to open the HTML pane (you can choose to set the
pane to the right, or along the bottom of the screen).
Add content to the uploaded landing page as needed. Elements can be added using one of
the following methods:
l
Type the HTML code directly into the HTML pane.

©2024 Oracle Corporation. All rights reserved
96 of 104
l
Click one of the icons on the left-side pane. Locate the element that you want to add in the
browser, then drag-and-drop the element into the code at the desired location. When an element
is added in the HTML code, the preview pane reflects the change.
10. Click Save in the upper-right corner.
The landing page or template is saved.

©2024 Oracle Corporation. All rights reserved
97 of 104
Landing page template manager
ëNote: You must have template manager permissions in order to access this
feature.
Landing page templates allow you to create standard landing pages that can be re-
used multiple times, you can create a new landing page then save it as a template, you
can upload an HTML template that was created outside of Eloqua, or you can create a
new template from the Template Manager. The Template Manager (accessed from the
landing pages launchpad), allows you to create, modify, and customize landing page
templates for users at your organization. It allows you to assign very granular settings
to areas of your landing pages, you can lock all elements in place, then define which
specific elements, if any, can be modified when creating new landing pages. This
allows you to maintain control and consistency when creating similar types of landing
pages, it also ensures that important elements are not accidentally deleted.
Creating new landing page templates from the template
manager
When you create a new template from the template manager, you are able to
customize the layout and content, then save the changes for future use. After you
have created a new template, you can also set the template to Protected mode to
prevent it from being altered.
©2024 Oracle Corporation. All rights reserved
98 of 104
ëNote: To manage templates, you must have the Manage Templates action
permission.
To create a new template from the template manager:
1.
Navigate to Assets , then click Landing Pages.
2. Click Manage Templates.
3. Choose a template or select Blank Template or Blank HTML Template.
4. Create your template. Learn more about creating landing pages.
5. Save your template.
6.
If prompted, complete the Save as Template dialog with information about the template.
This information appears for marketers in the Template Chooser window when they select
the template.
l
You can choose to use a thumbnail of the template or use a custom icon. To use an icon, clear the
Use Thumbnail check box and choose the icon.
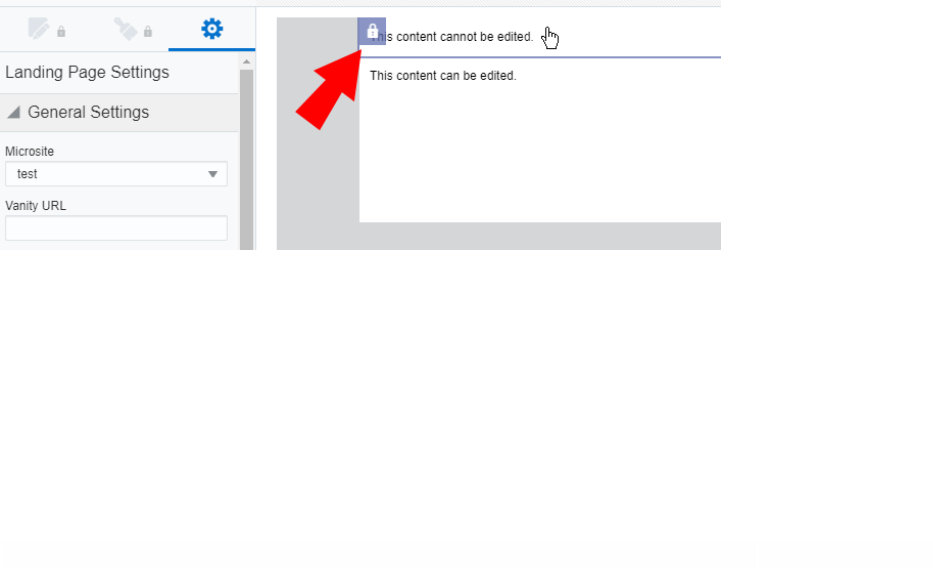
©2024 Oracle Corporation. All rights reserved
99 of 104
l
To link to a web page that provides more information about the template, complete the Text to
Display for Link and URL for the Link fields. When users select the template, they can follow the
link to find out more.
7. Click Save.
If you added protections to the template, the template status is Protected. Otherwise,
the template status is Standard. After you save the template, users can use the
template based on the permissions you've assigned the template.
Adding protections in landing page templates for
theDesign Editor
Protected templates allow you to prevent marketers from deleting or changing
elements of a landing page created from that template. After adding protections,
elements with protections appear with a protected indicator.
When a marketer creates a landing page using the template, Oracle Eloqua identifies
the content they can edit.
To protect elements of a landing page template:

©2024 Oracle Corporation. All rights reserved
100 of 104
1.
Navigate to Assets , then click Landing Pages.
2. Click Manage Templates and open the template you want to protect.
3. Choose an option:
Option Steps
If you are using
the Design Editor
a.
Click to open the Template Settings panel.
b. Click Protected Content and choose what users can change:
l
To allow users to change the layout settings (background image or border
settings) or the default landing page style, click Allow Changes to Style.
l
To allow changes to the overall landing page design, such as adding or moving
content and layouts, click Allow Changes to Design.
c. Click the content components in the landing page that you want to allow
users to change and click Allow Changes to Content. By default, the
setting is off and users cannot change the content component. When you're
editing a protected template, a locked icon shows what elements will be
locked for users creating landing pages from that template. Additionally,
you cannot protect a layout, but you can prevent users from changing the
settings for all layouts using the Protected Content settings above.
If you are using
the Source Editor
a. Right-click a landing page element that you want to allow users to change
and select Mark as Editable.
b. Choose the options you want to enable from the Settings dialog:
l
To allow users to change the element, click the Mark as Editable check box
and give the element a descriptive name. The name can help users identify the
intent of the element.
l
To allow users to remove the element from the landing page, click the Allow
Delete check box.
c.
Click Save to close the dialog.

©2024 Oracle Corporation. All rights reserved
101 of 104
¤ Tip:If you are using the Source Editor, you can manually add the elq-
edit="true" and elq-delete="true" attributes to elements of the landing page. See
the reference below for more information.
4. Click Save.
After you apply protections to the template, the status of the template changes to
Protected.
Protected HTML landing page reference
If you are using HTML code, refer to the following table for the attributes you can use
to protect elements of your landing page.
Attribute Description
elq-edit="true"
Defines an element as editable in a template.
Supported elements:
l
Some block level elements and HTML5
elements (<article>, <aside>,
<blockquote>, <caption>, <div>, <details>,
<fig>, <figure>, <footer>, <header>, <nav>,
<section>, <summary>)
l
Headers (<h1>, <h2>, <h3>, and so on)
l
Images (<img>)

©2024 Oracle Corporation. All rights reserved
102 of 104
Attribute Description
¤ Tip: These are the supported
elements. You can try to use the
attribute on other elements, but Oracle
Eloqua cannot verify the functionality.
elq-delete="true"
Defines an element as deletable. You can
apply this to the same elements listed above.

©2024 Oracle Corporation. All rights reserved
103 of 104
Creating an intermediate unsubscribe
landing page
If you use Eloqua's unsubscribe system action link in an email, and are not sending
contacts to a subscription management page, we recommend that you setup an
intermediate unsubscribe page. This is a landing page created in Eloqua using a
template we provide. When a contact clicks an unsubscribe link, they are presented
this page to confirm the unsubscribe. If you do not use this type of landing page,
contacts can be unsubscribed by email scanning tools unintentionally. To enable the
intermediate unsubscribe page, update your email defaults.
The intermediate unsubscribe page template includes:
l
The email address being unsubscribed
l
Button to confirm the unsubscribe page
You can customize your page as required.
Before you begin:
l
Only customer administrators can access the unsubscribe landing page template.
l
The template we provide includes a confirmation button. This button is configured
specifically for the contact to confirm their unsubscribe. It cannot be removed from the
email.
To create an intermediate unsubscribe landing page:

©2024 Oracle Corporation. All rights reserved
104 of 104
1.
Navigate to Assets , then click Landing Pages.
2. Click Create a Landing Page to open the Template Chooser window.
3. Search for the template Intermediate Unsubscribe Template.
4. Name your intermediate unsubscribe page by clicking Untitled Landing Page in the top left
and typing a new name.
5.
Click to configure your landing page settings.
6. Customize the page as needed.
7. Click Save.
After saving your landing page, update your email defaults to use this page when an
unsubscribe link is clicked.
