
Dreamweaver Guidebook

Dreamweaver 3
Setting up Your Local Site 4
Setting up Your Remote Site 6
Site Folder Overview 7
Uploading Local to Remote 9
Template Guidelines 12
Editing Your Web Page 20
Creating a New Section 31
Adding to the Main Menu 33
In-page Sub-navigation 35
Tips and Tricks 40
Feedback / Next Steps 42
Contents
3
A Brief Introduction.
In this guide, we will show you the basic fundamentals for updating and maintaining your
RI.gov Web site.
Dreamweaver

4
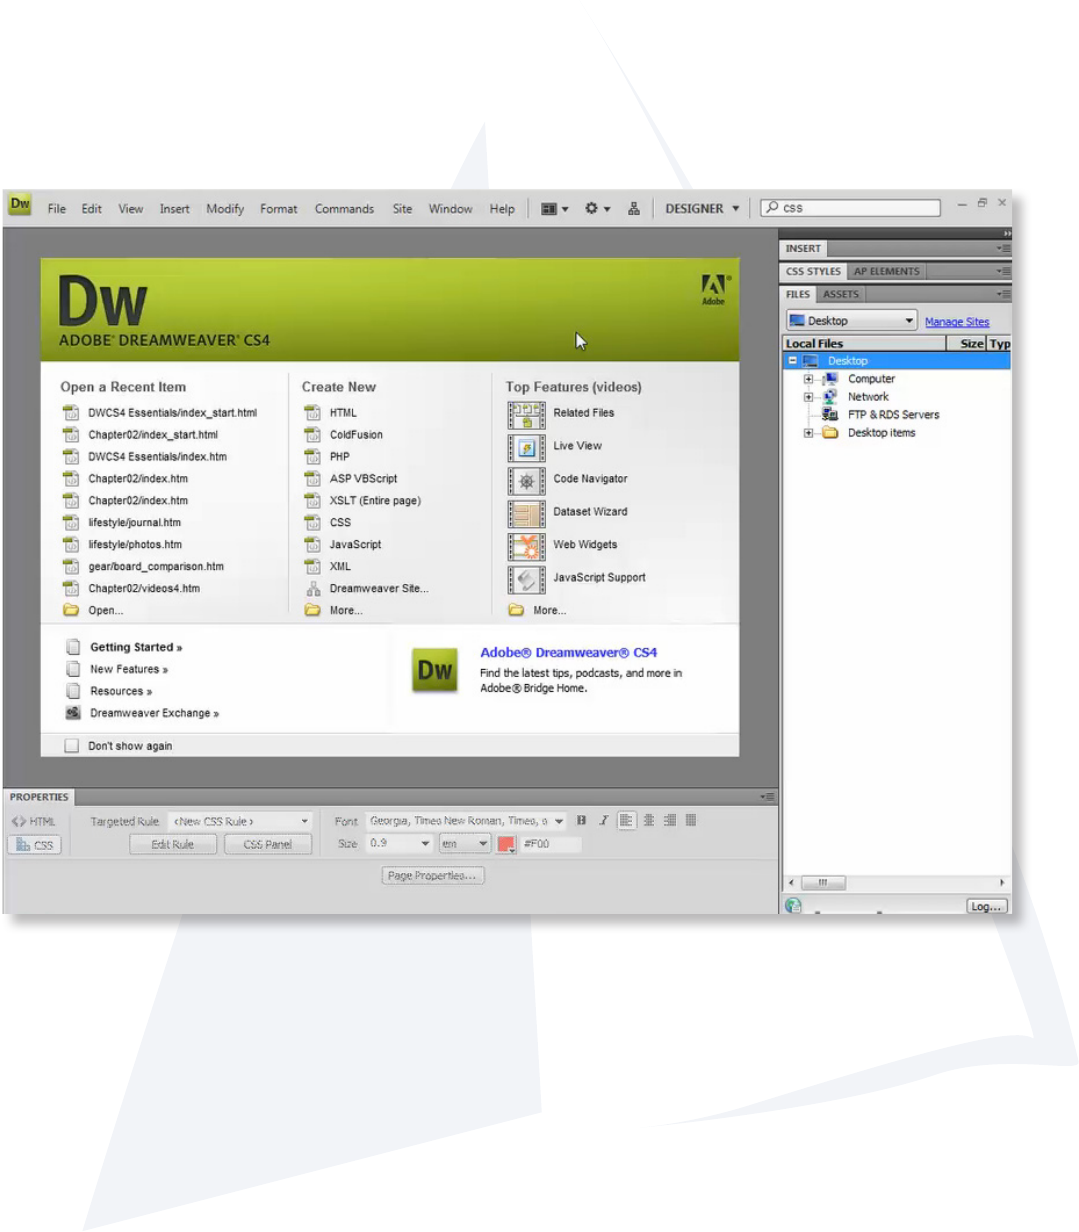
Creating a new local site.
Creating a site allows you to easily work
with all your les in one location.
Creating a new site.
1. Go to the menu bar at the top
and choose: Site / New Site
This will open the Site Denition
Dialogue Box
2. Make sure you have the
Advanced tab at the top clicked.
3. In the left panel, Make sure you
select in the Local Info tab.
Setting up Your Local Site
Lets get started.
1
3
2
5
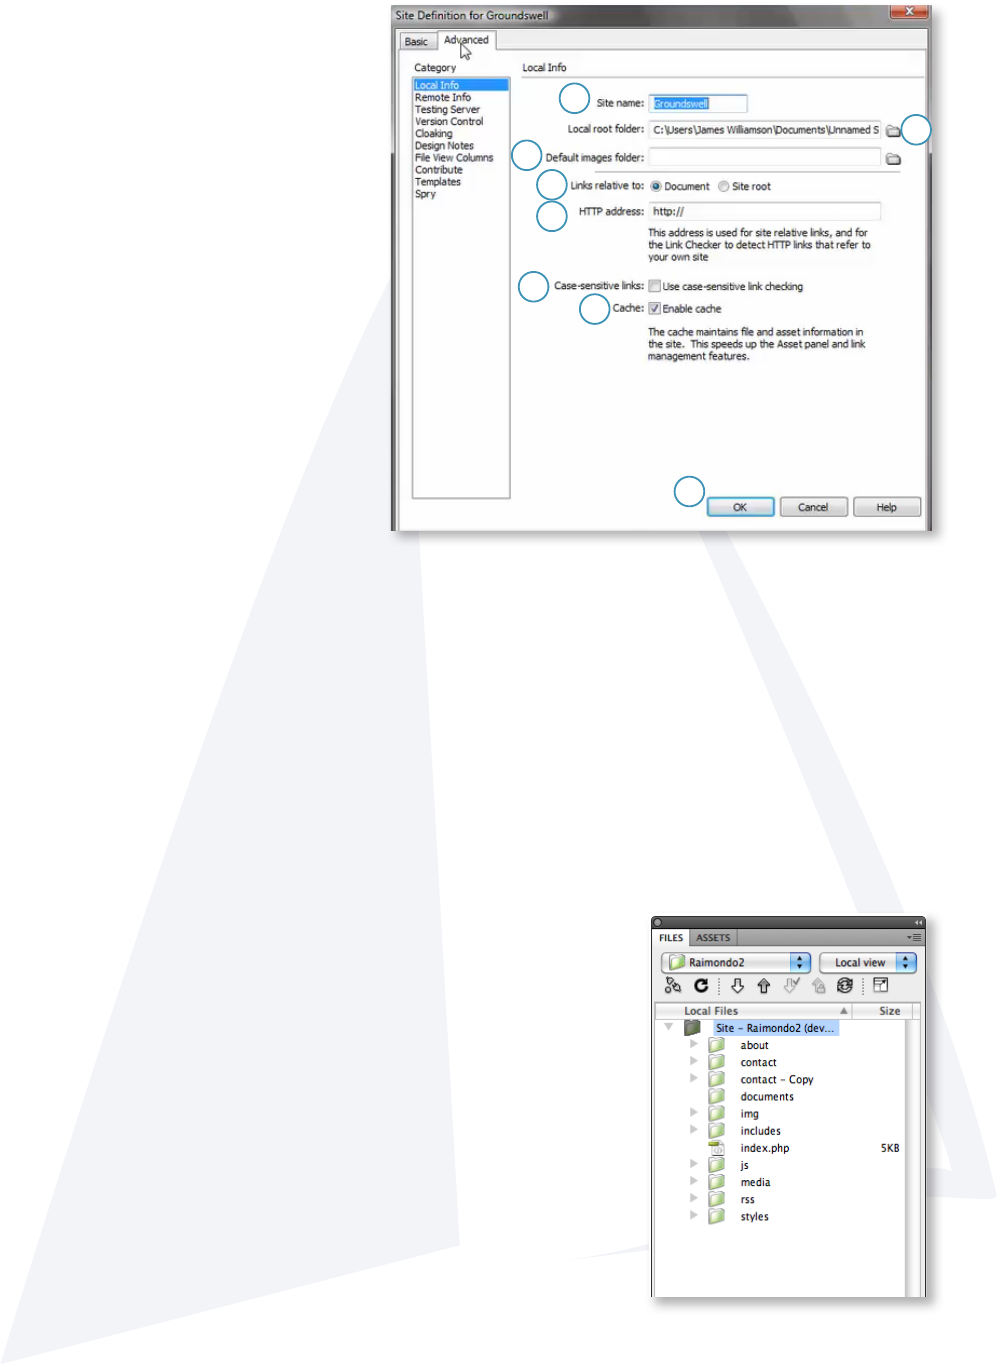
Once you click OK, all the les and folders for your site will now
be in your Files panel on the right. Now you can edit, delete and
add les and folders to your site right here in the Files panel in
Dreamweaver.
You are now ready to work on your site.
4
1
2
3
7
8
5
6
1. Site name: Fill in the name for
this site. (This name is only used in
Dreamweaver and is only used to
help you know which site you are
working on.)
2. Local Root Folder: Click on
the folder icon to browse on your
computer to the location of the root
folder for your site. This is the folder
where all the les for your site are
kept.
3. Default images folder: Leave
blank
4. Links relative to: Document
should always be selected.
5. HTTP address: Leave blank
6. Case-sensitive link checking:
Leave unchecked
7. Cache: Make sure Enable cache is
checked
8. Click OK:
Fill in the basic site information on the right.
6
Setting up Your Remote Site
Getting connected to the server.
Before we can set up our Remote site, an FTP (File Transfer Protocol) account needs to be
created. To do this, contact DoIT or IT Support and ask them to set up an FTP account for your
site. Once it is set up, they will send you all the necessary information you will need to set up
your Remote Site in Dreamweaver.
Once you have an FTP account ready and the information to connect, follow these next steps:
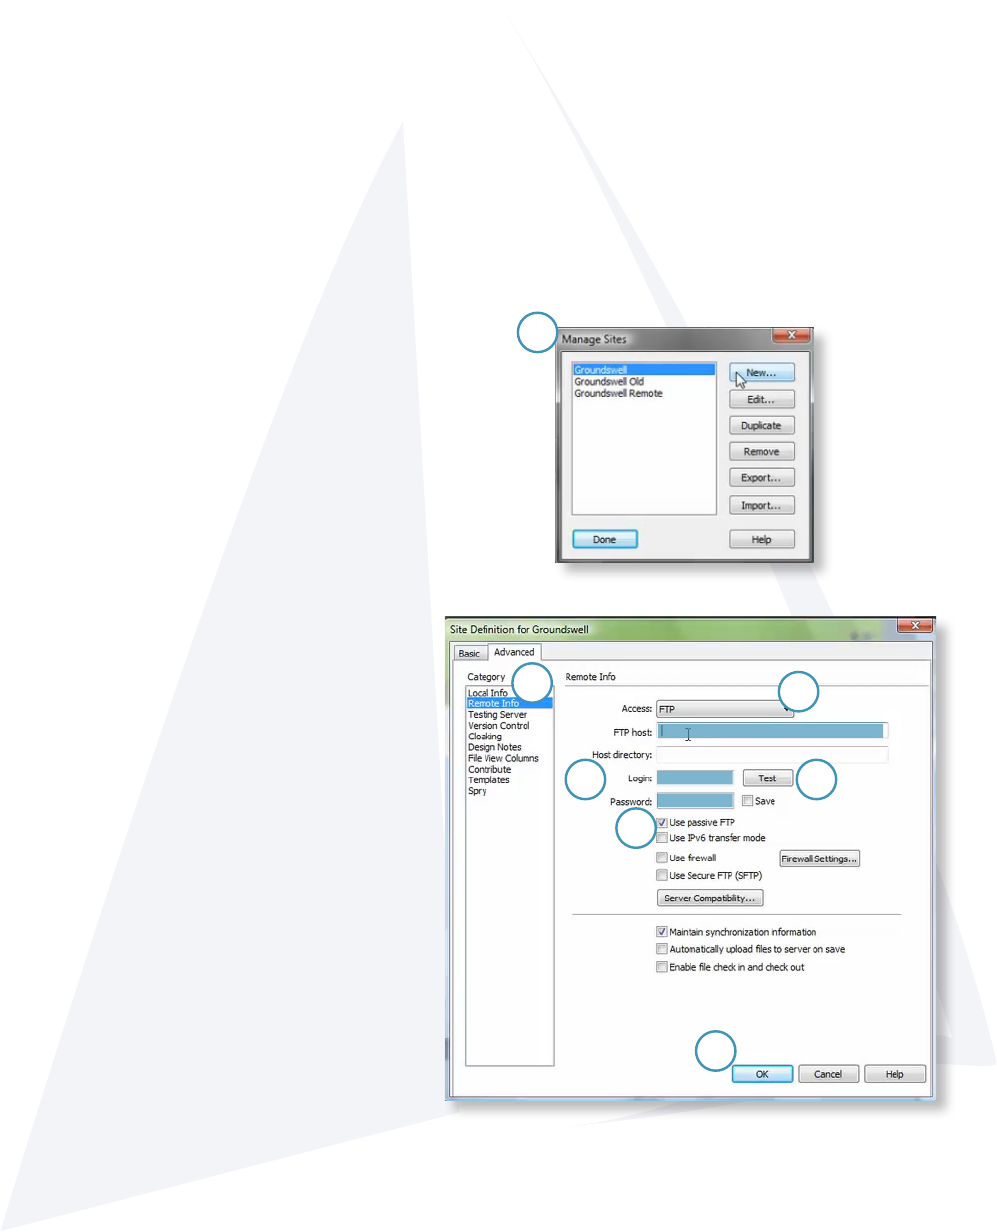
Setting up your remote site in Dreamweaver.
1. Go to Site / Manage Sites
-Click on the site from the list that you
want to edit. Make sure it is highlighted
and then click Edit.
(This opens Site Denition window)
2. On the left hand side, select Remote
Info
3. Where it says Access, in the drop
down menu, select FTP.
-All your host information will be given to
you by DoIT or IT Support.
4. Fill in the FTP Host, Login, and
Password.
5. Check the box: Use Passive FTP
6. Click Test to make sure you made
the connection. (If you were unable to
make the connection, contact DoIT or IT
Support.)
7. When Done, click OK
5
6
7
4
1
2
3
7
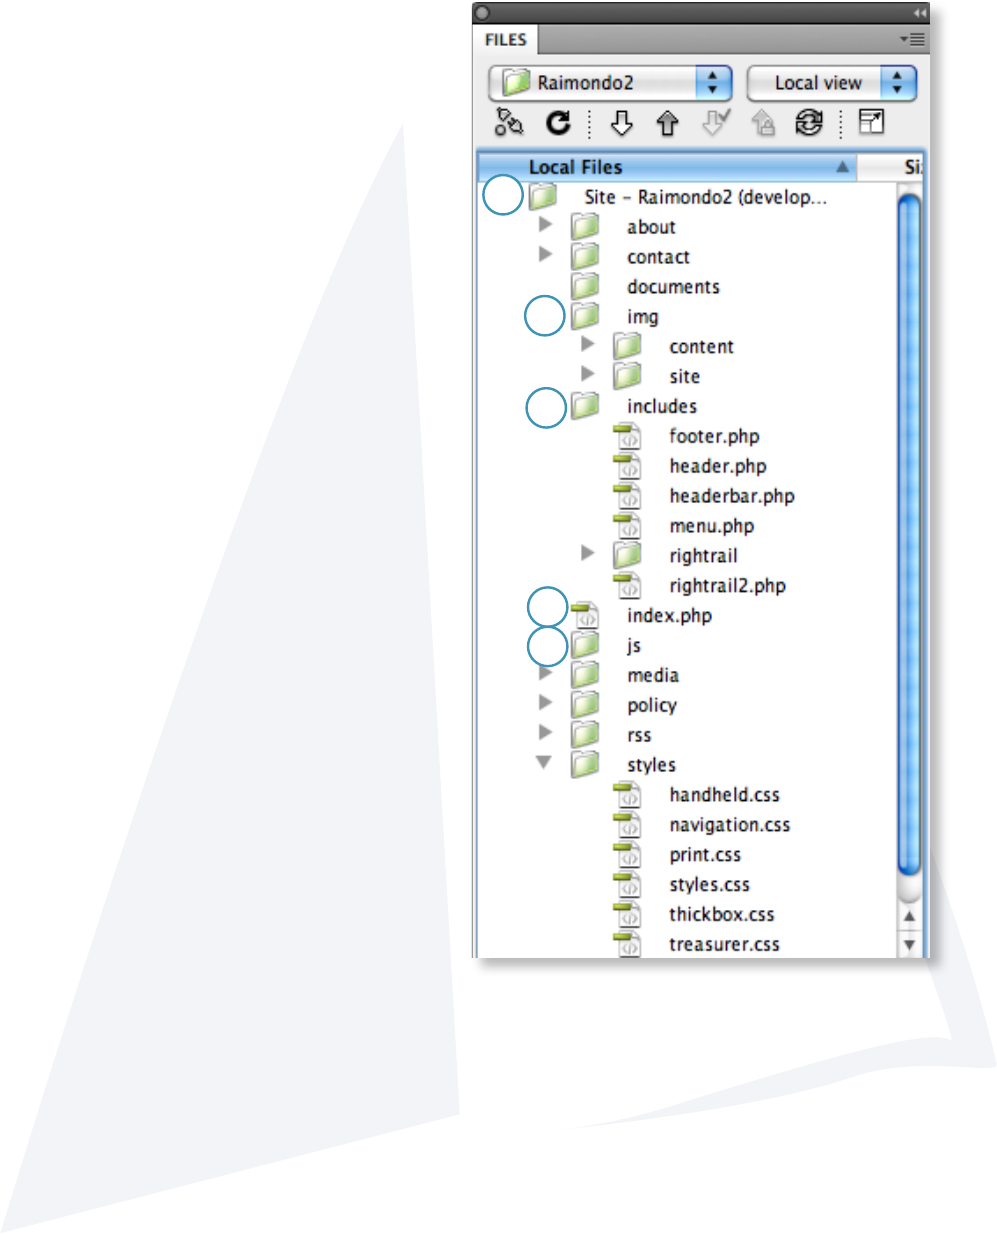
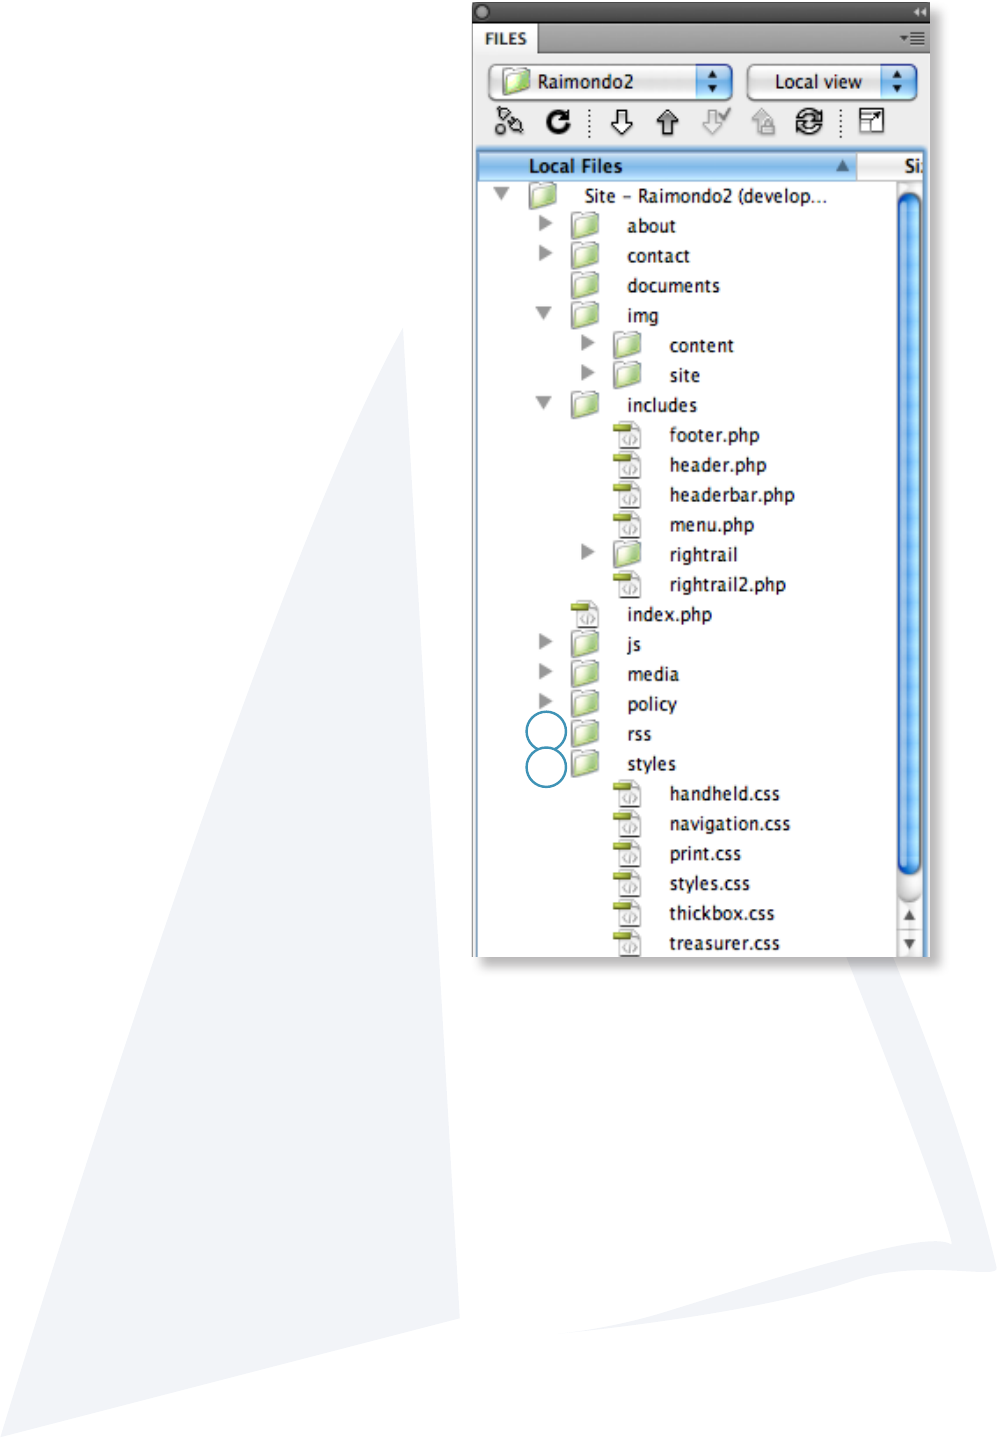
A brief description of the site les and how they work.
The Web site is made up of many different
folders.
1. The main folder that contains all the other
folders is called the Root Folder.
2. The img folder contains all the images for your
site. Inside the img folder there are two more
folders: content and site.
-The content folder is where all the images
you add for your site will be stored.
-The site folder is were all the images for the
entire Web site are stored. You will not need
to add or delete anything in this folder.
3. The includes folder is where all the
components that create the Web site are stored.
-footer.php is the le where all the footer
information is located.
-header.php is the le where all the header
information is located.
-menu.php is where the navigation for the
site is located.
-rightrail.php is where the right side bar is
located.
4. index.php is the main home page for the site. It is the default page when you visit the Web
site.
5. The js folder (js stands for JavaScript) contains the les that makes the Web site dynamic.
These les control the navigation drop-downs and many other things behind the scenes. You
will not need to access or use any of these les.
Site Folder Overview
1
2
3
4
5
8
6. The rss folder (rss stands for Really Simple
Syndication) contains a special le that
produces RSS feeds for press releases.
7. The styles folder contains all the les that
create the look and feel for the Web site.
6
7
9
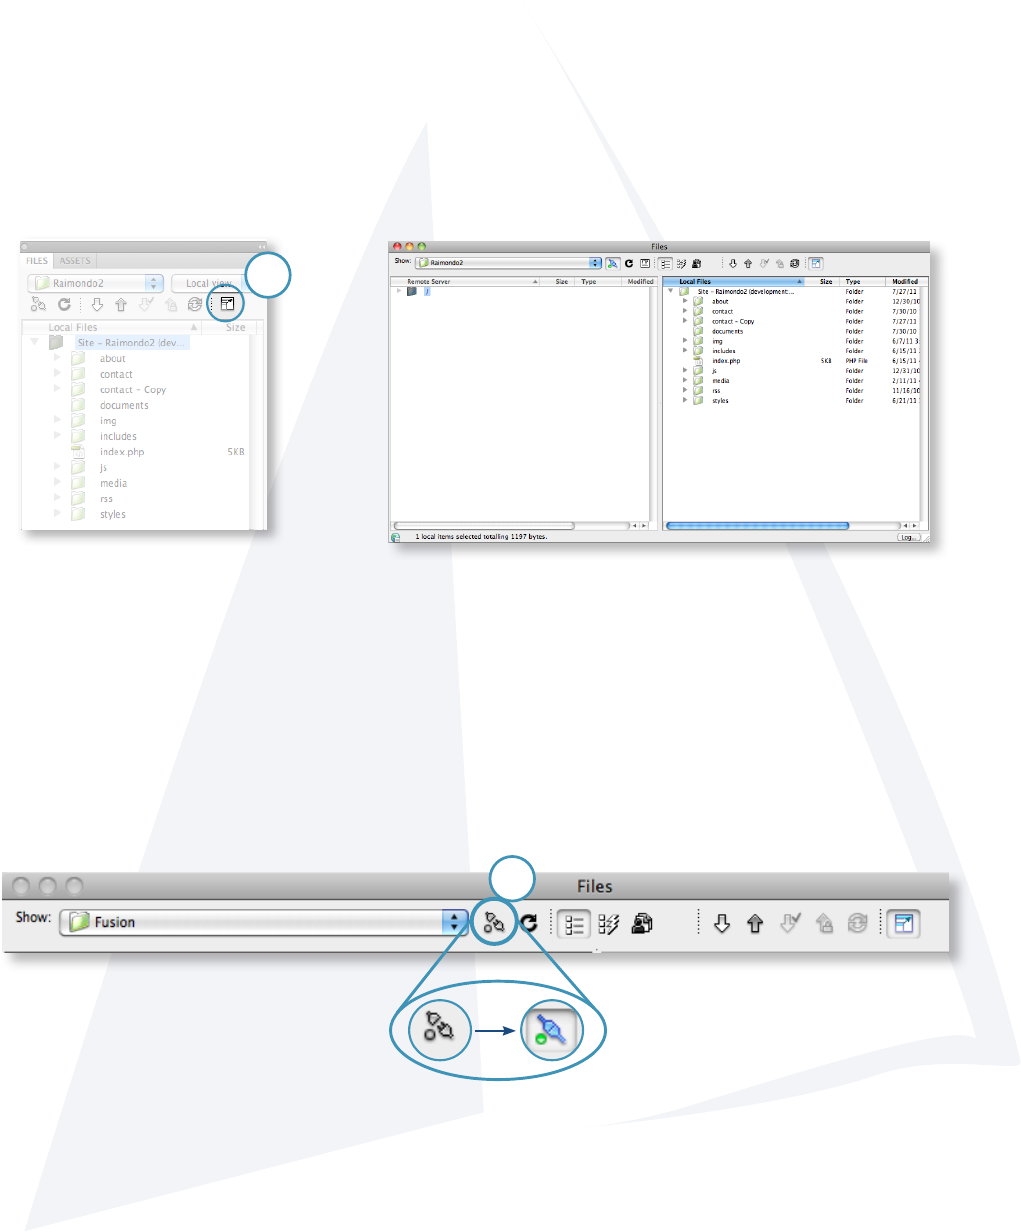
The easiest way to view both remote and local les is using the expanded les panel view.
1. In the Files panel, click on the expanded view button. This will open the expanded les
view.
Expanded les view.
2. At the top of the window, click on the button that looks like a plug that is unplugged.
This button is how we will connect Dreamweaver to the remote server. Dreamweaver will
make the connection and the button will turn into a solid plug.
2
The expanded les panel view.
Uploading Local to Remote
Uploading les to the Web site.
1

10
A progress bar should appear letting you know that you are now copying over all the les.
This step may take a while if you are copying over a lot of les.
2. Once that is done, your entire site is now on the test server and you will see all your
folders now on the test server.
1. Click and drag the site folder from your local les (A) over to the site folder for the
remote server (B) and drop the folder onto that folder.
Using the link DoIt or IT Support has supplied, open your browser, paste or type the web
address in and you will now see your test site in the browser window.
Copying all les over for the rst time from your local site to your remote server.
1
2
A
B
11
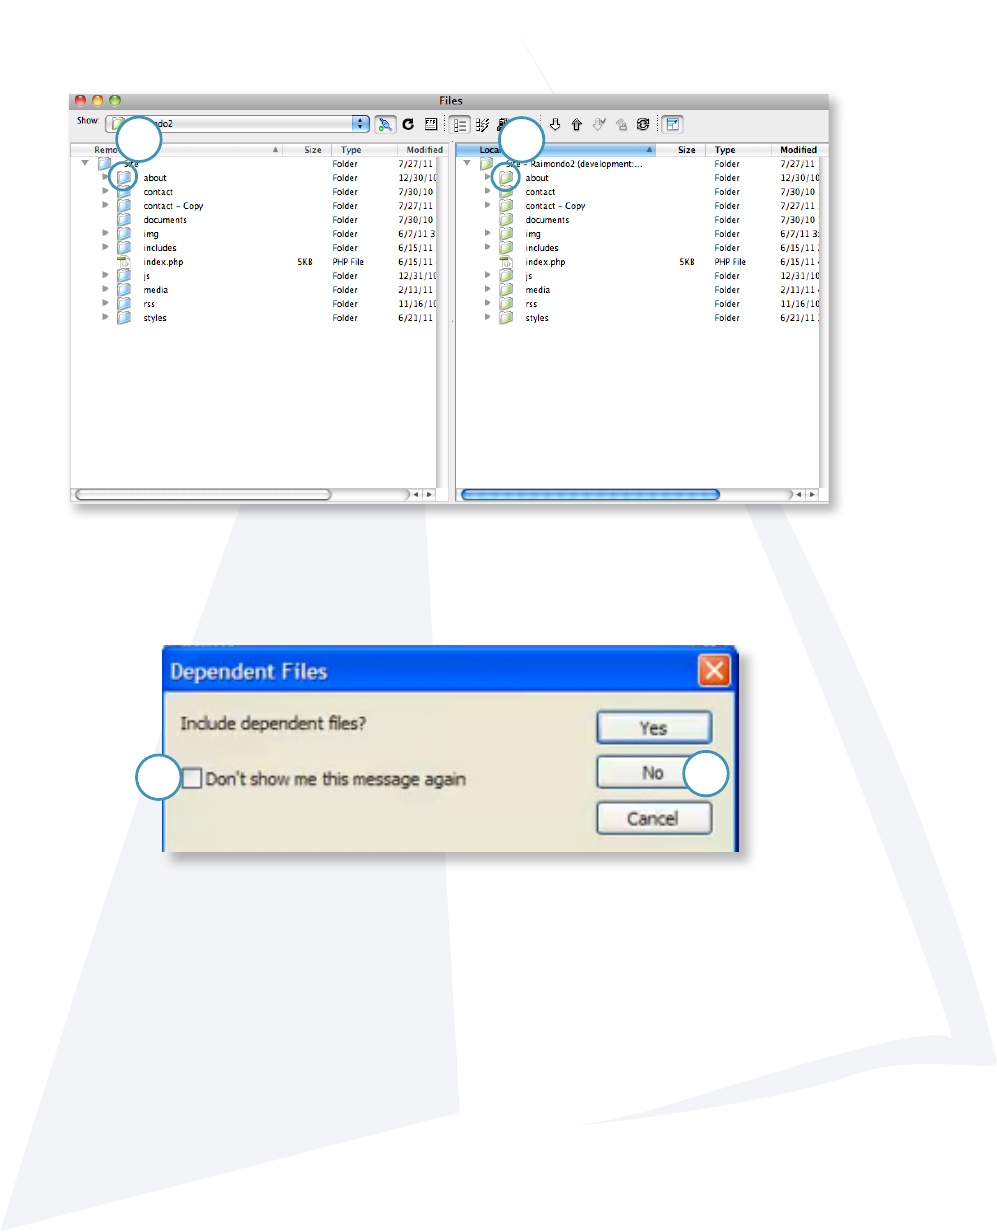
Copying individual les.
You can also copy individual les over when making updates to particular sections of the Web
site.
1. Choose the folder or le to copy to the remote server.
2. Drag and drop the folder or le on top of the corresponding folder or le.
When copying folders and les, you may get a pop-up message similar to this:
If you get this message,
1. Check the box: Don’t show me this message again
2. Choose No.
This question is asking if you want to include all the les associated with the le and you
will never need to do this.
1
2
2
1

12
How to best work with the RI.gov template.
Header
If you haven’t worked with RI.gov to create your agency Web site or template, please start by
visiting: http://www.ri.gov/resource/
There you will nd the Webmaker’s resource, complete with tools, tips and tricks, and the
RI.gov Workbook.
Take a moment download, ll out and fax to RI.gov at: (401) 831-8095, or email us at:
rihelp@egov.com to get started right away!
First, before we begin to edit the pages, let’s break the page up into sections and look at each
individually.
1
3
2
Each agency header is comprised of the following elements:
1. The Rhode Island Government State sliver
2. Agency seal, logo, or Rhode Island Seal (as appropriate)
3. Agency title
4. Photo montage, or branding elements (optional)
Header Guidelines:
• Statewide sliver is placed at the top of the header of all pages.
• Agency logo should be 80 pixels x 80 pixels, and either an ofcial state seal or
emblem, or agency / municipality logo, with standard blue background.
Please contact RI.gov if you need a custom agency / municipality seal or logo
optimized for the template.
• Agency name should follow the standard template format - State or Rhode Island
aligned top, followed by the agency name, with the department or division underneath
Template Guidelines
13
• where applicable. Header should be 80 pixels in height, and width should t on a
screen sized for 1024 x 768 resolution.
If you need revisions to your header name graphic, please contact RI.gov for a new
copy.
• Branding elements may be added to the right side of the header zone, with the
following guidelines:
Graphics, photos or other branding elements should either be placed on standard blue
header background color, or should use a fade to create a smooth transition into the
agency name.
All branding elements must be sized to allow for logo, name and branding elements to
all t horizontally on a screen sized at 1024 x 768 resolution.
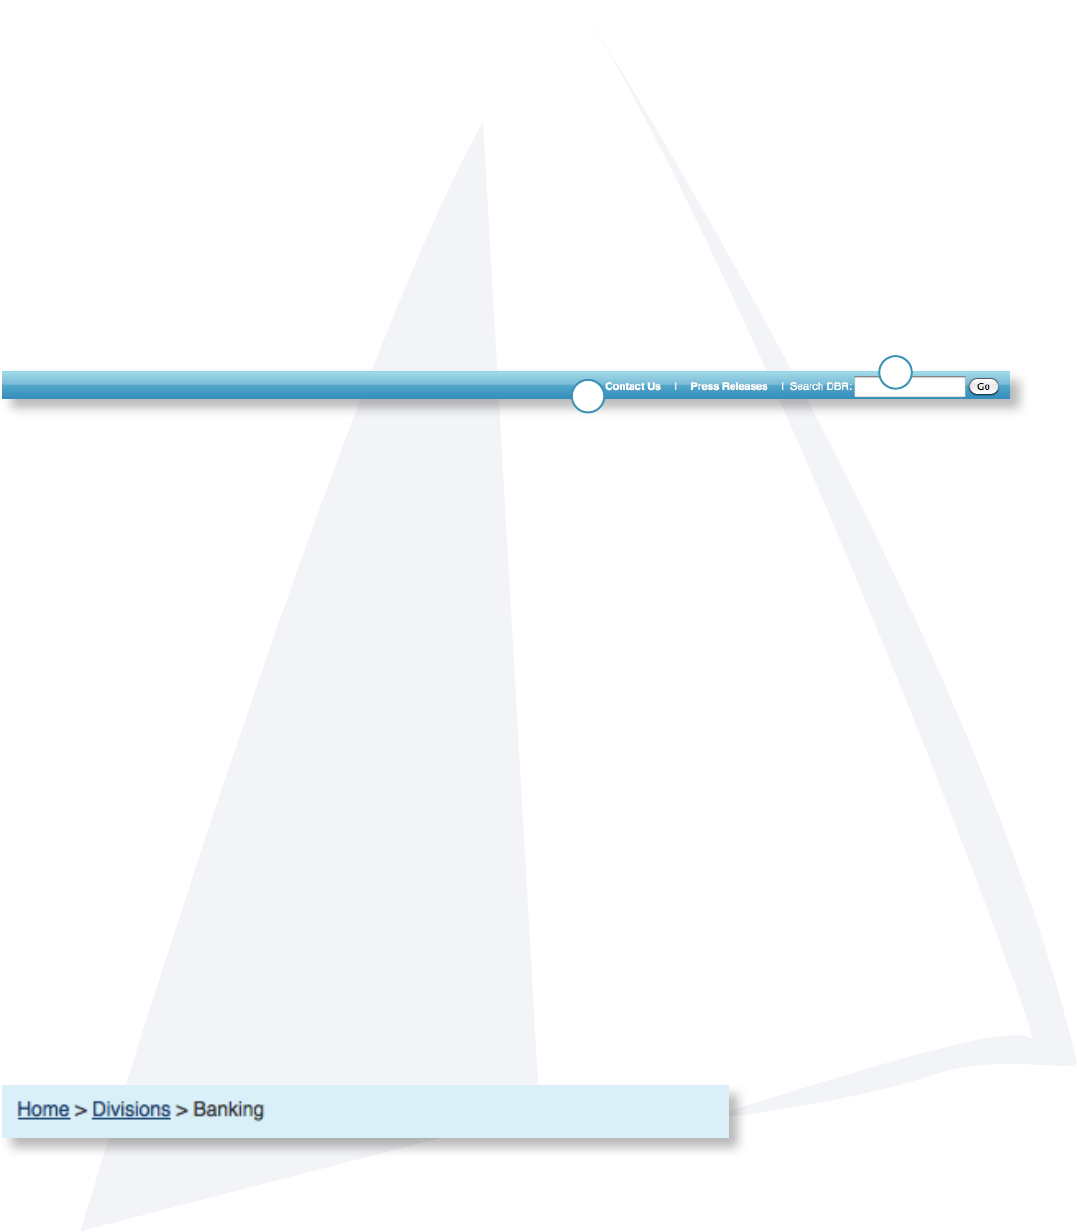
Header Bar
Breadcrumb Trail
1
2
This area is designed to contain the following content elements:
1. Agency Site Search box
Note: This is currently unavailable for municipality, or non-state agency sites.
2. Secondary link categories Links can be added to this area links that are general enough in
scope to pertain to the entire site, but are of secondary importance to the main navigation
categories. Good examples of this include “Contact Us” and “Press Releases”.
Header Bar Guidelines:
• Secondary links should remain consistent throughout the site, and should be mirrored
in the footer links are as well.
• Links should be of secondary importance to main navigation categories.
Where am I? The bread crumb is designed to illustrate to the user where they are in relation to
the rest of the site, how they got there, and how to get back as needed. Example:
14
Breadcrumb Guidelines:
• Links should be placed at the home page, followed by each successive level to the
current page you are on, separated by a > sign.
• All levels, or pages should be linked to the appropriate section or page, with the
exception of the current page - this should remain unlinked to avoid confusion, as it is
the page you are currently viewing and does not require a link.
• Breadcrumb trail should always be used at the top of the content area, before the rst
content box h1 to avoid confusion and keep navigation consistency with other sites
using the standard template.
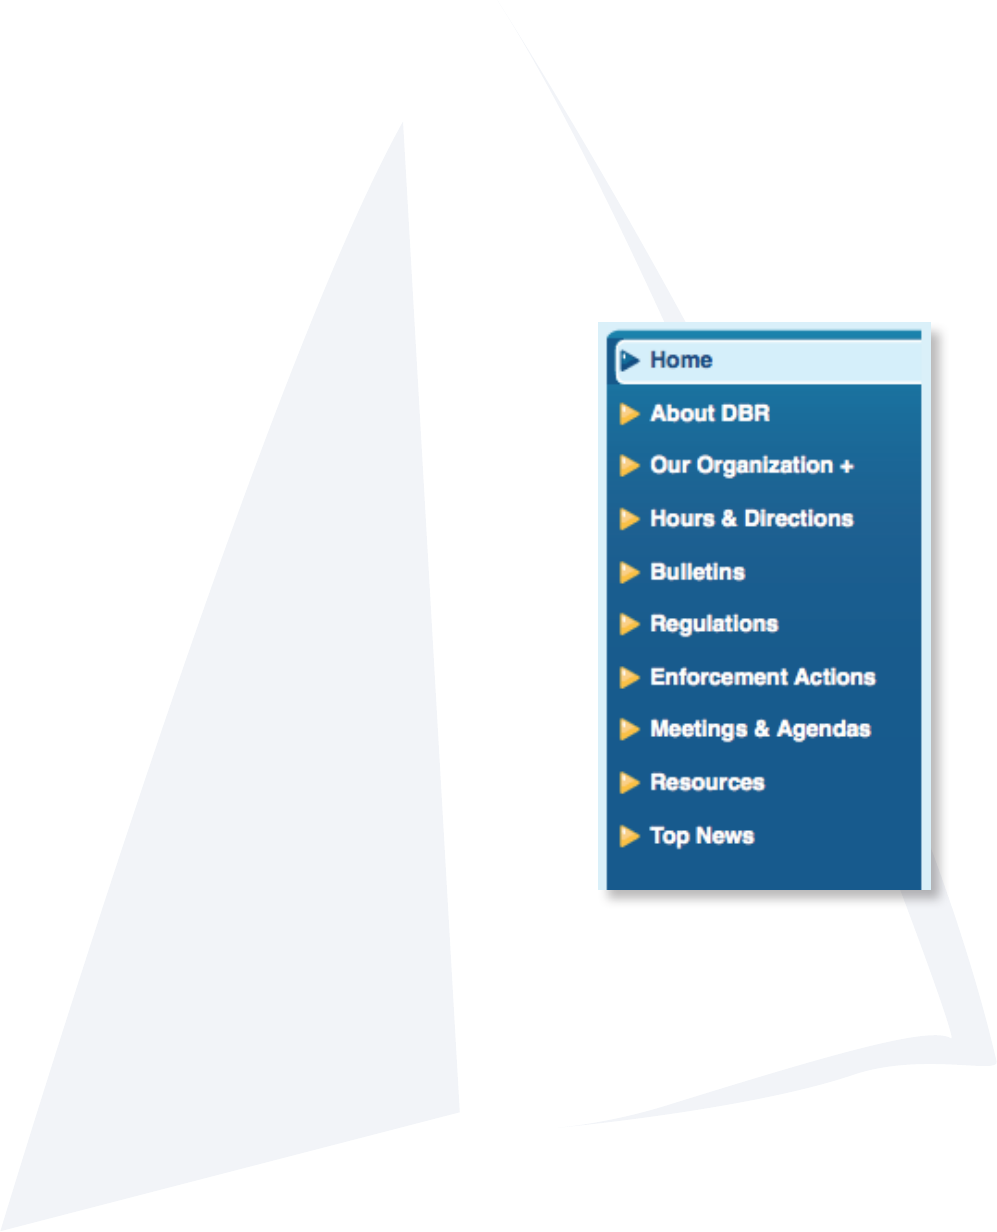
Main Navigation
The main navigation is limited to ONLY the following:
Your main site categories. (That’s it!)
Reason? It eliminates confusion by not cluttering the area with
too much information. Only the main categories are shown and
placing secondary information in sub-navigation.
Main Navigation Guidelines:
• Main navigation items should link ONLY to pages, or
major sections of your site.
• Linking to other items such as PDFs, Word documents,
or other Web sites should be reserved for the main
content area, sub-navigation or right column as
appropriate.
Reason: Linking to other items or sites creates a break
in the user experience - rather than being presented
with a section of the Web site to view, the user unexpectedly, or without warning is
presented with either a document, or entirely different Web site to navigate. If it is
important to have a main category item link to either a document or another site, rst
have the main navigation item link to a page on your site that then links to this item
from the content area on the corresponding page with an appropriate description
15
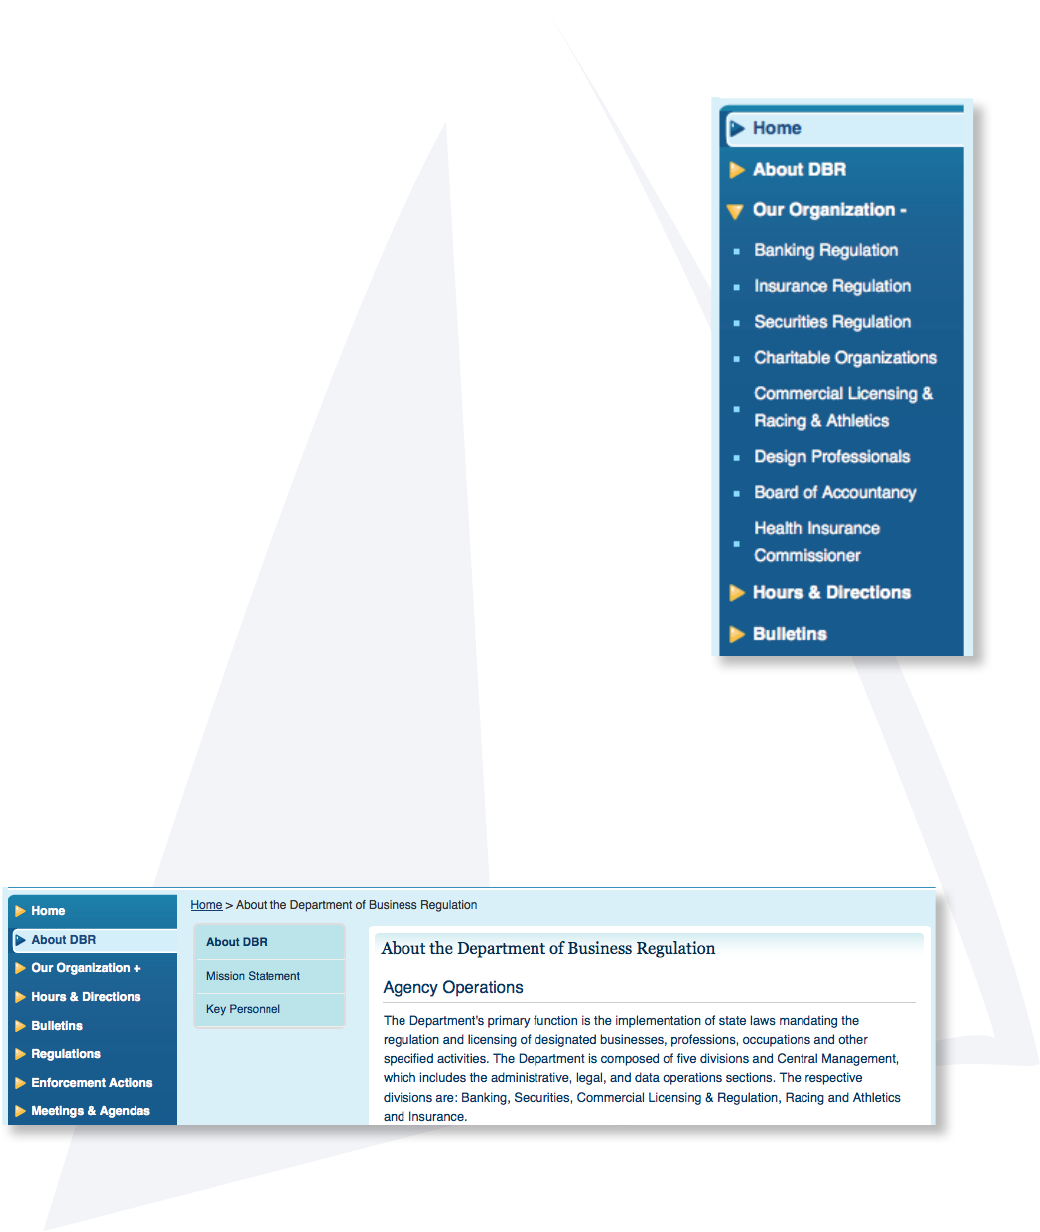
Sub Navigation
Sub Navigation can be used to assist the user in navigating major sub categories, or pages
within a main navigation or category section. There are two styles available:
• Dynamic drop down menus
• In-page sub-navigation
Dynamic drop down menus
Controlled by javascript to show/hide subcategories as needed in
the main navigation.
Guidelines:
• Subcategories must go only one level deep - no “sub sub
categories”.
• Subcategory links should remain consistent throughout
the main category selected.
In-page sub-navigation
A second option for secondary navigation is using the in-page navigation. This places the
secondary navigation next to the main content area.
16
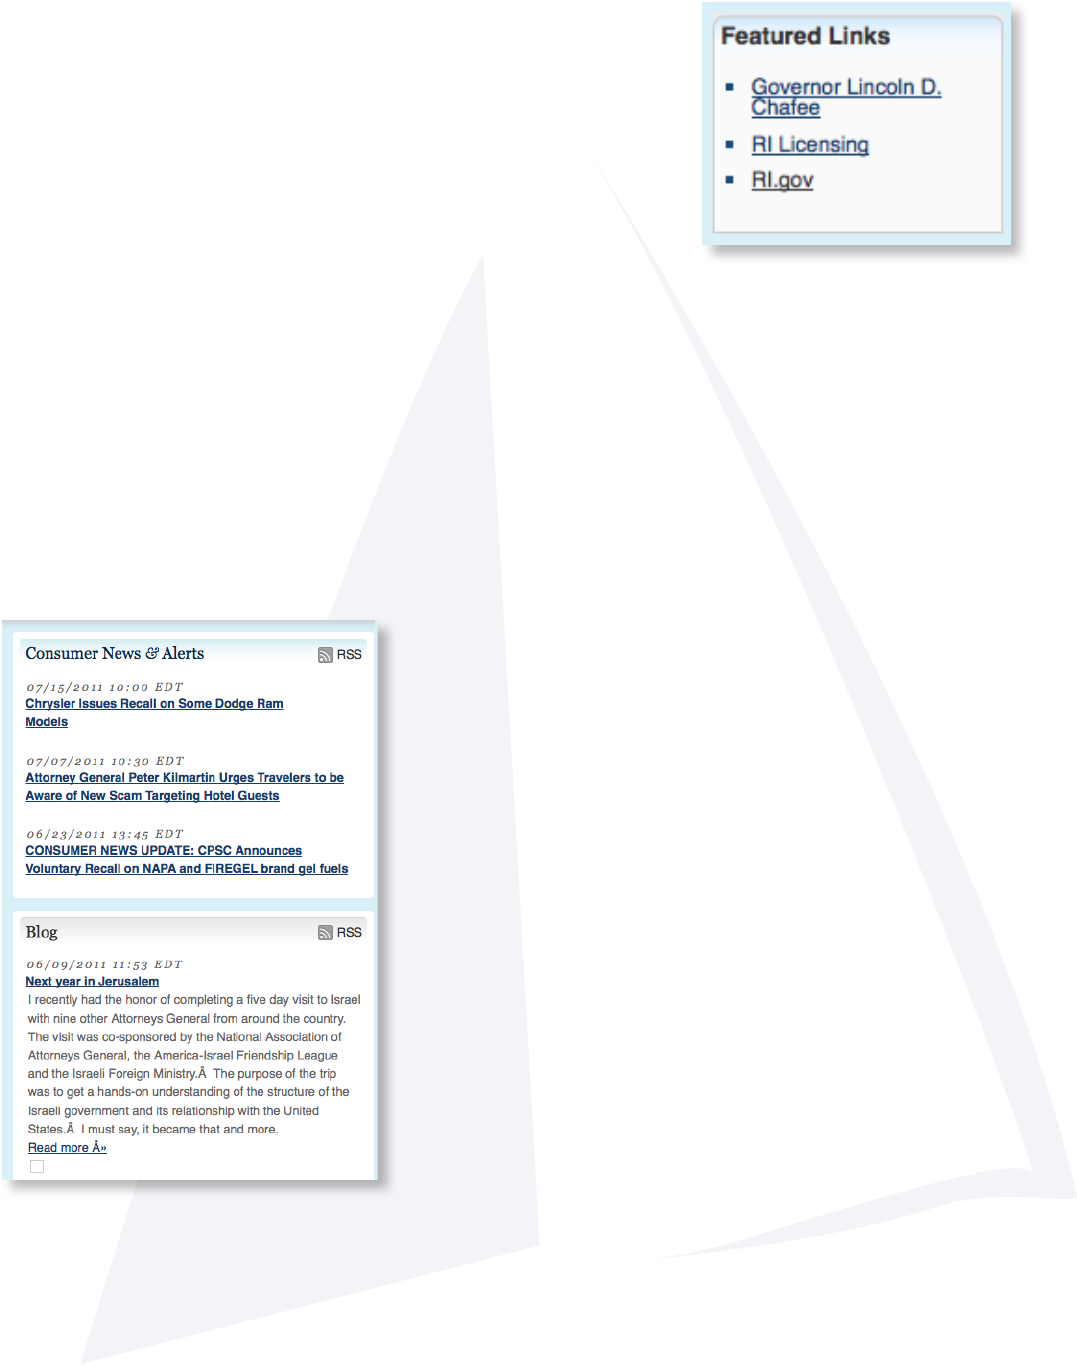
This right column area can include the following:
• Related Links
• Press release headlines
• Highlights headlines (using the RI.gov toolbox) - See
www.ri.gov/rex for more information
• Short snippets of content general in scope to the entire
site, or related to the main content.
• Related association logos, sponsors, agency badges and seals.
Featured Links Guidelines:
Third column content should not overly extend the length of the screen beyond the main
content area. In other words, if the third column becomes the main reason a page is as
long as it is, consider summarizing the content in the third column and linking to a page
with the full text in the main content area. Or consider, moving the content in it’s entirety
to a main content area on a dedicated page.
Example: Press releases list only the headline, while
using a link to view the entire press release in the body
of a page.
Reason: This helps limit scrolling and intervention to
navigate content, and makes for a better designed web
page.
Featured Links: (third column, or right column content)

17
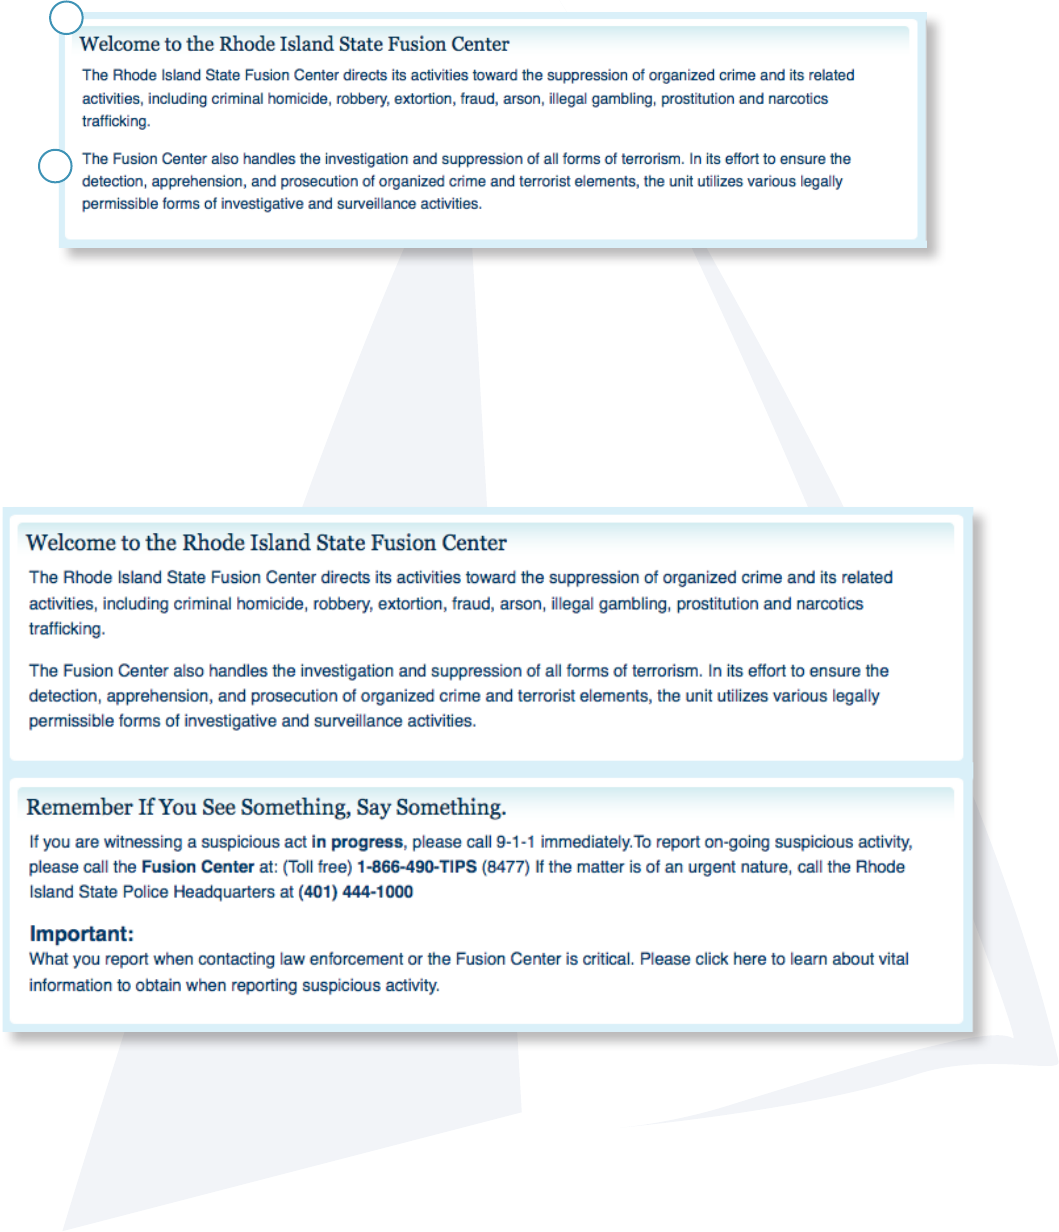
Footer
Main Content Area: (Center Column)
Much like the header bar, this are should accommodate links that are broad in scope to be
used throughout the site, while not important enough to warrant space on the main navigation.
The footer consists of 3-4 columns of additional links.
Footer Guidelines:
• All agency sites should use, or link directly to the RI.gov privacy policy - located at:
http://www.ri.gov/policies/
• Links placed here should mirror those in the header bar.
• Links placed in this region should be of secondary importance to those in the main
navigation, but broad enough in scope to justify placement on every page of the site.
• ONLY text links should be placed here.
The main content area is the location for all primary content on your site. Using the template’s
CSS, (cascading style sheet) main content areas are divided into building blocks that can be
assembled to best t your content. The main content area options include:
1. Single Blocks per page
2. Multiple Blocks per page
3. Headline Boxes
4. Sub-headings
5. Lists
6. Images
7. Tables
18
Multiple Blocks
This format is useful if multiple content areas are needed that or are distinct enough to warrant
their own content block, but are still related to the page as a whole.
1
2
Single Block
The most common layout is a simple one block layout per page. This allows for one primary
headline (1) for the page’s content area, followed by additional content (2) and sub-headers as
needed.
19
Tables
While the RI.gov template uses a fully CSS (no tables) design, the main content area is fully
optimized to work with tables where appropriate for tabular data.
Guidelines:
To make sure your table works well with the full liquid, or expandable nature of the template,
template widths must either not be set, or set to a percentage of 100 percent or less to ensure
they remain within the main content area.
Images
Images can easily be added to content area, and arranged as need be — this includes
centering, as well as aligning left or right to allow for text to wrap around the image.
Guidelines:
Make sure the image is compressed for web (small enough for someone to download on a
dial-up connection) and small enough in size to still t in the main content area on an 800x600
screen.
20
Editing Your Web Page
How to add content to your Web site.
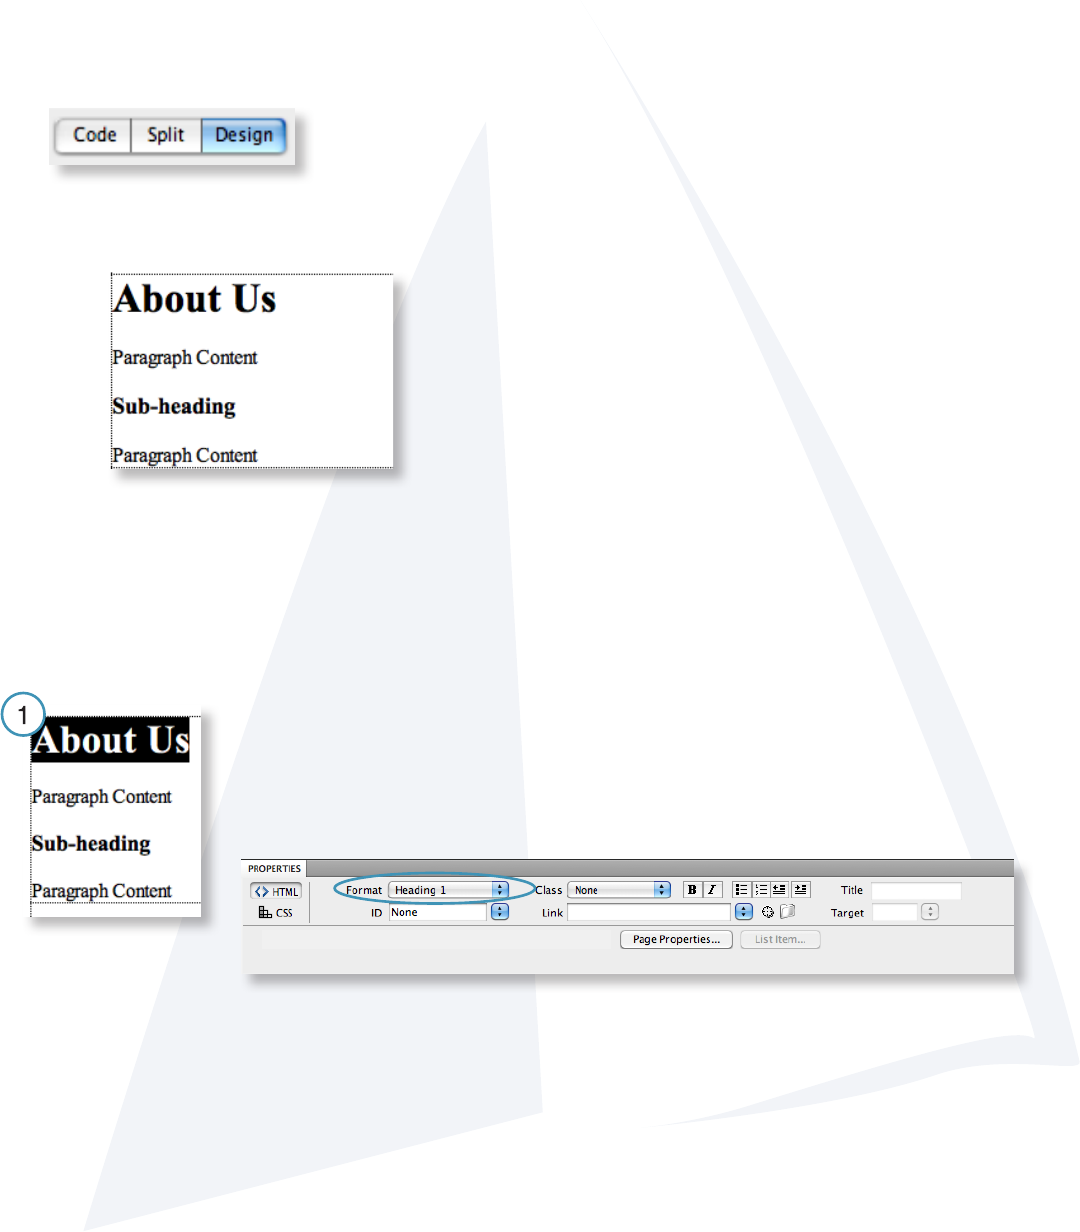
In Dreamweaver, make sure you are in the Design view
The main content will look like this:
1. The rst section is the heading. To change the heading, place your curser where you want
your heading to be or highlight the heading that is already there to change. Type in the text you
would like.
With this content highlighted, look at the Properties panel. Where Format
is, you should see Heading 1 selected. If you don’t, click on the drop-
down and choose Heading 1.
NOTE: Only one Heading 1 should be used on the page.
Editing the page content in Dreamweaver.
21
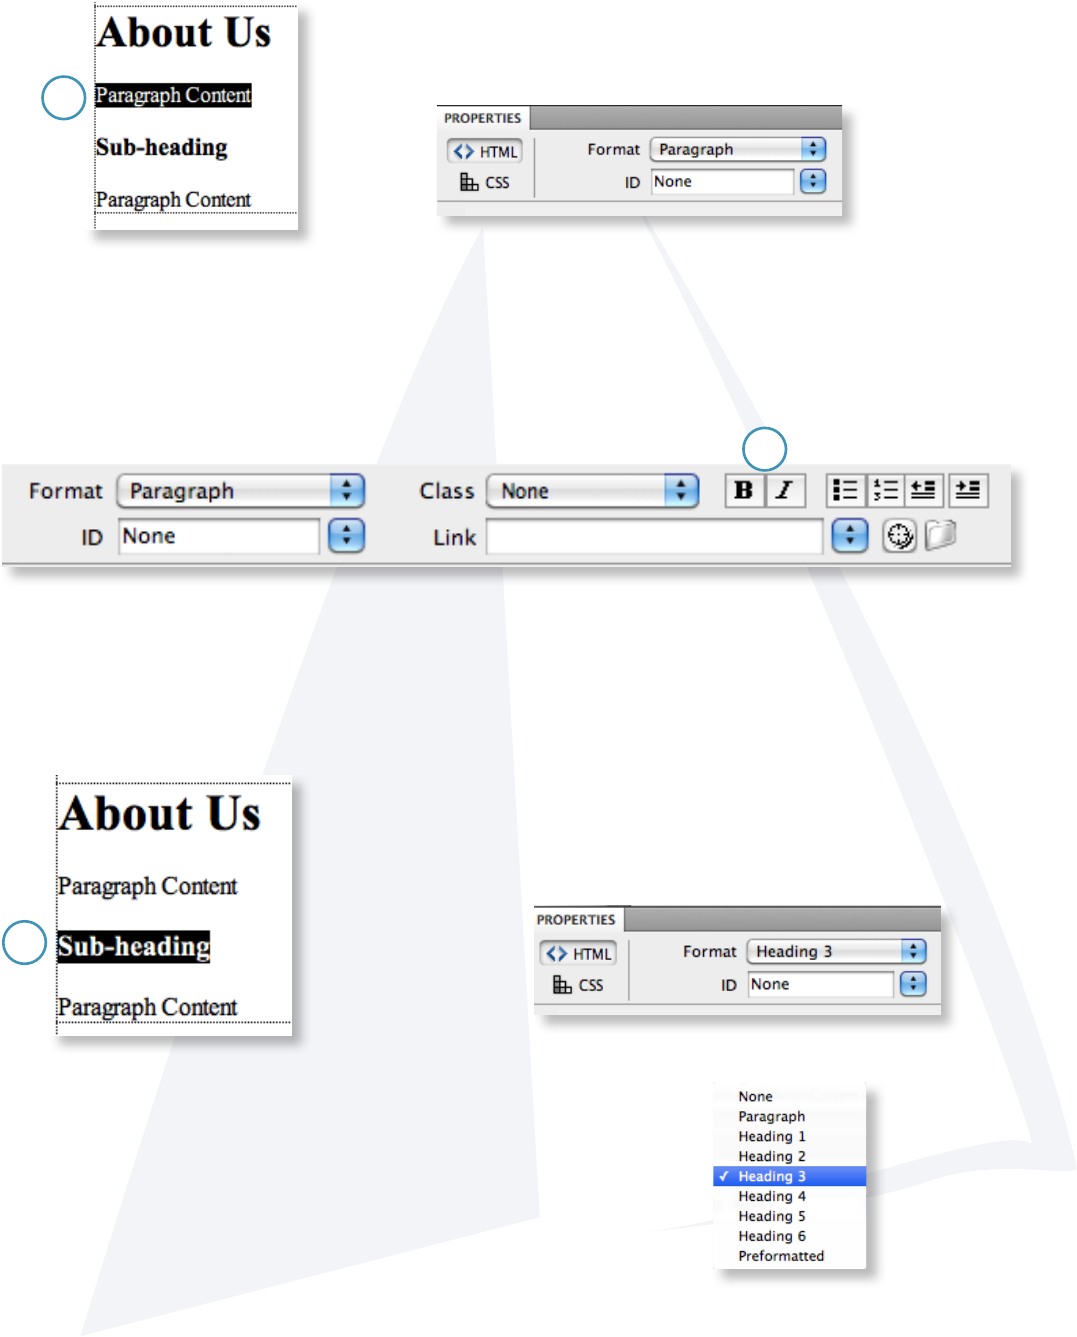
3. To change the sub-heading, place your curser where you want your sub-heading to be or
highlight the content that is already there to change.
With this content highlighted, look at the Properties panel.
Where Format is, you should see Heading 3 selected. If you
don’t, click on the drop-down and choose Heading 3.
NOTE: There are other Heading choices that you can
use. From the drop-down menu, you can select any of the
following headings: Heading 2, Heading 3, or Heading 4.
2. To change the content, place your curser where you want your content to be or highlight the
content that is already there to change.
With this content highlighted, look at the Properties panel.
Where Format is, you should see Paragraph selected. If you
don’t, click on the drop-down and choose Paragraph.
NOTE: All the styling and formatting for the Web site is located in an external le. This includes
the font choices and colors. There is no need to change the font since that is already done
for you. You can change basic formatting like bold or italic, similar to Word. In the Properties
panel, you will see similar icons to make type bold or italic (2.1)
2.1
3
2
22
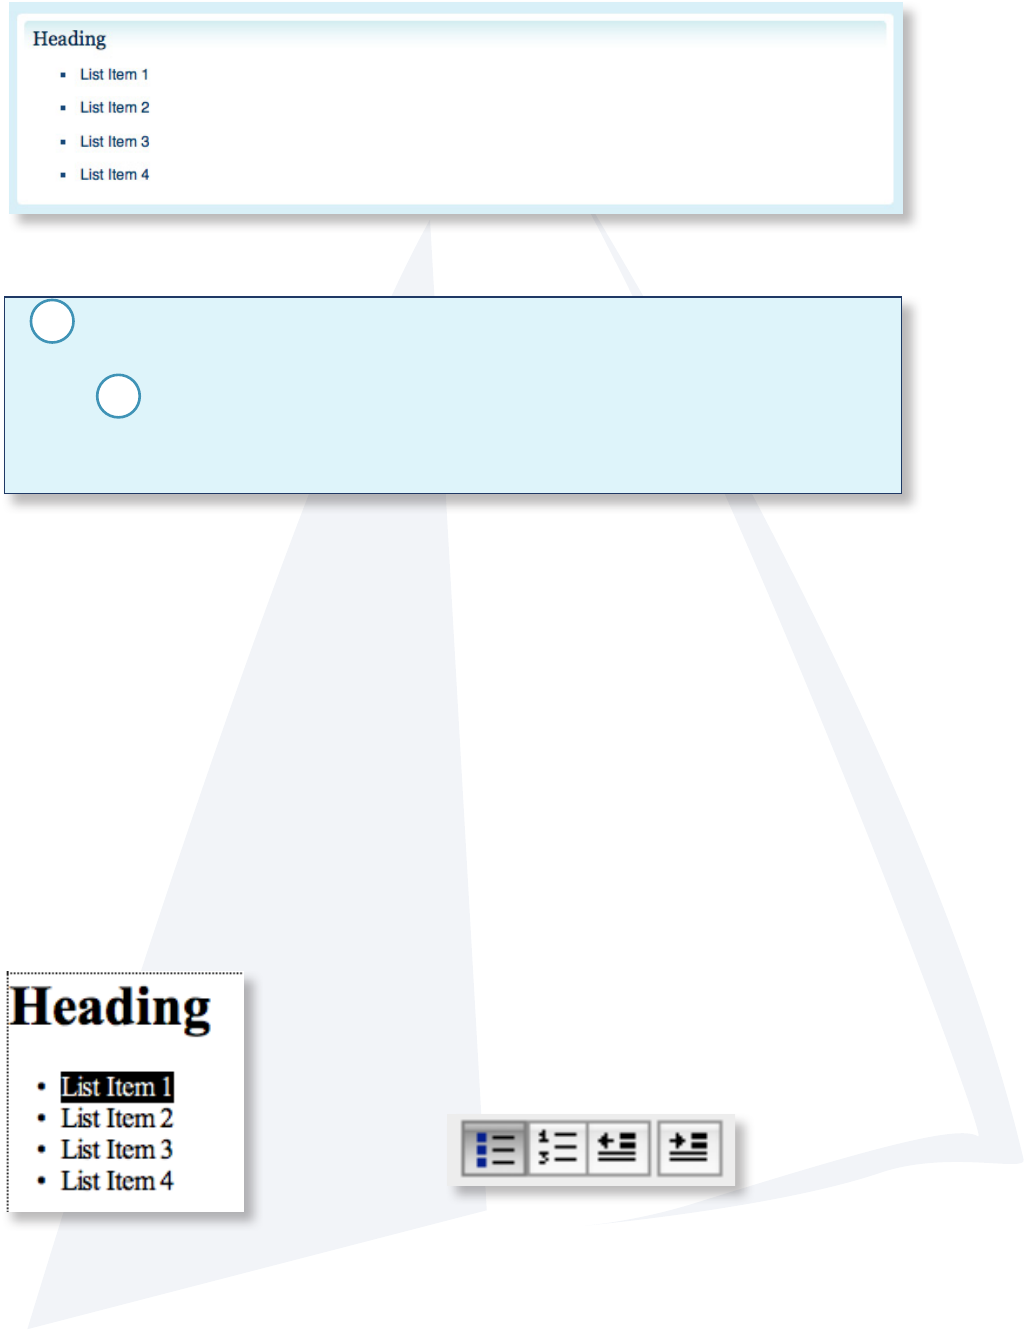
Creating a List.
Another type of content besides paragraphs is lists. A list will look like this:
In code view, a list looks like this:
<ul>
<li>List Item 1</li>
<li>List Item 2</li>
<li>List Item 3</li>
<li>List Item 4</li>
</ul>
1. A list begins with a <ul> tag. The <ul> tag stands for unordered list. Inside the <ul> tags are
the <li> tags.
-There is a second type of list item, the <ol> tag. The <ol> tag stands for an ordered list and
instead of seeing the bullet points, the list will be numbered starting with 1.
2. The <li> tag stands for list item. This is where the content for each list item goes.
2
1
Creating a list in Dreamweaver.
1. To create a list, place your curser where you want the list to be or highlight the list that is
already there to change.
With this content highlighted, look at the Properties panel. Find
the icons that look like the image below. To create an unordered
list (a list with bullet points) click on the rst box. To create an
ordered list ( a list with numbers) click on the second button.
23
Adding an Image.
1. Make sure the image is small enough for someone to download on a dial-up and small
enough to t in the main content area on an 800x600 screen.
2. Out side of Dreamweaver, locate your Web site les.
3. Place the image into the content folder located in the img folder.
3. Go back to Dreamweaver and open the page you want to place the image.
4. Place the curser above, below or next to the content on the page where you want the image
to be placed.
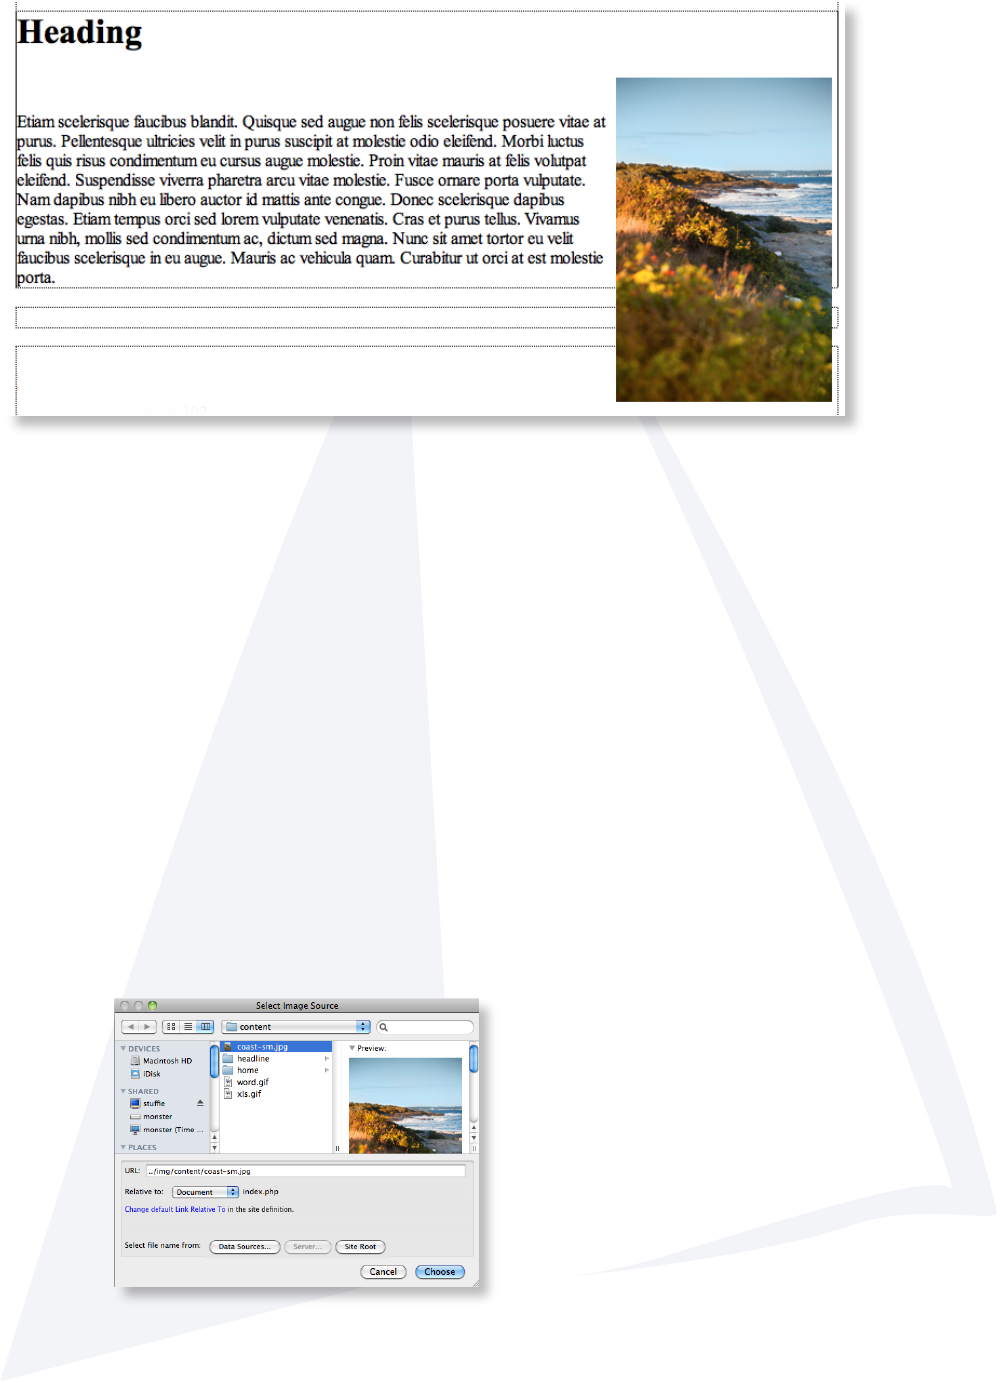
5. Go to the top menu, select Insert / Image.
6. In the window, navigate to the img folder then the content folder and select the image to use.
Click Choose.
24
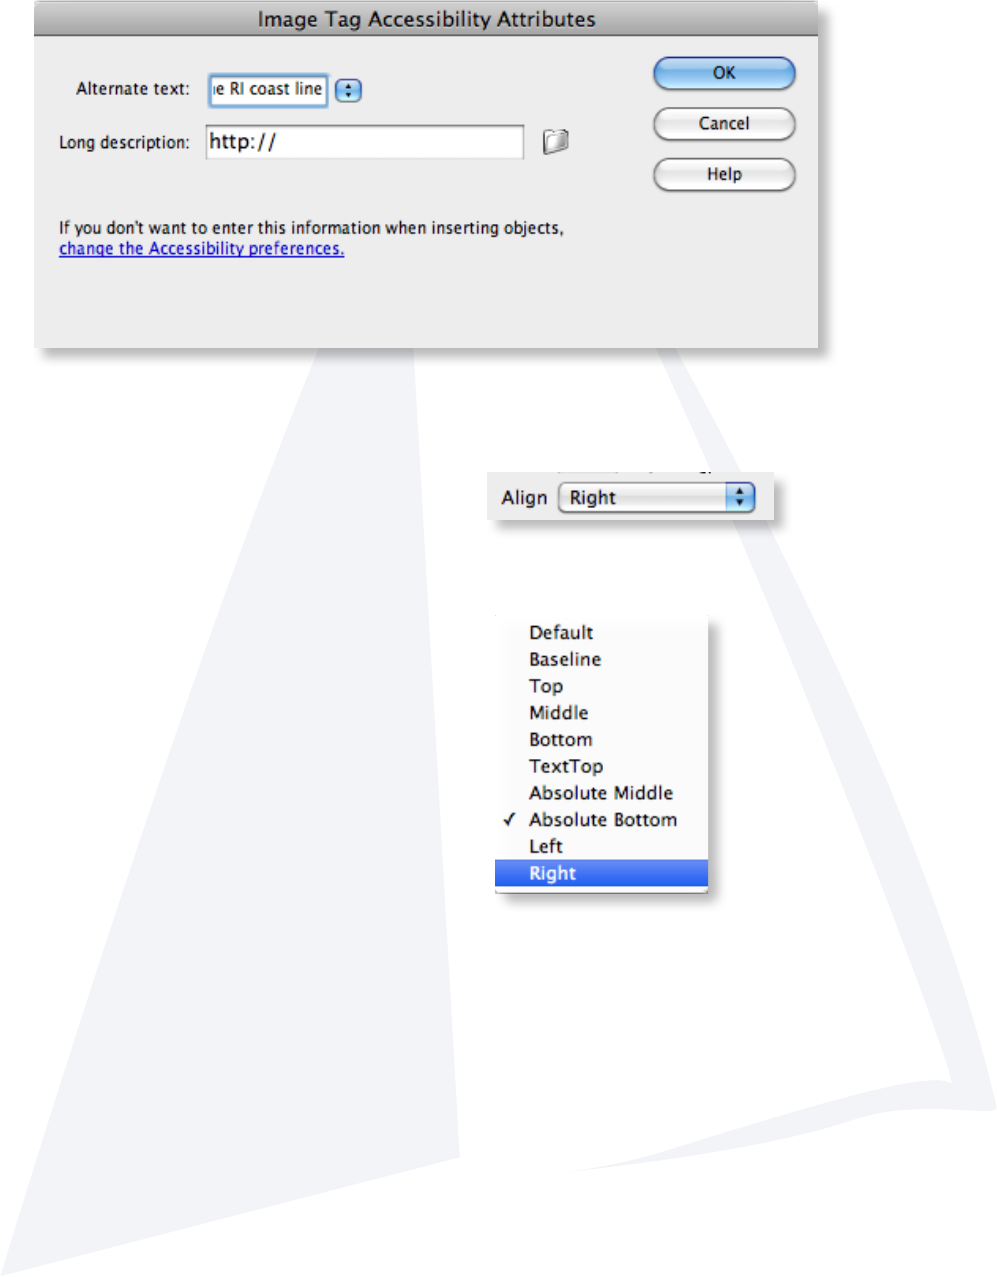
7. The next window is for accessibility. Fill out the Alternate text option in the window below.
This is a brief but detailed description of what the image is about. Click OK.
NOTE: Filling out the Alternative text box satises the required State and Federal accessibility
guidelines.
The image is now inserted into the page.
8. With the image selected, In the Properties panel,
look for the Align option.
9. Select the orientation you would like the image to
have from the drop down menu.
25
Adding a Table.
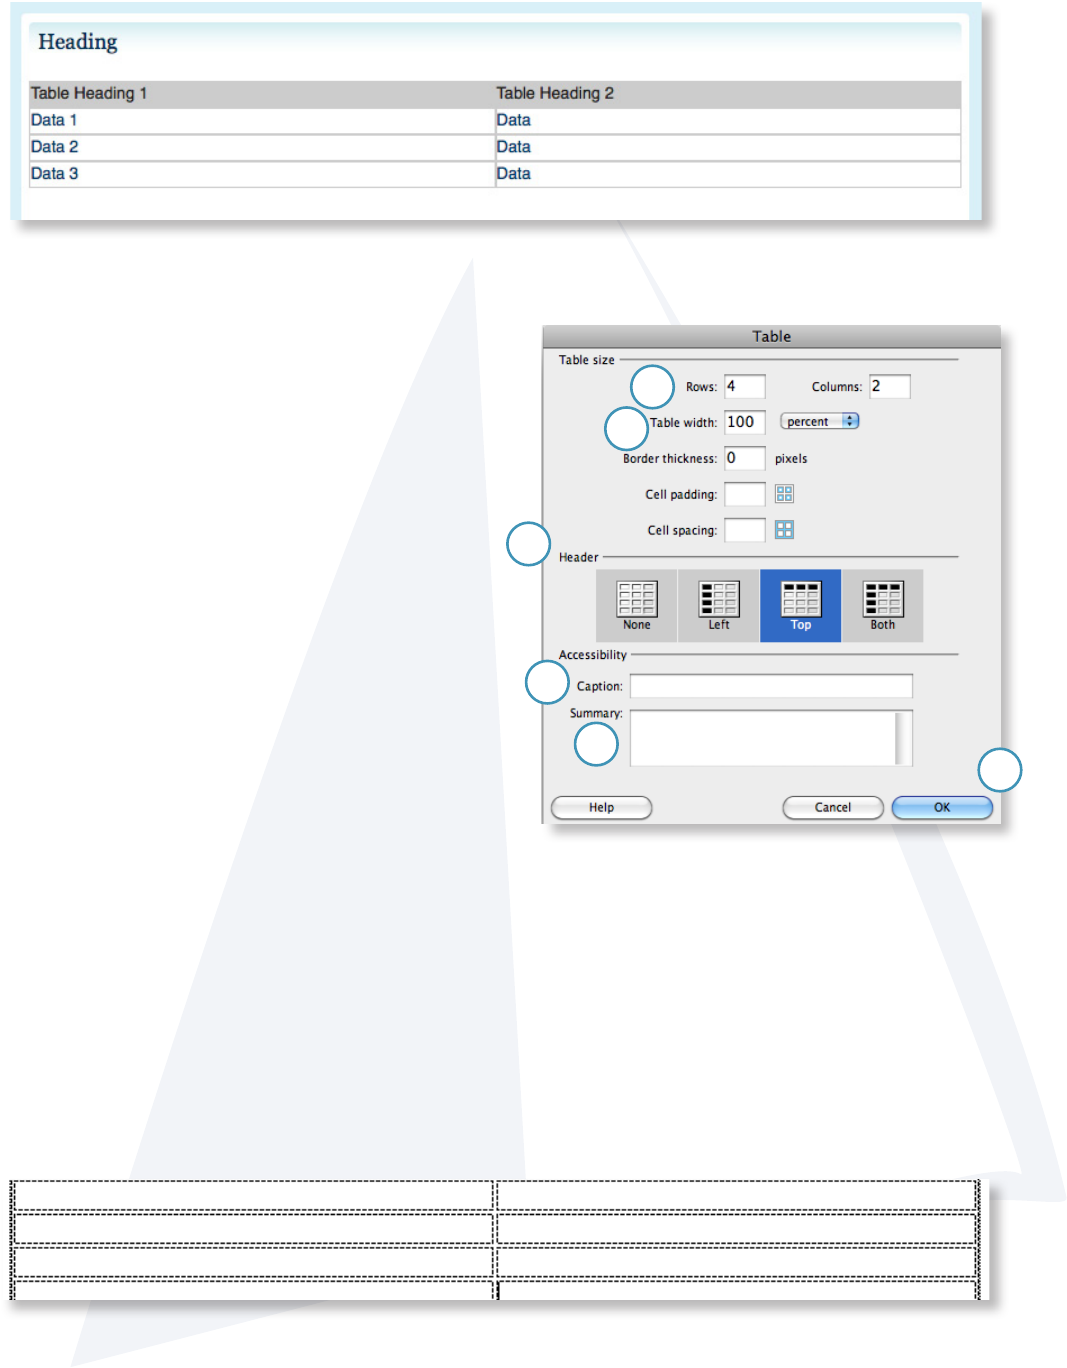
1. To insert a table, place the curser where you want to insert the table, go to Insert / Table.
2. In the window, input the number of Rows
and Columns that are desired.
3. Table width:
-100% will make it t the entire content area
4. Header: This option places a row or column
header into your table.
-None for no header
-Left to place the headings as a column
-Top to place headings as a row
-Both gives you headings for the columns
and rows.
5. Caption: add a caption for what the data in
the table is about.
6. Summary: a brief summery about the contents of the table.
7. When done, click OK
You will now have a table similar to this in Dreamweaver, with your chosen number of rows and
columns
2
3
4
5
6
7
26
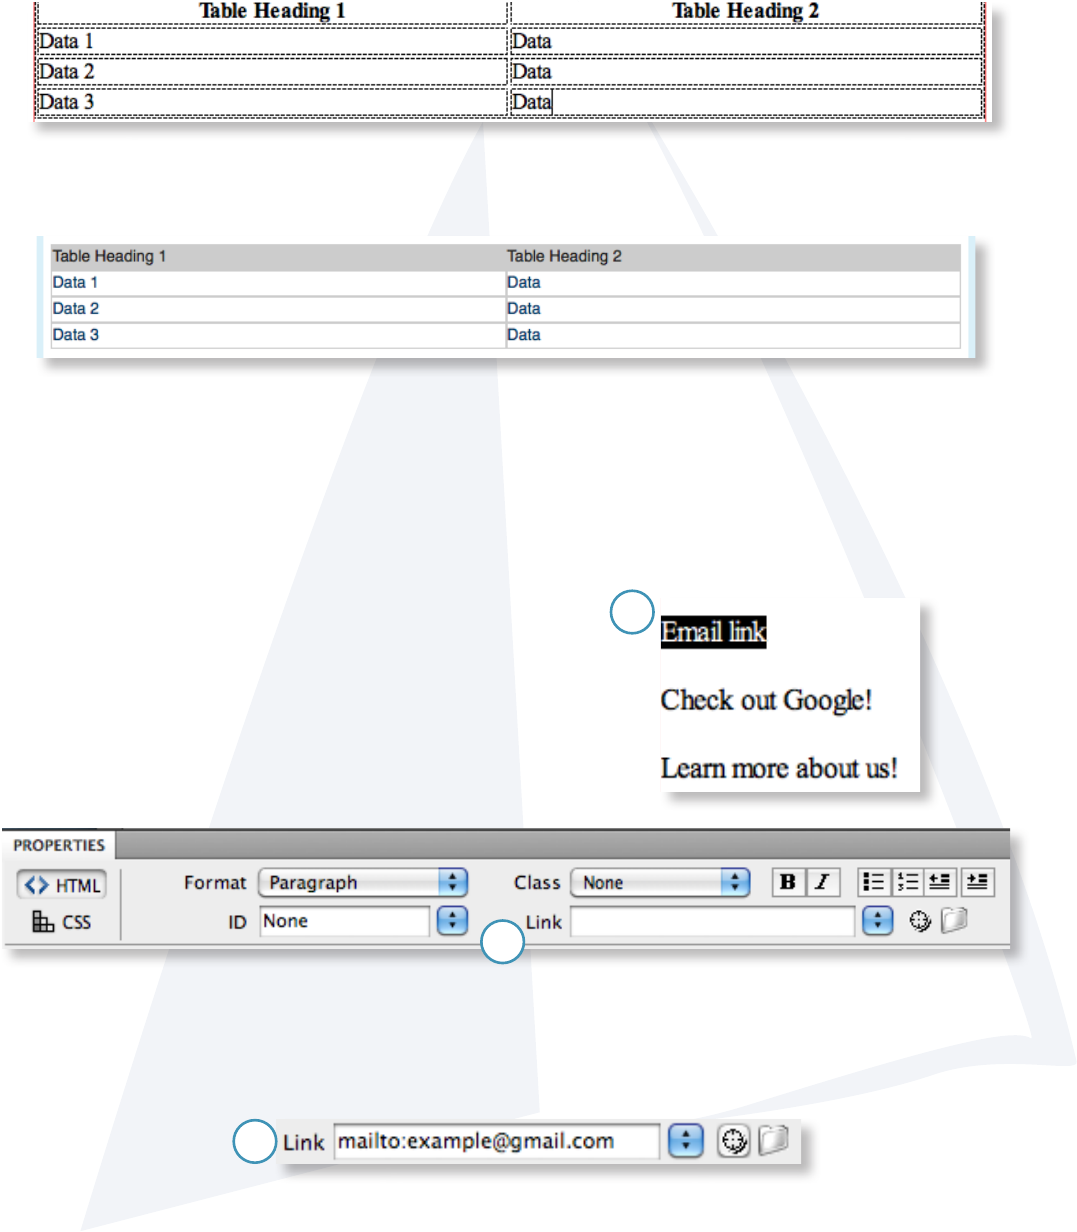
Add the content to the table.
1. Place the curser inside one of the boxes. Begin typing the data for that place.
Below, this table example is 4 rows, 2 columns and has a header along the top and has a
width of 100%
Below, is an example of how it appears on the site.
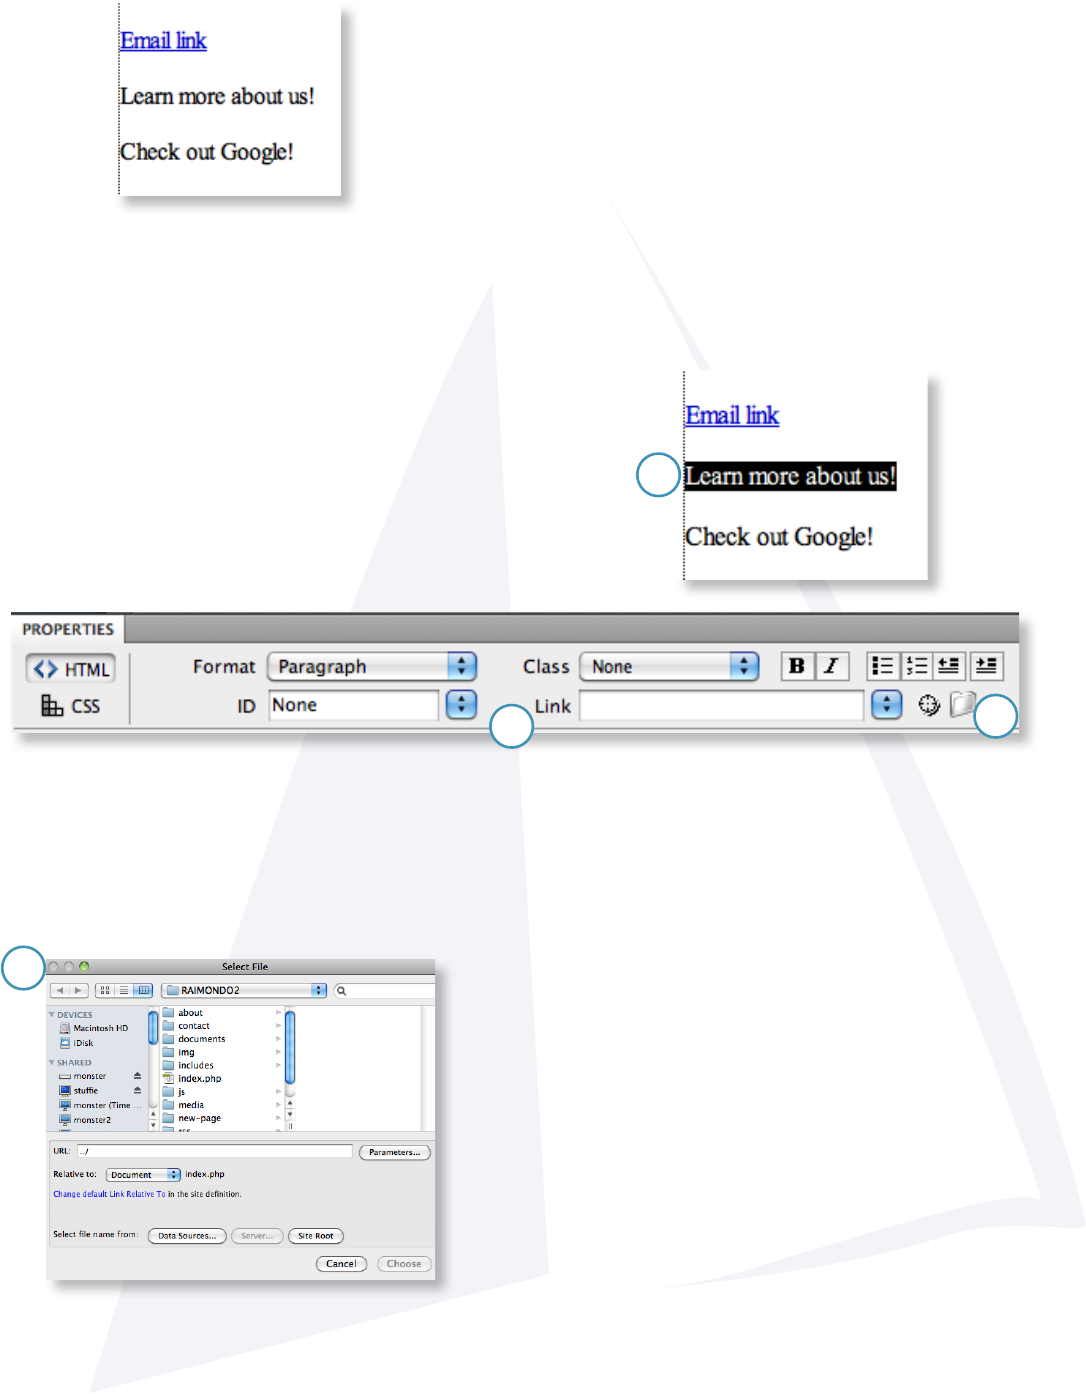
Creating a Link.
There are three types of links: an email link, a link to a page within your site, and an external
link.
1. Highlight the text you want to use for the email link
2. In the Properties panel, nd the Link option.
3. Type this into the box: mailto:[email protected] (make sure to put in the actual email
address.) Then press Return or Enter on the keyboard.
Email Links.
3
2
1
27
Internal Page Links: Linking to other pages on your site.
1. Highlight the text you want to use for the link.
2. In the Properties panel, nd the Link option.
3. Click on the folder next to the link box
4. Once you have typed in the mailto text, your highlighted words should look like this:
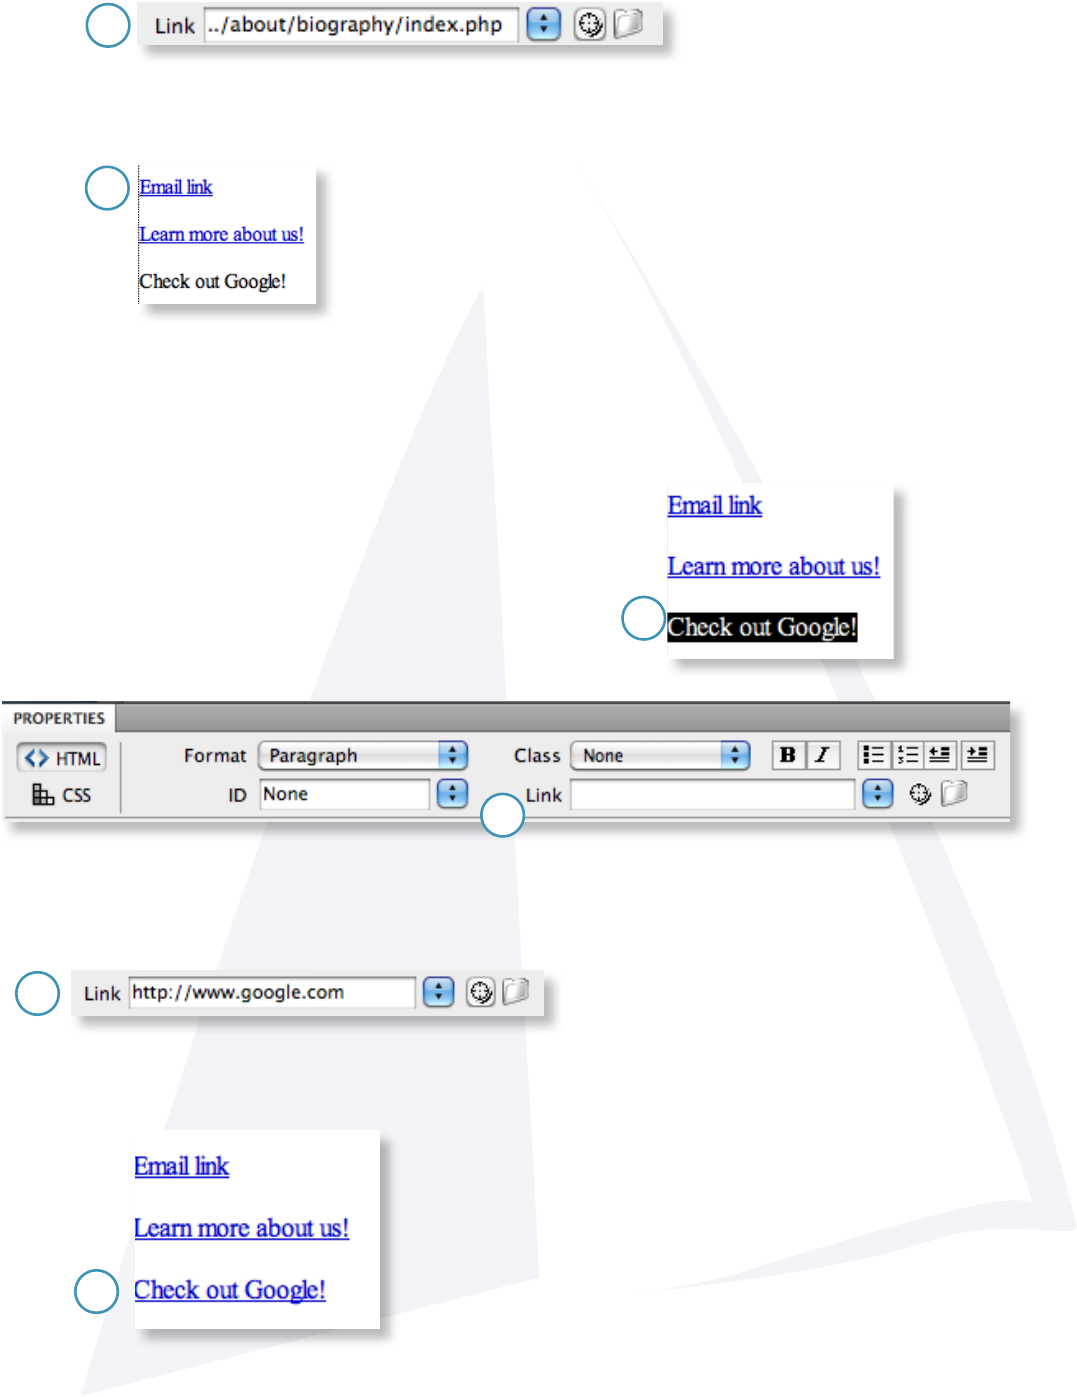
4. A window will pop-up to navigate to the location of the page you would like to link to.
Navigate to the page you want to link to, select it and click Choose.
NOTE: You can also link to a PDF, Word, Excel and other les using the same method. See
the guidelines below for linking to les.
Guidelines for linking to les:
-Before creating a link to a le, place the le (PDF,
Word doc, Excel, Powerpoint, ect. into a folder
on the site named Documents. If no folder exists,
go ahead and create one. Then navigate to the
Documents folder and select the le you want to
link to.
2
3
1
4
28
5. After you select the page or le, the path will show up in the Link box.
6. The highlighted text will now be a link to a page on your site or a le.
External Page Links: Linking to other Web sites.
1. Highlight the text you want to use for the link.
2. In the Properties panel, nd the Link option.
4. Press the Return or Enter Key when done and the text should now look like this:
3. Type in or copy and paste the complete web address for the Web site you want to link to.
NOTE: Make sure to write the entire address including the http://.
5
6
2
3
1
4
29
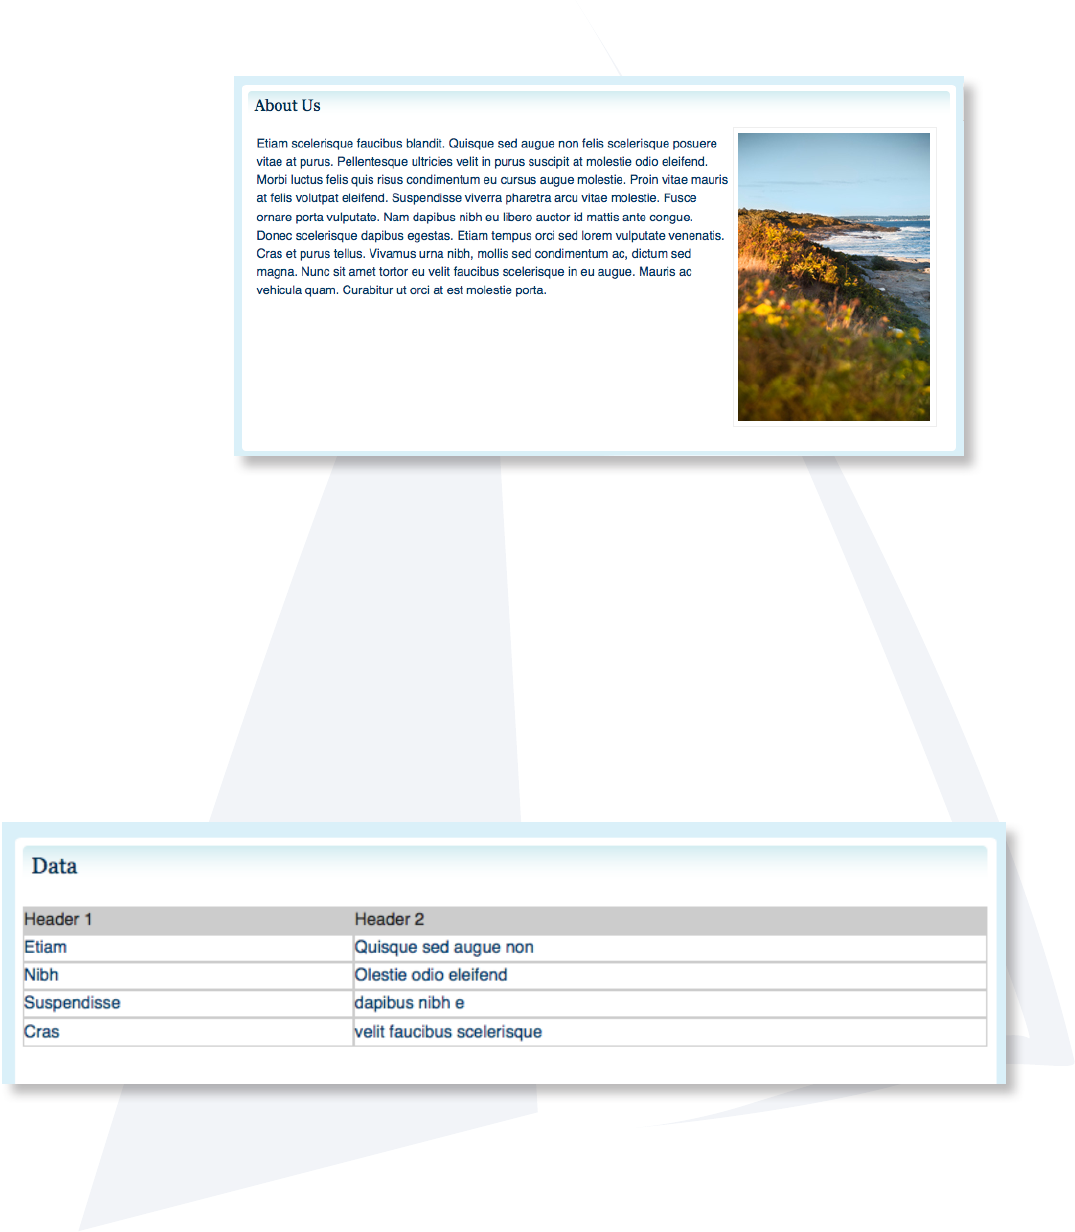
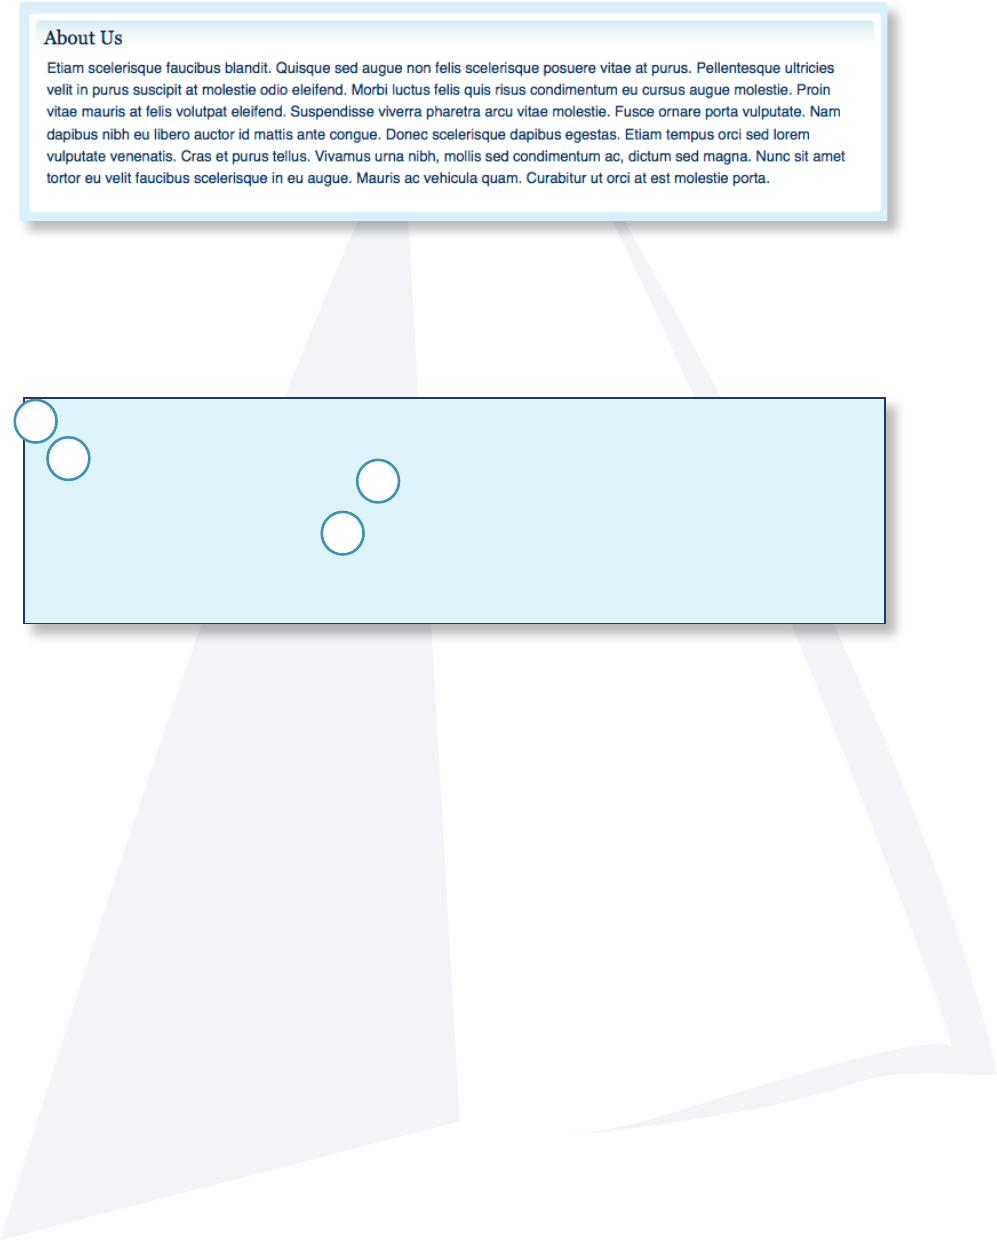
A Single block of content.
A single block of content will look like this on your Web site:
Creating blocks of content.
To create a single block of content, use the code below:
<div class=”lightblueContent”>
<h1>About Us</h1>
<p>Paragraph Content</p>
<h3>Sub-heading</h3>
<p>Paragraph Content</p>
</div>
1. The <div>, </div> creates the block for the content.
2. Inside the box, contains the rst heading (<h1>, </h1>).
-There are four different <h> tags: <h1>, <h2>, <h3>, and <h4>. The <h1> is used as
the main heading for each block of content. The <h1> should only be used once per
block. Using it more then once in a single block will cause aesthetic issues with the
style sheet.
3. The <p>,</p> tags are paragraph tags and is where the actual content goes that
appears on the Web site.
4. Use the <h2>, <h3>, and <h4> tags for all sub-headings.
2
1
3
4
30
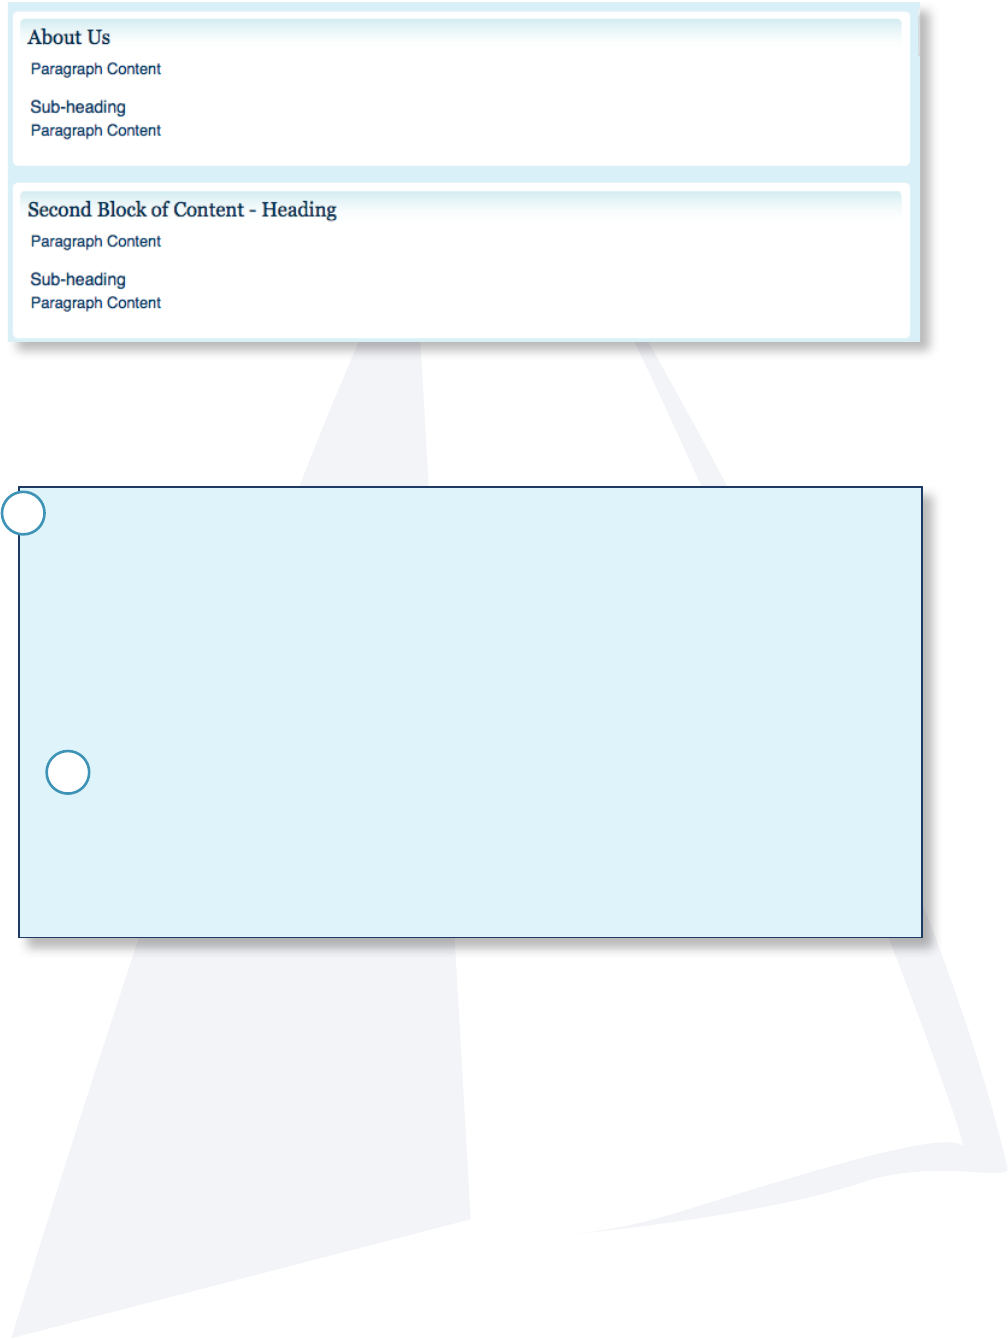
Multiple blocks of content.
Multiple blocks of content will look like this:
To create the look for multiple blocks of content, use the following code:
<div class=”lightblueContent”>
<h1>About Us</h1>
<p>Paragraph Content</p>
<h3>Sub-heading</h3>
<p>Paragraph Content</p>
</div>
<div class=”lightblueContent”>
<h1>Second Block of Content - Heading</h1>
<p>Paragraph Content</p>
<h3>Sub-heading</h3>
<p>Paragraph Content</p>
</div>
1. Copy the entire <div> from the opening tag, <div class=”lightblueContent”> to the
closing tag, </div> and paste right below the <div> you just copied.
2. Rename the <h1> for this second block of code. And ll in the rest of your content.
2
1
31
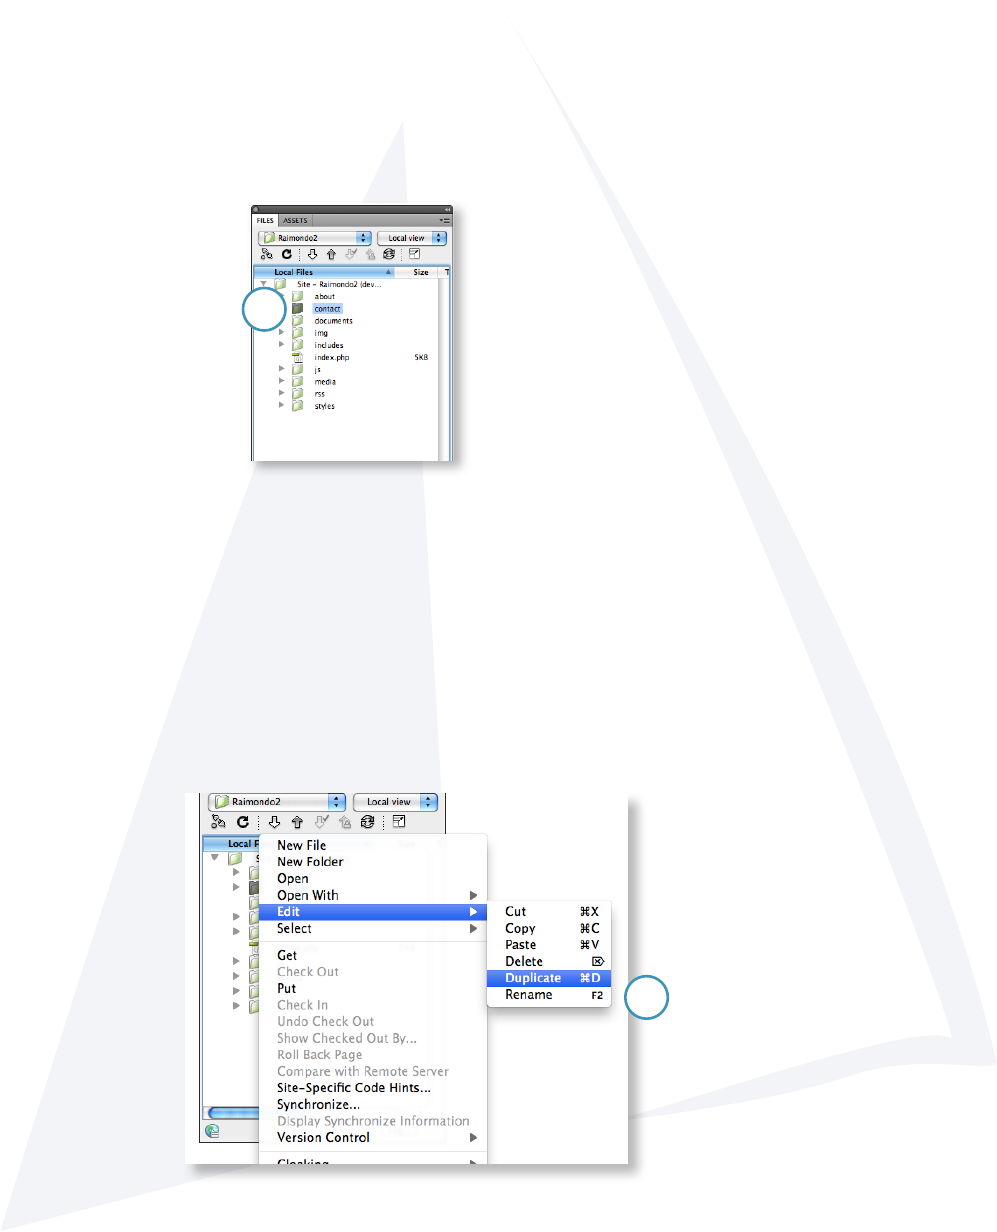
Creating a New Section
Dreamweaver’s Files panel makes it easy to update and create new pages for your site.
Creating a New Section.
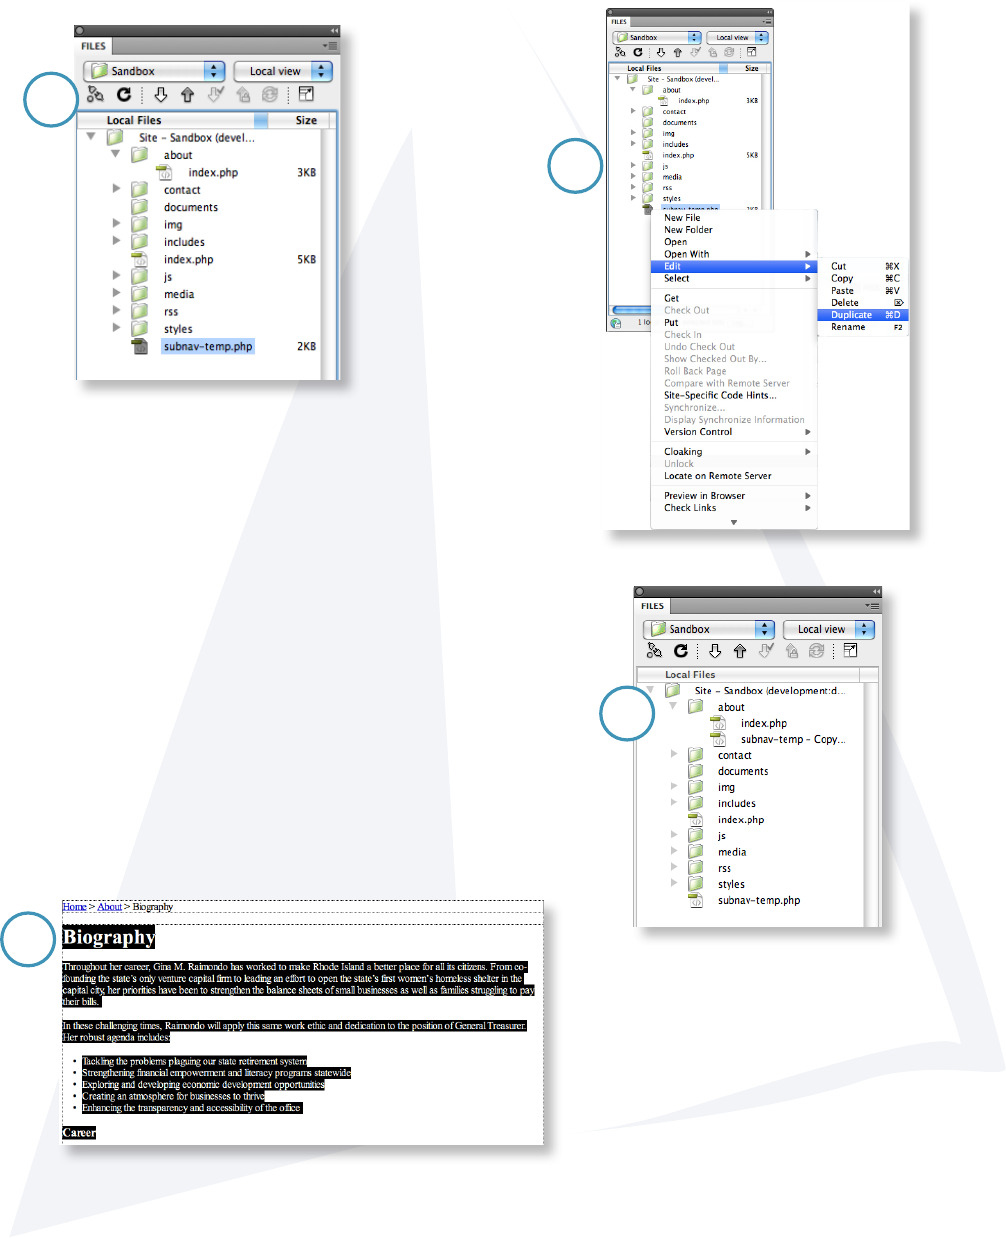
To create a new section for your site, duplicate an existing folder.
Adding a section to the site.
2. Right-click the folder to get the pop-up menu.
-Choose Edit / Duplicate from the pop-up menu.
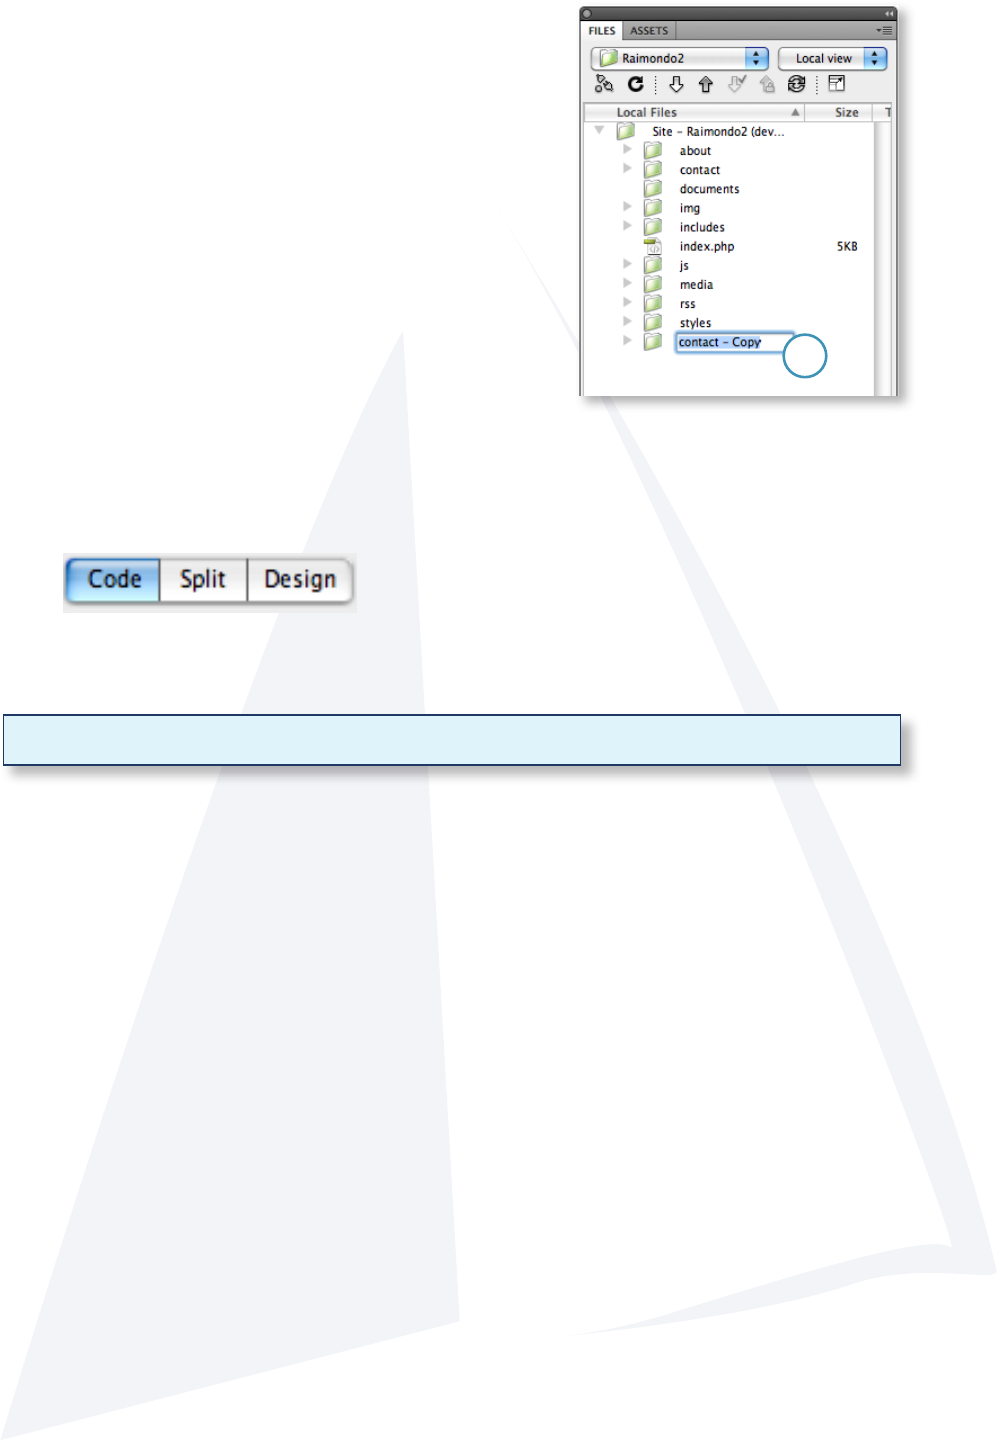
-The new folder will be placed at the bottom of the Files panel.
1. Select a folder to duplicate.
1
2
32
4. Open the index.php in the new folder.
5. Switch to Code view.
6. At the very top, look for the rst line of code that looks like this:
This code is the title of the page. Between the double quotes, rename the new page. ( It
may contain capital letters and spaces. ) Your new page is ready to go, you can switch
back to design view and can edit your content accordingly.
Next, you need to create the link for it in the menu. For instructions on how to do this, go
to page 33.
3. Rename the new folder that you just created.
(Make sure to use all lowercase characters, no
spaces and no special characters when renaming the
new folder.)
<? $title=”About Us”; ?>
3

33
Adding to the Main Menu
Creating a new Menu item.
Adding to the Main Menu, Part 1 of 2.
After you create a new page, you are now ready to add the new section to the main menu.
1. In your les panel, look for your includes folder and open menu.php.
2. Then click on Code to view the code.
3. Find the part of the code that looks like this:
NOTE: You will likely have more menu items then what appears here.
<div id=”mainNav”>
<ul>
<li class=”home”><a href=”<?=$url_prex?>/”>Home</a></li>
<li class=”about”><a href=”<?=$url_prex?>/about/”>About</a></li>
</ul>
</div>
1
3
2
34
4. Highlight one of the <li> lines. Go to Edit / Copy
<div id=”mainNav”>
<ul>
<li class=”home”><a href=”<?=$url_prex?>/”>Home</a></li>
<li class=”about”><a href=”<?=$url_prex?>/about/”>About</a></li>
</ul>
</div>
<li class=”about”><a href=”<?=$url_prex?>/about/”>About</a></li>
<div id=”mainNav”>
<ul>
<li class=”home”><a href=”<?=$url_prex?>/”>Home</a></li>
<li class=”about”><a href=”<?=$url_prex?>/about/”>About</a></li>
<li class=”about”><a href=”<?=$url_prex?>/about/”>About</a></li>
</ul>
</div>
5. Then nd where you want the new menu item to be (here, it is pasted on the bottom of the
list so it will be at the bottom of the menu on the Web site) and go to Edit / Paste
6. Next, rename the new line that you just added. Make sure to change the name in three
places: NOTE: A and B shown below should be the same and should match the new
folder name.
A. Change the class name. This must be all lowercase, no spaces and no special
characters and should match the new folder name.
B. Change the path name (URL). The path name is where the new menu item is located
or the URL link for the new page. The name here should match the name of the folder you
duplicated in the Create a new Page instructions. This must and should be all lowercase,
no spaces and no special characters.
C. Change the name of the link that will be visible in the menu on the Web site. This can
contain capital letters, special characters and spaces.
<div id=”mainNav”>
<ul>
<li class=”home”><a href=”<?=$url_prex?>/”>Home</a></li>
<li class=”about”><a href=”<?=$url_prex?>/about/biography/”>About</a></li>
<li class=”contactus”><a href=”<?=$url_prex?>/contactus/”>Contact Us</a></li>
</ul>
</div>
C
A B
4
5
6
35
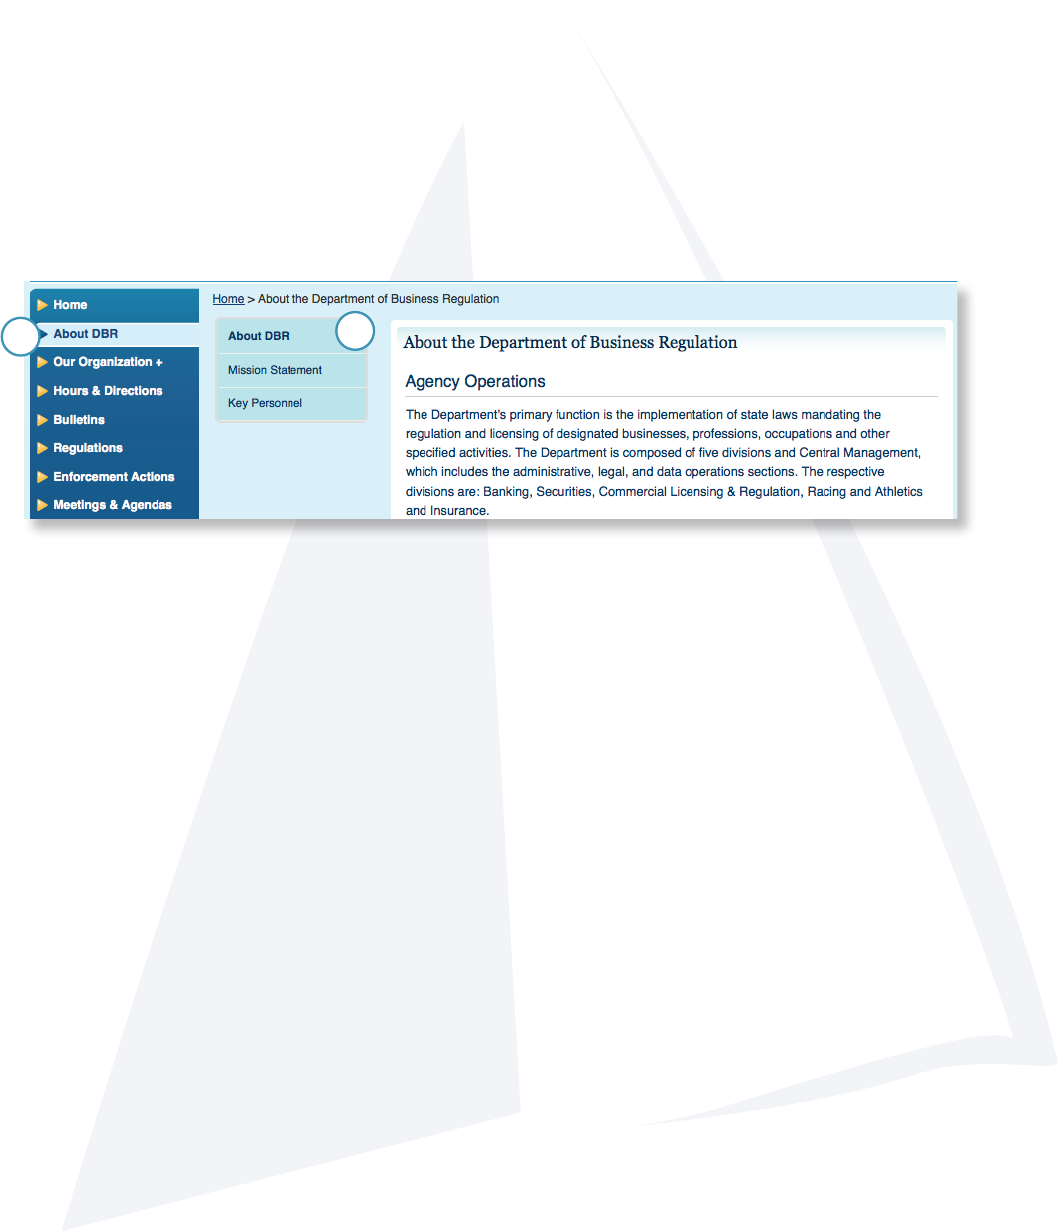
In-page sub-navigation basics.
For the creation of in-page sub-navigation, a sub-navigation template le will be used. Contact
RI.gov for a template le.
The sub-navigation resides within the content area, sliding over the main content for the page.
The categories for the sub-navigation (A) should relate to the main navigation category (B).
A
B
In-page Sub-navigation
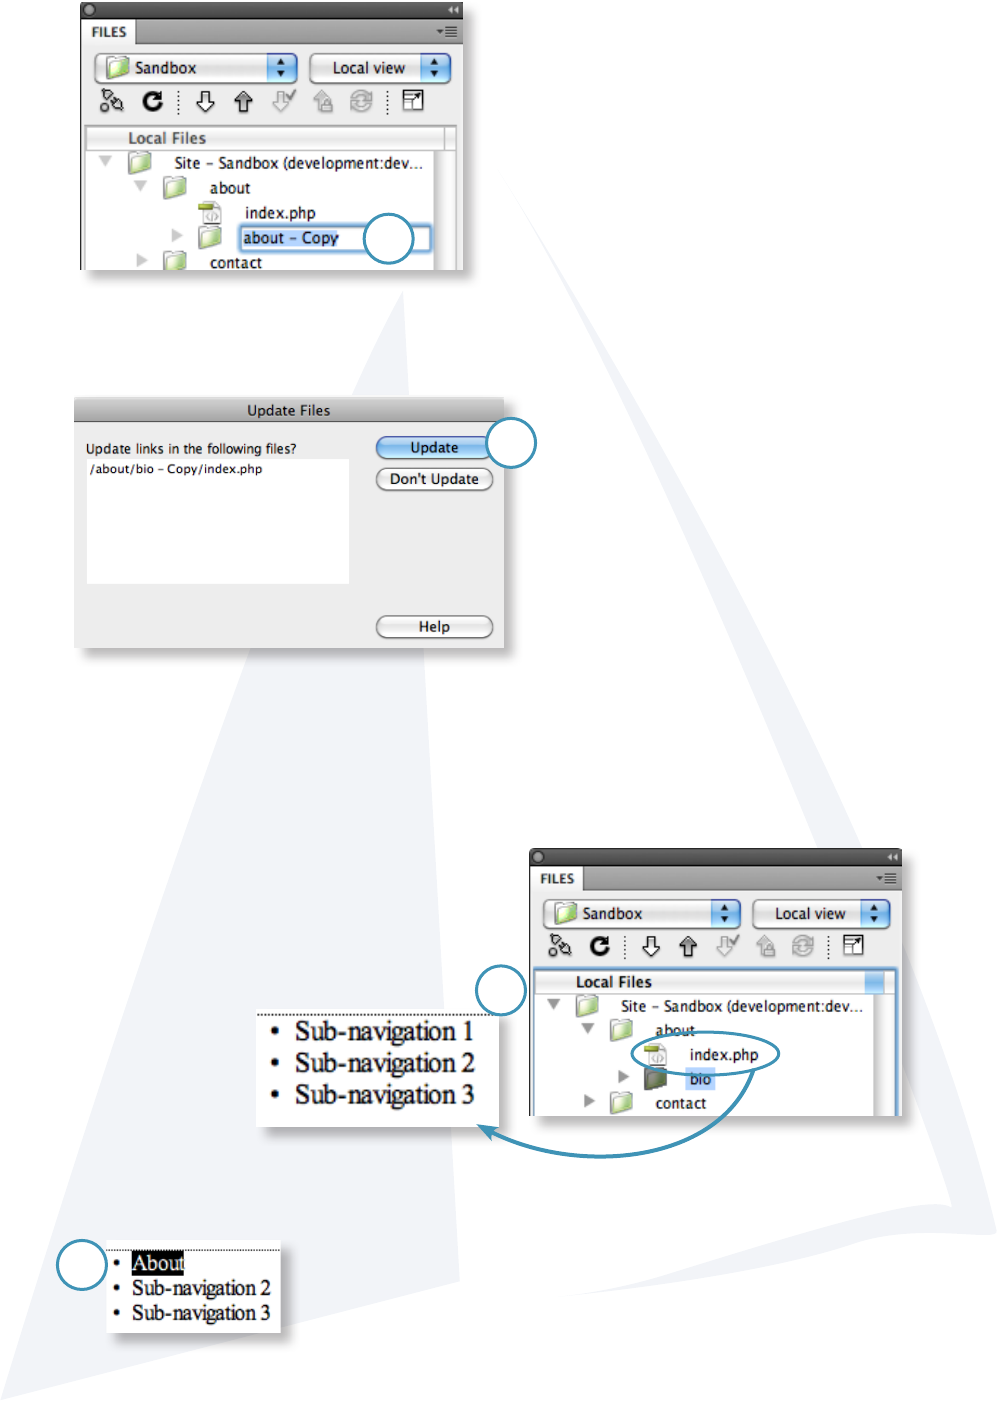
Creating a new sub-navigation.
36
3. Place the new duplicated le into the folder we are
adding the sub-navigation to.
-For example: place the new duplicated le into the
about folder to add sub-navigation for the about page.
4. Open the original index page and highlight all the
content on the page. Go to: Edit / Copy.
Implementing the sub-navigation template le.
1. Place the sub-navigation le into the
root folder for the Web site.
2
Creating the sub-navigation: Part 1 of 4.
2. Duplicate the le by right-clicking to get the
pop-up menu. Then go to Edit / Duplicate.
4
3
1

37
1. In the Files panel, duplicate the folder we
just updated for the sub-navigation.
2. Move the duplicated folder into the original
folder we just copied.
Creating the other sections for the sub-navigation.
Creating the sub-navigation: Part 2 of 4.
All the content should now be transferred to the new duplicated
sub-navigation template le.
6. Save and close both les.
7. Back in the Files panel, delete the original index.php le.
8. Rename the new duplicated sub-navigation template le to
index.php.
5. Open the new duplicated sub-navigation template le and highlight all the content on
the page. Go to: Edit / Paste.
1
2
7
5
38
1. Open the index page in the folder where we
have built our sub-navigation. At the top, there is
a list of links. These are the sub-navigation links.
2. Highlight and change the name for the link to match the main folder name.
Linking the pages together.
Creating the sub-navigation: Part 3 of 4.
3. Rename the new duplicated folder.
4. A pop-up window will ask if you want to update the links. Choose Update
4
1
2
3
39
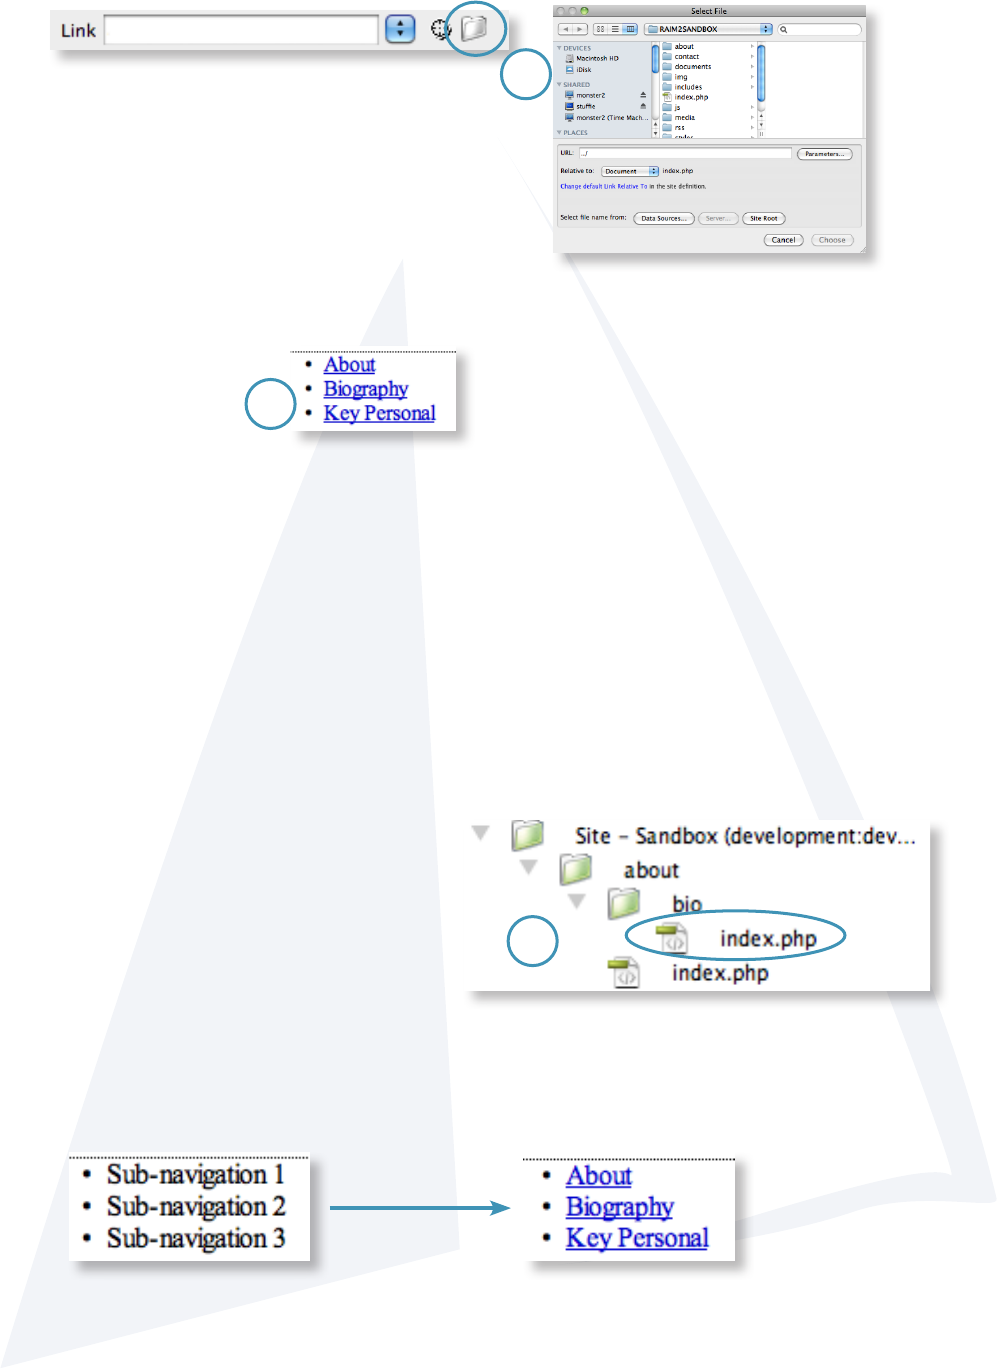
Continuing to link the sub-navigation pages.
Creating the sub-navigation: Part 4 of 4.
1. Open the index.php le in the sub-navigation folder.
2. Repeat the steps in Part 3 for this le updating the sub-navigation links.
3. Highlight the type then go to the Properties Panel.
-Click on the folder to open the window to navigate to the le we created in Part 2.
4. Repeat the above steps for the other items in the list. Rename, highlight and navigate
to the le to link each item.
5. Save and close the le.
1
3
4

40
“My page is broken!”
Nine times out of ten, this is due to either an extra closing </div> tag, or a missing closing
</div> tag on your page.
In other words:
For a content box on your page:
This content box is controlled by an opening and closing container, or in HTML, a pair of <div>
tags - one to open <div> and one to close </div>
This container (one called “light blue content” in the example above) is then transformed by the
style sheet into the look you see above.
However, what can happen if the box is not properly closed with a closing </div> tag (note the
/), is that this style for the content box is no longer contained to the area it should be, and is
now free to cascade into other page elements where it doesn’t belong.
By the same token, if you end up with an additional </div> tag in your main content area,
elements that need to control the layout and other style elements on the page, can be
prematurely closed, resulting in errors when rendering the page.
What to do:
If you’re using Dreamweaver, use the “split” view, then highlight the text in your content box.
Tips and Tricks
Tips to get the most out of your Web site.
41
You should now see your text highlighted in both the design area in the bottom half of the
screen, as well as in the code view at the top of the screen. Check the code in the code view -
your content box should begin with an opening div statement that looks like this:
<div class=”lightblueContent”>
Your content in the middle, with a closing div at the end like the one in this example.
</div>
<div class=”content”>
Your padded content goes here
</div>
If you have an additional closing </div> tag, or don’t have one at all rectify by adding or
deleting one in the code as necessary.
“I need more padding!”
To add more padding to almost anything, wrap the content in question in the following:
This will add 4 pixels of padding to anything contained inside - pictures, text, you name it.

42
Feedback / Next Steps
Get in touch with us.
Questions? Comments? Get in touch with us!
Contact us:
Danny Chapman
E-mail: dchapman@egov.com
Phone: (401) 831-8099 x240
Leslie B. Mann
E-mail: lmann@egov.com
Phone: (401) 831-8099 x280
Visit the Web Maker’s resource online at: www.ri.gov/resource/
