Dreamweaver MX Instructions 1
Dreamweaver MX Instructions
By Henry F. Winterfeldt
Getting Organized & Getting Started.
The design and creation of web pages requires you to be organized and to have a good understanding of how
files are handled on the computer you are using. If you don’t understand how to create folders or directories
then you should not attempt to create web pages. Developing web pages is not for beginners.
1. Create a folder on the server where you will be saving your web page documents and images, e.g.
Asimov. You could call it “WebPages” or whatever name you like. Do not use spaces in the name.
2. I recommend you create an images folder inside the folder you created in step one above. It is not
necessary to create an images folder for your first few web pages. However, if you plan to create multiple
web pages with a large number of images on them, it is best to have a separate folder for your images.
This added complexity helps you stay organized.
3. Start DreamWeaver and import you site definition: Site>Manage Site>
Click on Import ... The Site definition has the extension “.ste” If you have not defined a site go to page 5
Dreamweaver Site Definition.
4. Start a new document: File>New Page – Select html
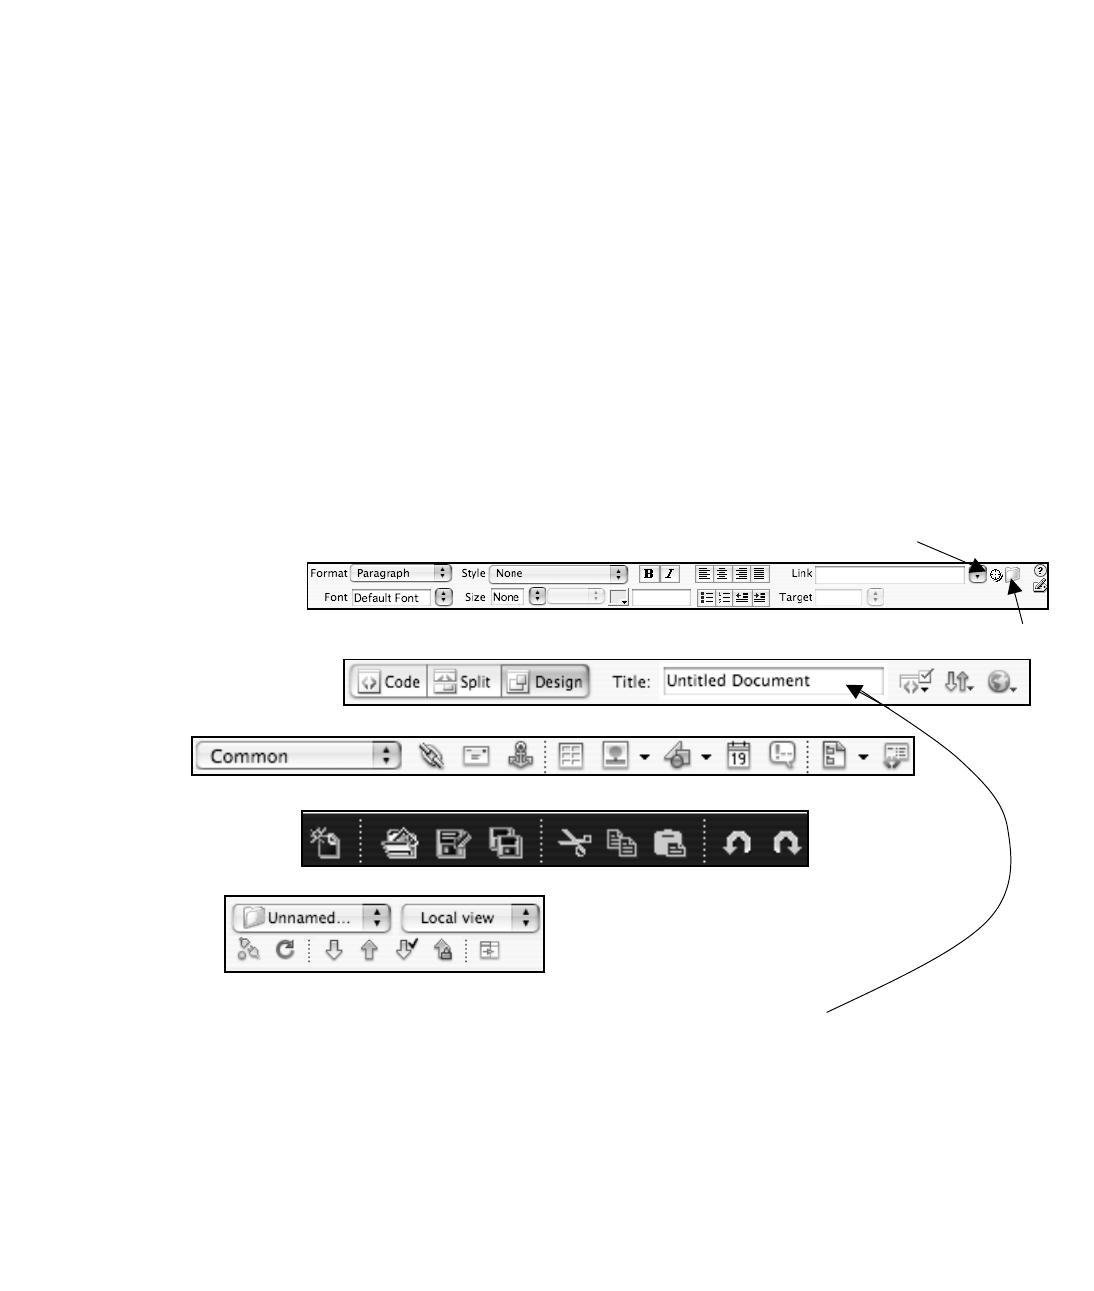
5. Make sure the following Toolbars and Windows (Pallets) are available: Window>Properties,
Window>Insert, Window>Files, View>Toolbars>Standard, and View>Toolbars>Document.
6. Give your web page give a Title. You give the web page a title in the Document Toolbar. The Title
is the text that will be used for the bookmark/favorites in your web browser. Therefore, it should be
descriptive. The Title is not the same as the name of your document.
7. Save your web page to the folder you just created in #1 above. When naming your web page it is
recommended that you use only lower case letters and no spaces in the name (use the “_” character
in place of a space if necessary), end it with the extension .html or .htm. Choose one or the other and
stick with it. Keep the names short. For example: index.html or soc_stu.html
View>Toolbars>Document
View>Toolbars>Standard
Window>Properties
Point to File Icon
Browse for File Icon
Window>Insert
Window>Files
2 DreamWeaver MX Instructions
Linking to External Web Pages and Resources
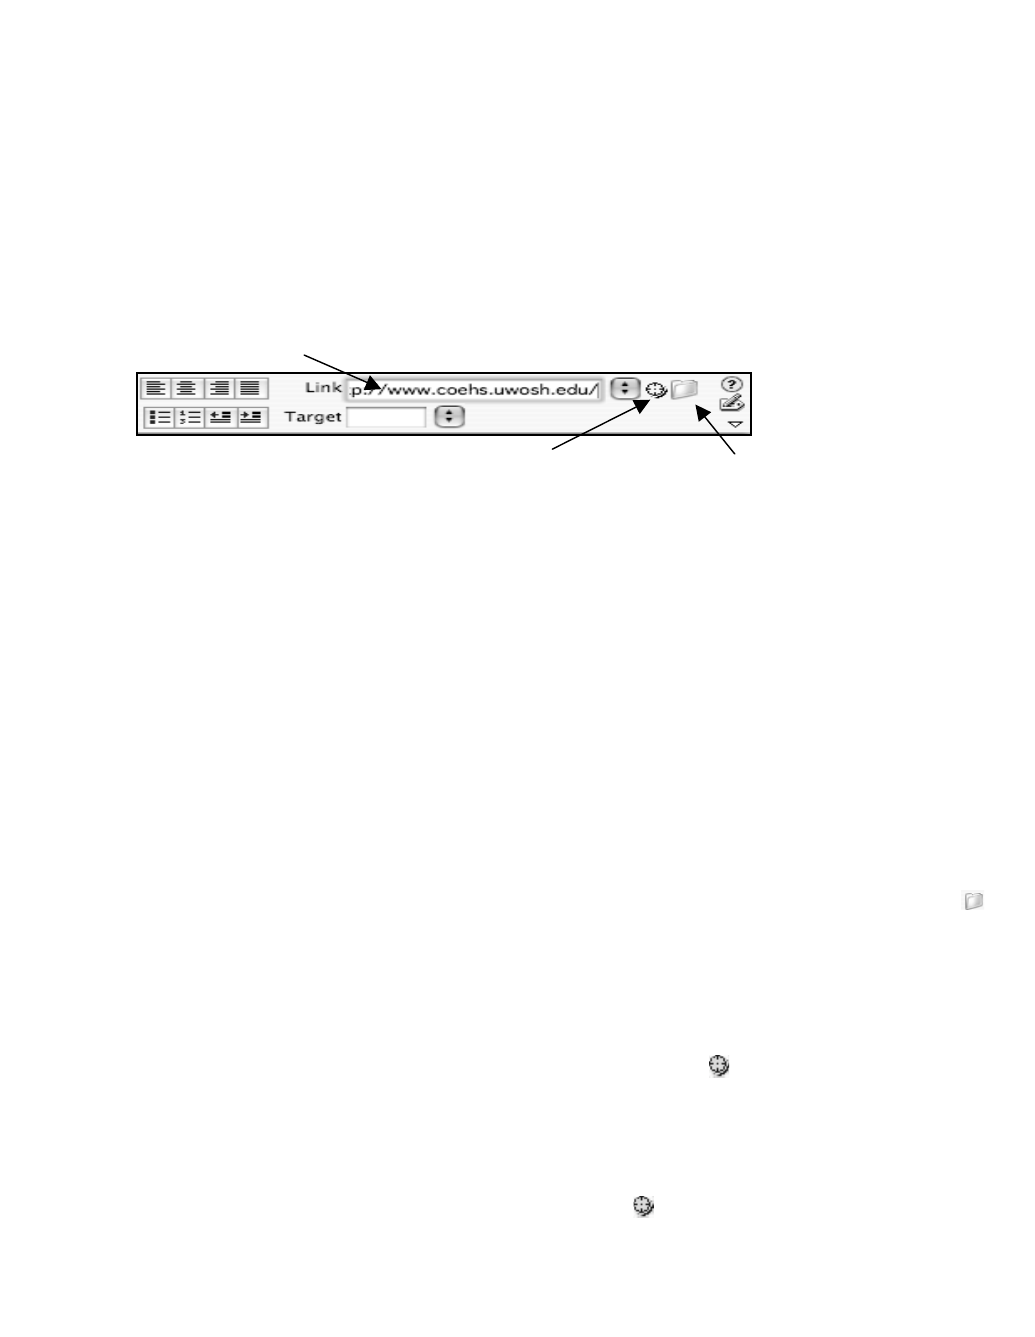
Before you can link to another web page or resource, you must know the exact URL (e.g.
http://www.coehs.uwosh.edu) for that web page or resource. In the Link Editor dialogue box you
must type the URL exactly as it was created, including upper/lower case letters and any special
characters such as the tilde “~”. If you include any extra characters or spaces your link will not
work, so don’t ad lib!
To create a link to another web site:
1. Select/Highlight the text or graphic you want to be “clickable”. If you don’t have anything
to click on, then you will have to type in some text or place a graphic, e.g. “College of
Education and Human Services at UW Oshkosh.”
2. Click in the Link box on the Properties toolbar.
3. Type the URL of the link’s destination in the Properties Palette, e.g.
http://www.coehs.uwosh.edu/
make sure you do have any spaces after the last “/” If you do, your link will not work.
4. Press return.
5. The text that you selected in number one above should now be blue and underlined. If it is
not then you will need to start over.
Linking to a Web page in the “WebPages” folder you created on the previous page.
After you’ve created and saved some Web pages, you can create links to them. It is recommended that
you keep all of the files you are linking to in the same folder.
1. Select/Highlight the text or graphic you want to be “clickable.” If you don’t have any text to
select then you will have to create it, e.g. Task or Process.
2. Click the in Link box in the Properties Palette and then click on the Browse Files icon .
3. Navigate to your webpage’s folder select the name of the “html” file you want to link to and
click Choose.
4. The text that you selected in number one above should now be blue and underlined. If it is not,
then you will need to start over.
An alternative is to use the Sites file Window and the Point to File Icon .
1. Make sure you can see the “Site Files Window” (Window>Files) to the right of the document
you want to link from.
2. Select/Highlight the text or graphic you want to be clickable.
3. Press the mouse button down on the Point to File Icon , drag so arrow is over the “Site Files
Window” and then point to the file where you want to link, release the mouse button.
4. The text that you selected in number two above should now be blue and underlined.
Browse for File Icon
Point to File Icon
Dreamweaver MX Instructions 3
Creating an internal link (linking to a specific location on your Web page).
A common internal link is Go to top of page or Return to top. Another type of internal link is a
menu at the top of the page that will jump to a different location on the same page. Links can jump
to anchors on the same page as the link itself or to anchors on other Web pages.
Creating this type of link is a two step process. First you create an anchor at the spot on your Web
page where you want your readers to jump to and then create a link to the Anchor.
A. Creating an anchor
1. Position the insertion point (click) where you want to place the anchor on your Web page.
2. Click the Insert Anchor button on the tool bar or choose Insert>Named Anchor from
the menu.
A dialog box appears. Type in a descriptive name, but keep it short. Do not use spaces in
the name. If you do Dreamweaver will complain about it!
3. Click OK.
An anchor icon appears on your Web page. If icon does not appear go
View>Visual Aids>Invisible Elements
4. Choose File>Save from the menu so you can link to the anchors you've created.
B. Linking to an anchor on the same page.
After you've created and named anchors on your Web pages, you can create links to them.
Creating links to anchors is very similar to creating links to URLs or other web pages.
1. Before you can create a link to an anchor you must first have something “clickable,” either
text or graphic. If you don’t have anything to click on, then you will have to type in some
text or place a graphic, e.g. Click here to go to Top of Page or Top of Page.
2. Select/Highlight the text or graphic you want to make into a link.
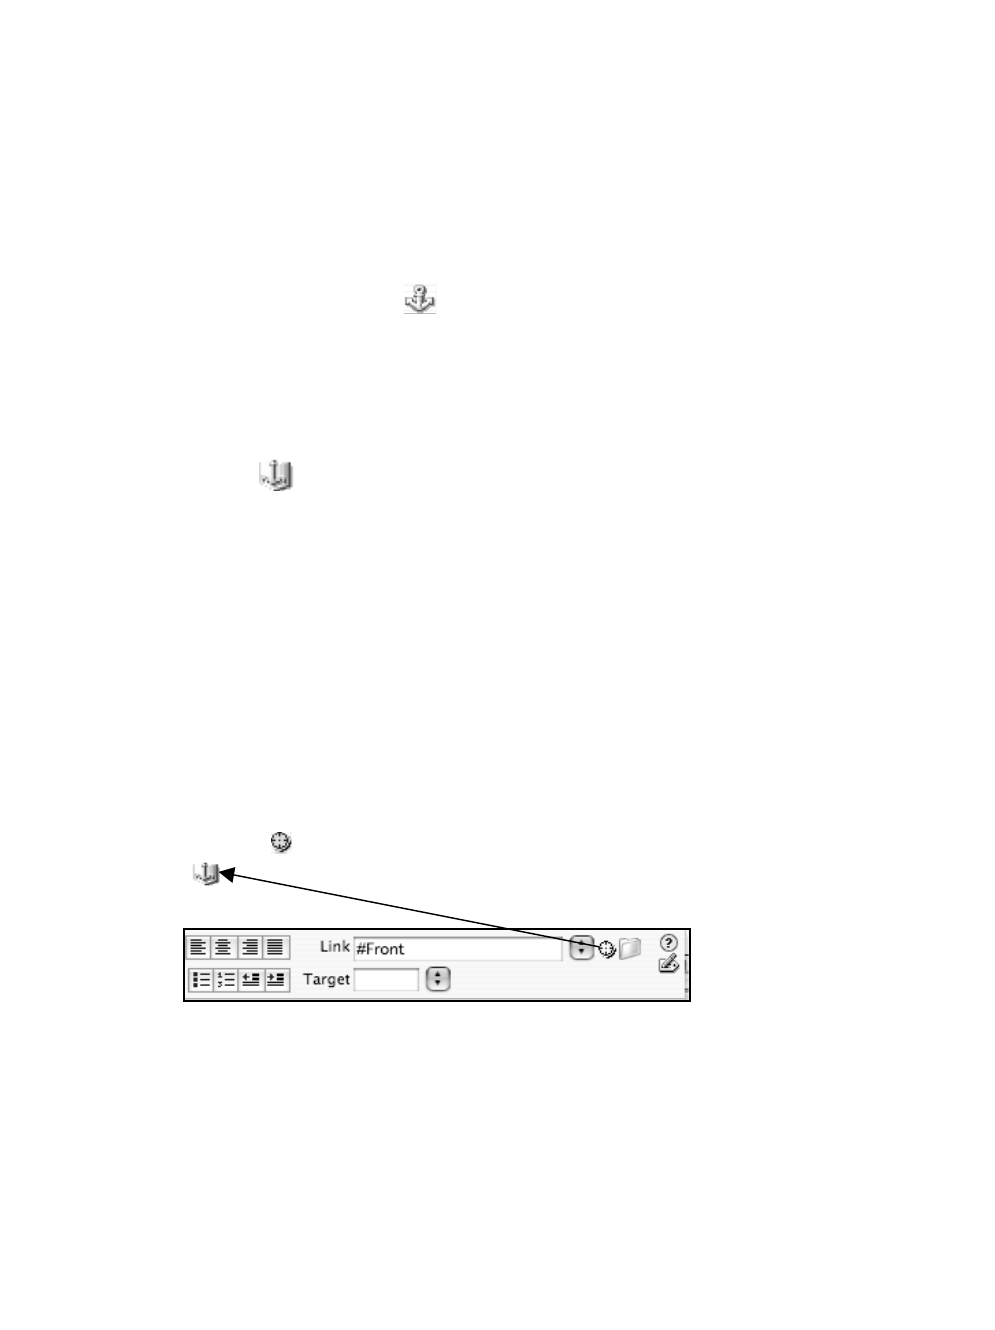
3. Scroll so you can see the Anchor you want to link. Press the mouse button down on the
Point to File icon and drag so arrow points to Anchor you want to use. See illustration
below.
The name of the link will appear in the link box. You should notice the link name has a
“#” in front of it.
4. An alternative to pointing to an anchor is to type the anchor's name in the link text box.
Remember to type the # symbol in front of the anchor’s name, e.g. #anchorName, #top,
#menu. Make sure you type in the name of the anchor exactly as it was created, including
upper/lower case letters. An alternative to typing in the name is to choose the anchor from
the pop-up menu. The pop-up menu only works if you have linked the anchor at least once.
5. The text that you selected in number one above should now be blue and underlined. If it is
not, you will need to start over.
4 DreamWeaver MX Instructions
DreamWeaver MX Tables
Making a table:
1. Menu: Insert>Table (make sure your cursor is where you want your
table to be located)
2. This dialog box comes up.
a. Insert the number of rows and columns you would like to have.
b. The width can be in percent or pixels. If you use percent, then
that is how much space your table will take up on the viewers
screen. (i.e. 100% will take up their entire browser window in
width) I prefer to use 750 pixels.
c. The border is the thickness of the lines in your table. If you want
an invisible table, you would set your border to 0.
d. The Cell Padding is the number of pixels that will surround
text/graphic in a cell.
You can think of cell padding as the margins in the cell.
e. The Cell Spacing is the space between cells and the border if you have a border.
3. Click OK.
4. You now have a table.
Inserting Rows/Columns in a table:
1. Click inside the cell in the table you want to insert a row (above or
below) or a column (to The Left or The Right).
2. Insert>Table Object>[ Insert Row Above, Insert Row below, Insert
Column to the Right, Insert Column to the Left]
Splitting a Cell
Modifying the Cells/Column using the Properties palette
Modifying the characteristics of a table using the Properties palette.
Click inside table, then Modify>Table>Select table
1. You can adjust the Cell Space and Cell Padding in your Properties palette found under
Window> Properties.
2. You can adjust your table alignment on the page (right, center or left) with the drop down menu on your
tool bar.
3. You can adjust the Border of your
table.
4. You can adjust the Background
Color of your table.
5. You can adjust the Border Color of your table.
Change vertical and horizontal alignment of text in a cell. The
default for vertical is center. You may want to change this to Top.
Cell Background Color
{
Dreamweaver MX Instructions 5
Inserting image – It is recommended you have the images in your images folder or web folder before
you insert them.
Make sure you edit your pictures to the size you want in another program before
you bring them into a web page. e.g. Edit them in Adobe Photoshop.
1. Insert>Image
2. Before you select your image make sure you have the dialogue box set
to Relative to: Document
3. Navigate to the image you want to insert and Choose it.
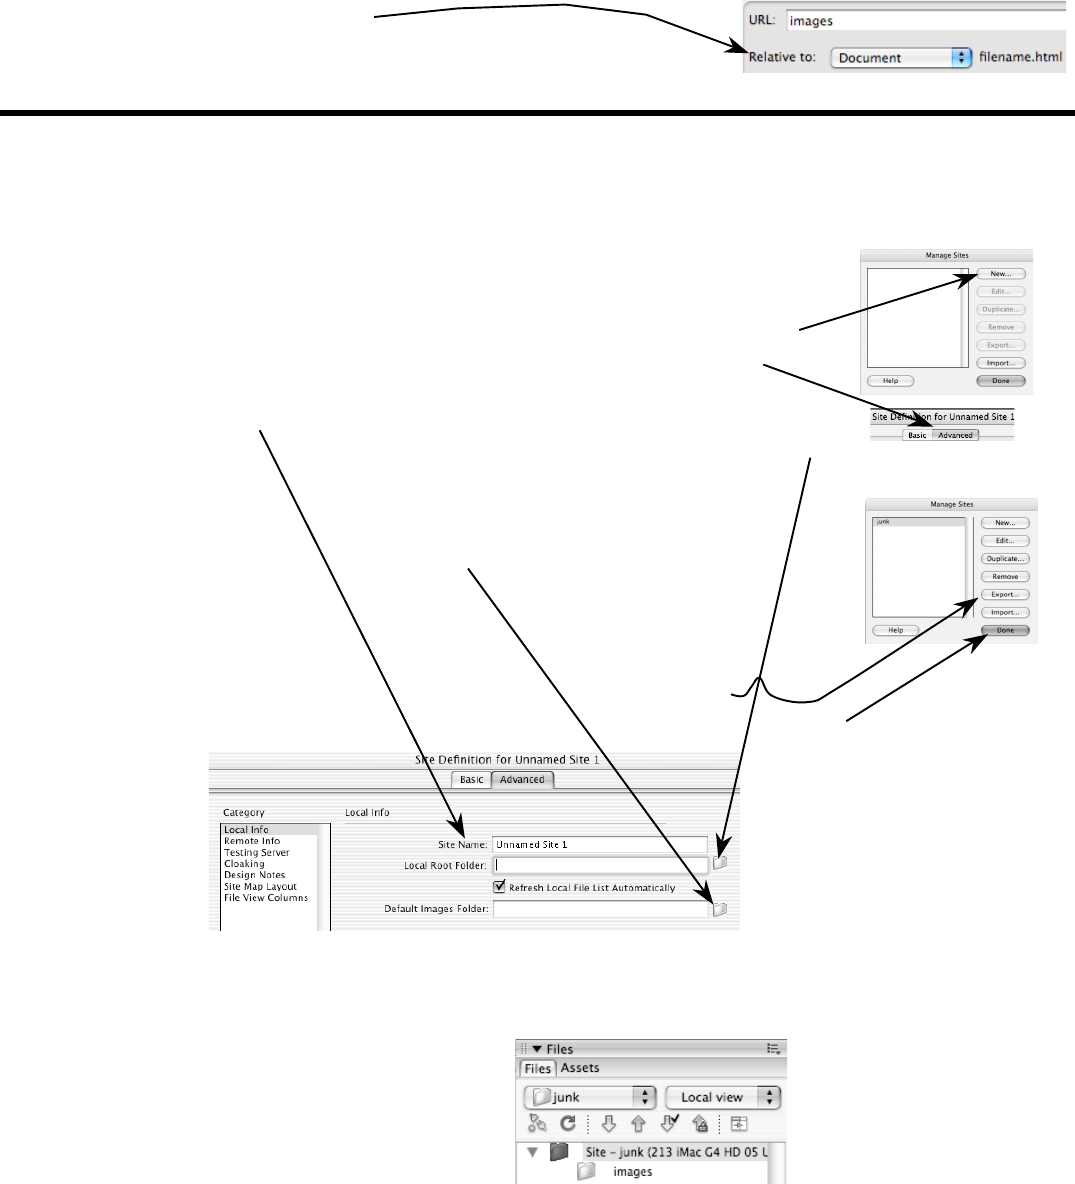
Dreamweaver Site Definition (Server)
4. Your Folder/files should now show in the Files box on the right hand side of the screen; see below.
Always open your files from the Files box. When saving your files make sure they are saved in your
web folder. They should appear in the Files box window (see picture below). If you do not see this on
the side of the screen go to Window>Files
1. Before starting Dreamweaver, make sure you have logged into the server that
has your files on it, e.g. Asimov.
2. Open Dreamweaver.
3. Go to Site>Manage Sites; The Manage Sites dialogue box will open.
a. Make sure the server icon (e.g. Asimov) is on the desktop. Click New.
Select Site from drop down menu. Make sure you are in the Advanced
mode.
b. In the Site Name: type your name and the word web you may use two or
more words and spaces. (For example: Jackson Smith Web). In Local Root
Folder click on the icon of the folder; navigate to your web folder and
highlight it, click Choose.
c. You should also tell Dreamweaver where you want to store your images. To
indicate where you want the Default Images Folder click on the icon of the
folder and locate your images folder. If you don’t have an images folder you
may want to create one. It is not necessary to have an images folder; however
it is recommended. After selecting the images folder, click Choose and then
OK at the bottom of the dialogue box.
d. Now you need to export your Site Definition. Click on Export.
Save you Site Definition into the same folder you have your html files, then
Done.
6 DreamWeaver MX Instructions
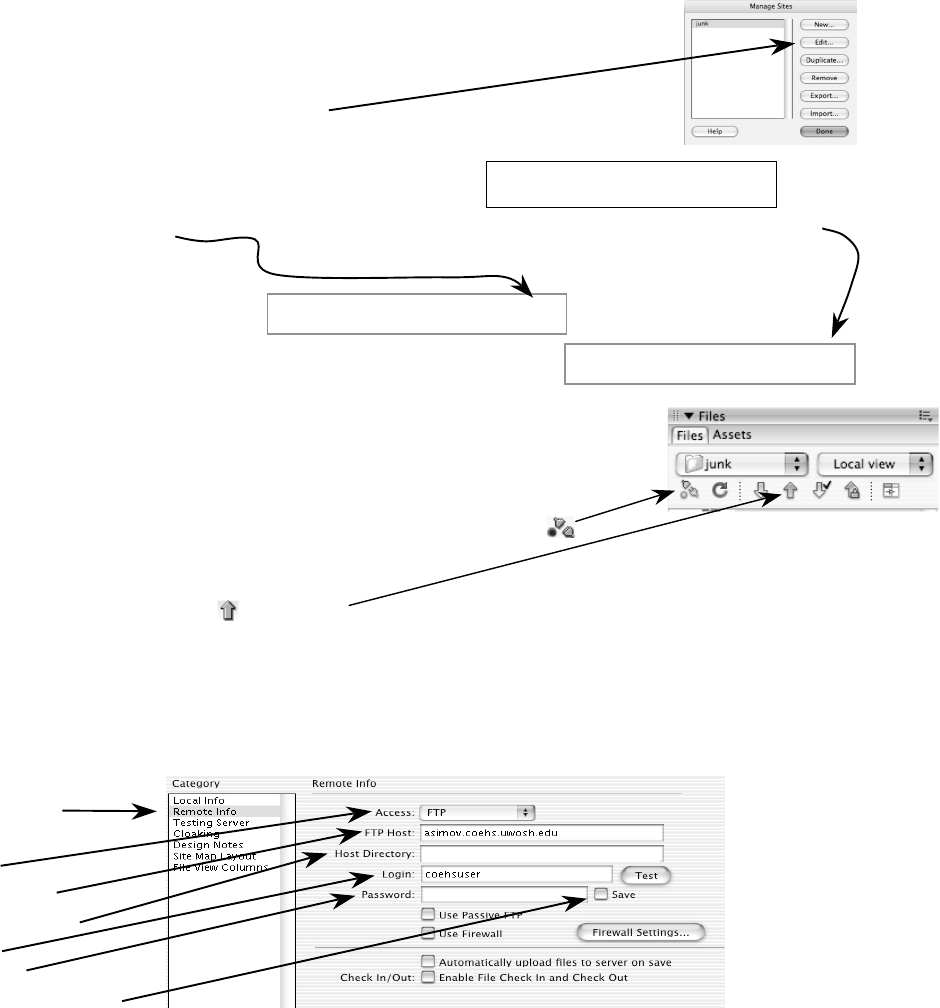
How to Put Your Web Site on the Courses Server Using DreamWeaver to FTP
This handout assumes there is a folder for each user on Courses Web Server.
1. Open DreamWeaver on your computer.
2. Go to Site>Manage Sites
3. Highlight your site name and select Edit…
4. Once in the Edit Menu highlight Remote Info in the left menu
5. Where the drop down menu saying Access: select FTP
6. In the FTP Host section type in asimov.coehs.uwosh.edu
7. In the Host Directory type //FTPRoot/courses/2007yr/2007_Fall/edl325_00X/FolderName/
where X is your section number and “Foldername” is your last name.
8. Where it says Login: type coehsuser
9. Where it says Password: type coehs
10. To test your remote info Click on Test
11. Click OK
12. Now you need to export your Site definition click on Export. . .
13. Click on Back up my settings and click Ok.
14. It will ask you to Save. Make sure you are in your folder. Click Save and
then Replace, Done.
15. To upload (put) your files on the web server.
a. In your Files view click on the Connect to Remote Host Icon to connect to the
course web server.
b. Select all of the files you wish to upload (Put) to the course web server.
c. Click on the Put File(s) Icon (blue up arrow) on the top of the Site Files menu.
16. To see if your site is live, use the URL:
http://asimov.coehs.uwosh.edu/courses/2007yr/2007_Fall/edl325_001/foldername/filename.htm
again, replace the X with your section number; your foldername with your” lastname,” and the
filename.htm is the name of the page you want people to look at first. An example of a filename would
be index.htm or home.html
Refer to Figure 1 Below
Make sure to include the last “/”
Remote Info
Access
Remote Host
Host Directory
Login
Password
(do not save Password)
Test
Figure 1
/courses/2007yr/2007_Fall/edl325_001/foldername/
Make sure to include the two “//”
